| Сегодня 24 июля, пятница |
|
|
|
Какой рейтинг вас больше интересует?
|
Главная /
Каталог блоговCтраница блогера PSDTUTS/Записи в блоге |
|
PSDTUTS
Голосов: 2 Адрес блога: http://psdtuts.com Добавлен: 2008-10-26 20:48:58 блограйдером DrakAngel |
|
Apply a Tilt-Shift Effect to a Video Using Photoshop
2011-06-06 17:30:32 (читать в оригинале)Advertise here
Tilt-shift is an effect that when applied to an image or in this case, a video, will create the illusion of miniaturization, making it seem as if the video is shooting a model set and not real life. To create one of these videos outside of Photoshop would require an expensive camera and and an even more expensive lens, which can cost into the thousands of dollars. In this tutorial I will show you how to create this effect using only Photoshop and how to apply it to almost any video.
Tutorial Assets
The following assets were used during the production of this tutorial.
- Stairs Video
- Iterate Script
Download Original Footage
Before you begin. Let’s take a look at the original footage. Make sure to download it from here.
Step 1
Before opening Photoshop, install the Extension that was included in the tutorial assets. Open the Adobe Extension Manager, which should be found in the Adobe folder.
PC users, if for some reason, it will not let you install the Extension, close and re-open the Extension Manger by right-clicking on the program in the start menu and selecting “Run as administrator”.
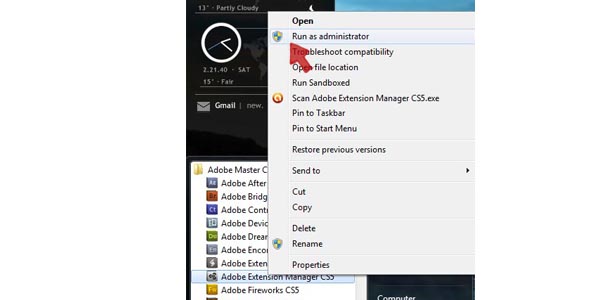
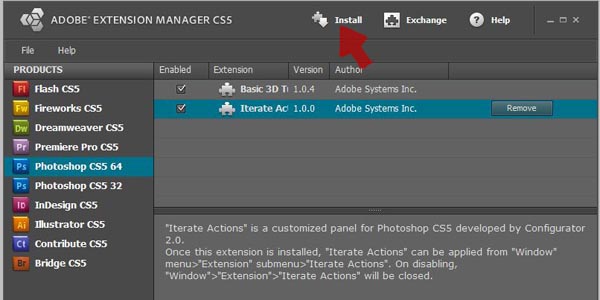
With the Extension Manager open, click the install button, and locate where you saved the Iterate Action extension.
Step 2
Open Photoshop and then choose File > Import > Import video frames to layers.
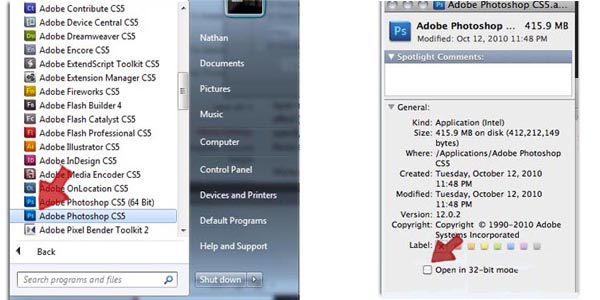
For those users using CS5 or higher you’ll need to use the 32bit version of Photoshop that should have been included in your install. You have to use the 32bit version because unfortunately Import video frames to layers utilizes the Quicktime API which remains a 32bit application.
For PC users, you should find the 32bit version in the Start menu, right next to the 64 bit version, if it’s not there check the (x86) folder, still not there then re-install, the 32bit version was unchecked during the initial installation.
For Mac users, open the Photoshop folder in a finder window and Command/Ctrl-click on the Photoshop icon, then click on Get info, click the check mark to run the program in it’s 32 bit mode.
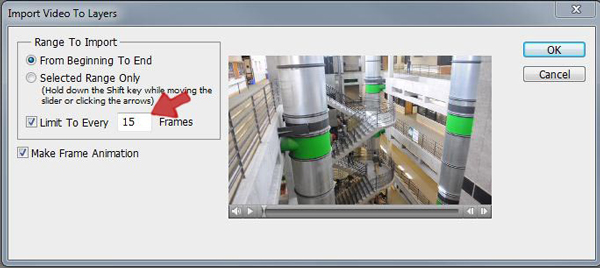
Import video to layers offers a few options for importing. Depending on the video, you can grab the whole thing or just a selected range. Make sure that “Make Frame Animation” is checked and then for this video limit the imported frames to every 15th frame. Doing this is going to not only cut the length of the video it’s also going to mimic a stop-motion effect which will help sell the overall effect.
Note: You can work with video frame layers in the 64bit version. To do so import the video using the 32bit version, save the file as a .PSD file, then open the file up in the 64bit version.
Step 3
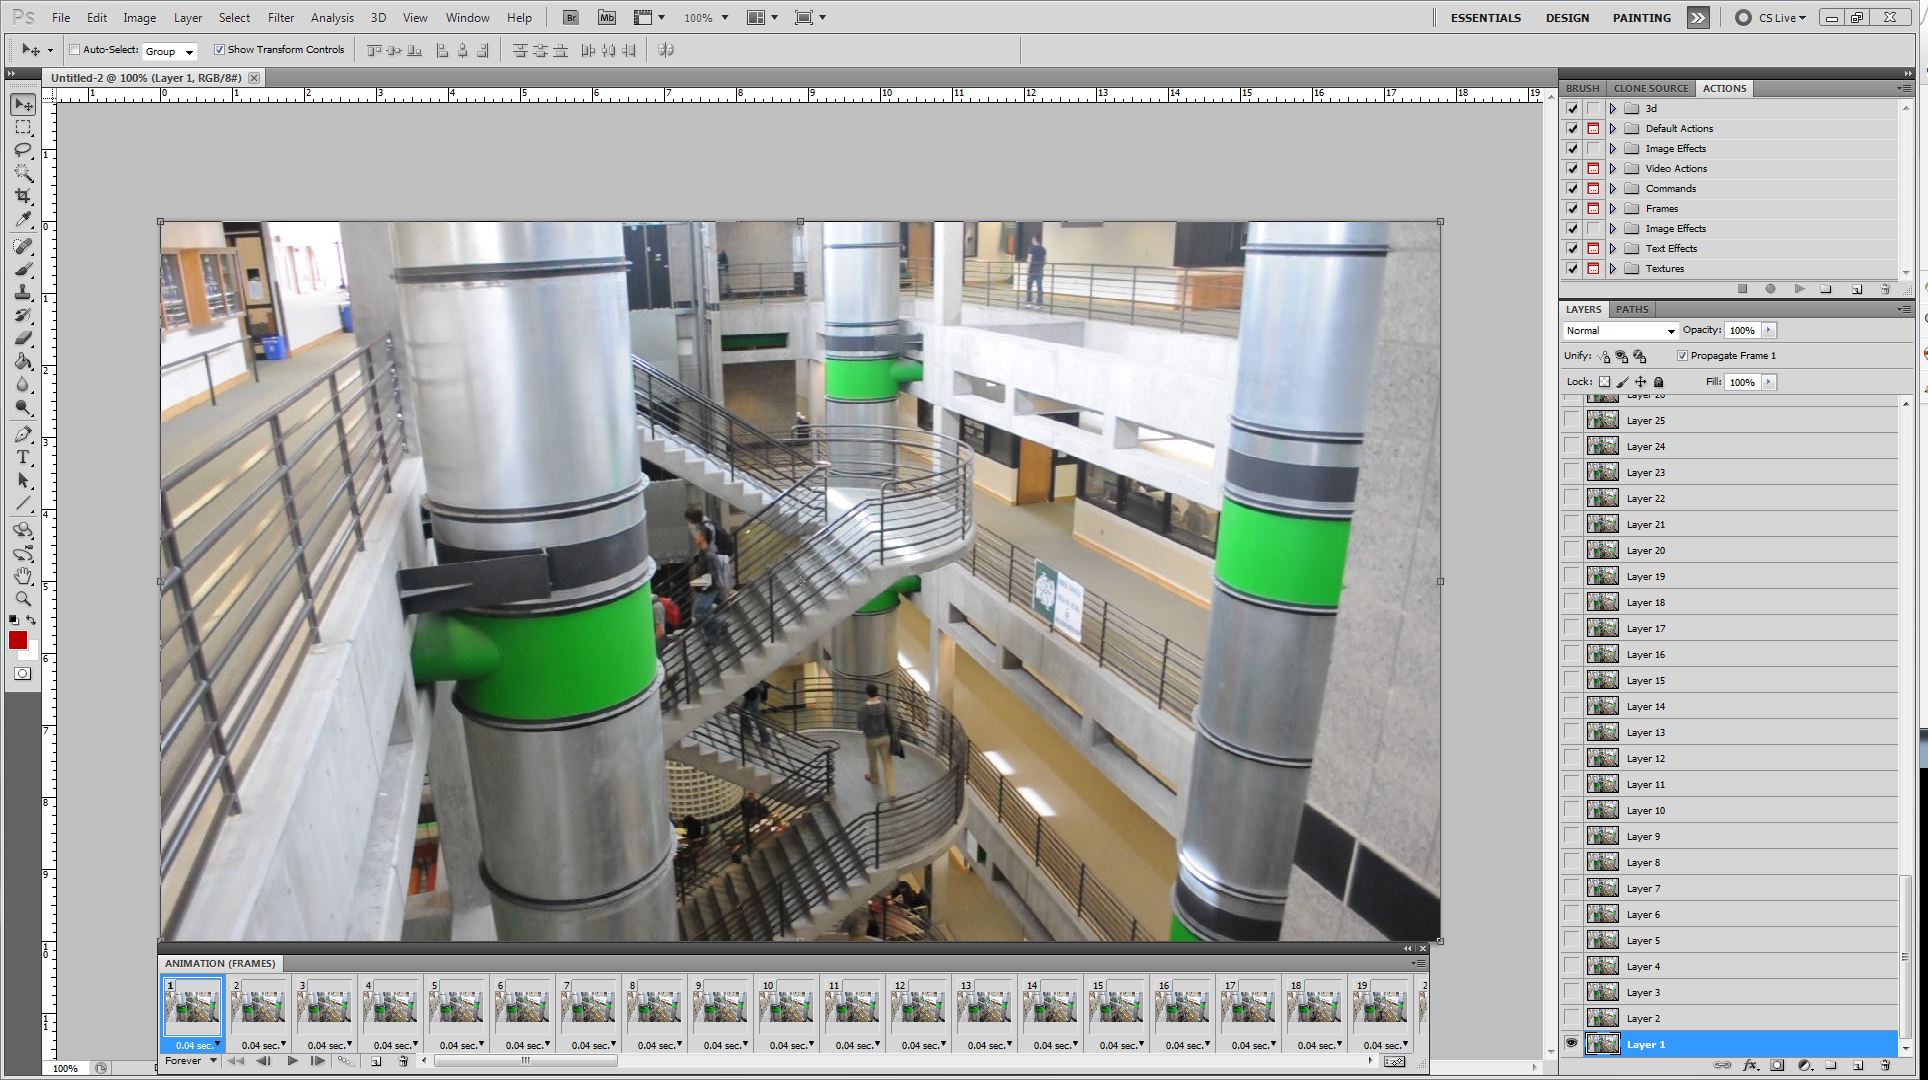
Before moving on, it will be helpful to setup your workspace, in the top right corner there are a number of workspace presets, you can select the Motion preset to load a number of popular tabs. However for this tutorial you will only be needing the Animation tab, Layers tab, Action tab and History tab.
To begin applying the tilt-shift effect press (Q) to enter the Quick mask mode. Press (D) to reset your Foreground/Background colors, then select the Gradient tool. In the top left of the screen there are a number of Gradient styles, select the Reflected Gradient which is the fourth style from the right. While holding the Shift key, draw a line from the bottom of the staircase to just above the railing.

You’ll now see a light red gradient running horizontally across the screen. This red area will be the area of focus for the tilt-shift effect, don’t be afraid to play with different widths and positions for the mask. Moving the mask higher or lower will allow you to place the area of focus for the effect. The focal point doesn’t necessarily have to be centered to be effective. For more complicated video’s you could paint in the the mask but for most videos, this step should be sufficient.
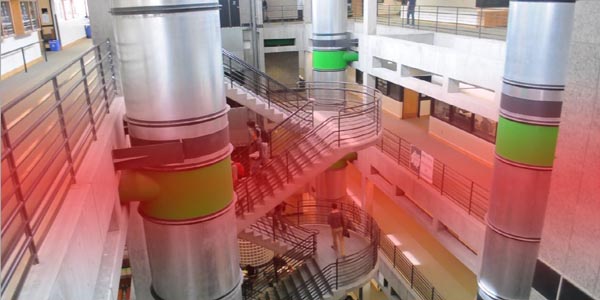
Once satisfied with the placement of the mask press (Q) to exit the Quick mask mode. You should now have and upper and lower selection.
Note: This selection MUST remain in place throughout the rest of the tutorial. DO NOT deselect or else the effect will not work.
Step 4
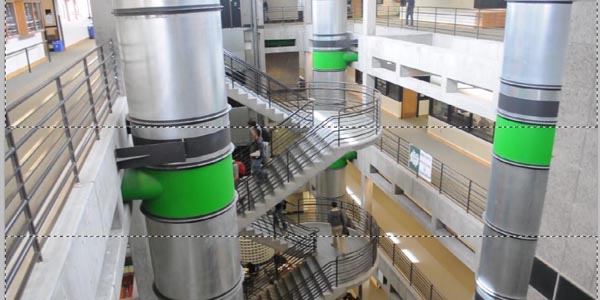
With the selection in place, Choose Filter > Blur > Lens Blur. For this video the default settings are bit too much, so reduce the Radius to 20. Drop the Curvature to 27 and kill the Noise. Be advised that this filter can take some time to refresh on slower machines, so be patient. When you are happy with the effect press OK to apply.

Step 5
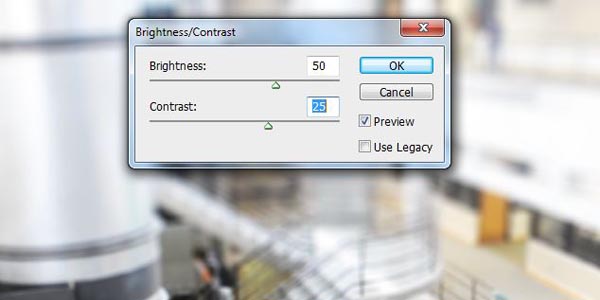
For the next two steps you’ll want to try and exaggerate the brightness and color to help sell the effect. Choose Image > Adjustments > Brightness/Contrast, bump the Brightness by 50 and the Contrast by 25.
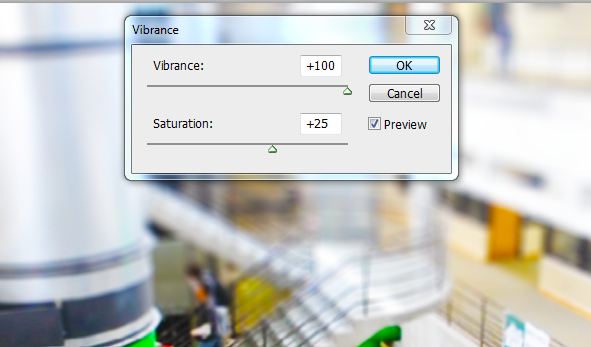
Then Choose Image > Adjustments > Vibrance and bump the Vibrance by +100 and the Saturation by +25. Experiment with different setting’s, now is the time to find which settings create the most dramatic effect.
Step 6
Now that you have an effect that you are happy with, it’s time to apply it to the rest of the video. First save your file out as a .PSD file, then undo everything back to Step 4. Make sure that you DO NOT deselect the selection created in step 3.
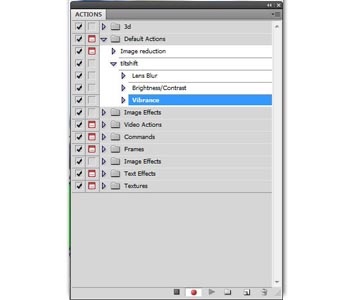
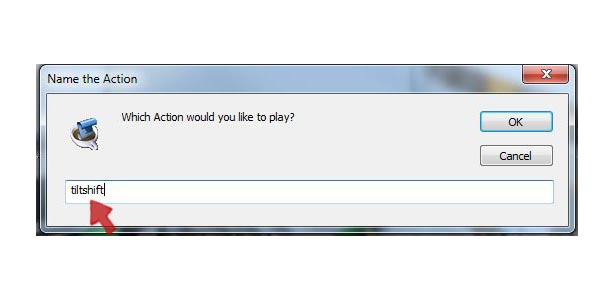
To create an Action, open the Action tab, press the new Action button near the bottom of the tab. Name the Action "titlshift", making sure it is saved in the Default Actions folder, (This will be important later on) then press Record. The round button at the bottom of the Action tab should turn red when recording.

Step 7
Now that Photoshop is recording, you can begin by re-applying the Lens blur effect. Choose Filter > Blur > Lens Blur or press Command/Ctrl + F to apply the last filter. Then Choose Image > Adjustment > Brightness/Contrast and apply the same setting’s as before. Then Choose Image > Adjustment > Vibrance and apply the same settings as before. Double check that Photoshop only recorded these three actions. If Photoshop accidently recorded an extra step, don’t worry, press the stop button, drag the unwanted step to the garbage can at the bottom right corner, then press the round record button to begin recording again.
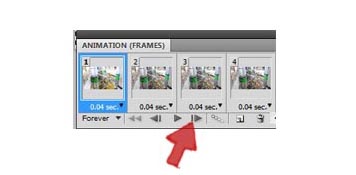
Now that the Filter and Image Adjustments have been recorded you need to record an Action that will move the Animation frame forward. If you simply selected Animation frame 2, Photoshop would record “Select animation frame 2″ which when you played the Action back it would not advance forward but remain on frame 2 indefinitely. To record a generic Action that moves the selection forward one frame, press the Fast Forward button at the bottom of the Animation tab. This will record an Action that tells Photoshop to “Activate next animation frame”.
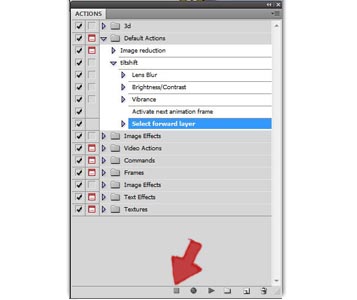
However you are not done yet, telling Photoshop to activate the next animation frame is not enough, if you left it at that you would move the Animation frame forward but Photoshop’s ability to apply your setting’s would remain on Layer One. A little confusing, but what is happening is that an Animation frame only effects the visibility of a layer, not whether Photoshop can edit that Layer. To fix this you need to add one last step in our Action. As with the Animation frame you need to use a generic command to move forward one layer, press Alt/Command + ] to record the Action “Select forward layer”.
These last two actions are critical to the looping script you are going to use. All the looping script is doing is pressing the play button a set number of times for us, by having Photoshop move the selection forward, it is going to allow the looping script to move up the layers in the file applying the effect.
With this last step recorded, press the square Stop bottom at the bottom of the actions tab to end the recording.
Author’s Note
It’s time to test your Action. Press the Play button a couple of times to ensure that it is applying the effect the way you want and that it is moving the selections forward. Now is the time to make adjustments if needed. Remember to save the document if you haven’t already.
Before you proceed, I need to take a moment and give credit to Dr. WooHoo who has generously provided the Iterate script free of charge to the world. It was published in the May/June 2009 issue of Photoshop User Magazine and is also available on his website here.
Step 8
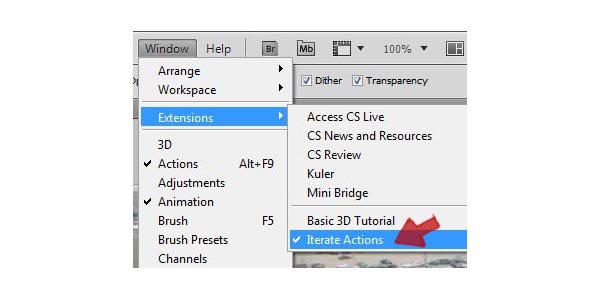
If you have ever played around with Photoshop Actions, you may have come across this odd limitation within Photoshop’s extensive Automation tools. For whatever reason, Photoshop cannot loop Actions to multiple layers within a single file, it is this limitation that Dr. WooHoo script corrects. If you haven’t already installed the Iterate script then save your work, close Photoshop and jump back to Step 1. If the extension’s been installed, then choose Window > Extension > Iterate Actions.
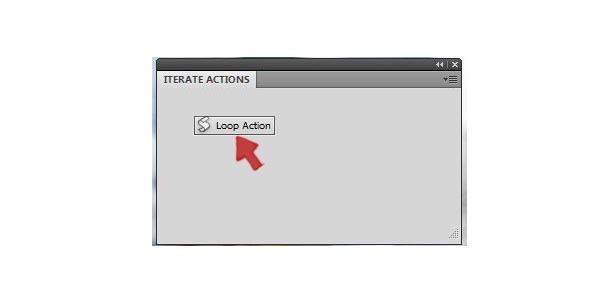
Click the Loop button.
Enter the Actions name exactly as you spelled it. Remember the Action must be located in the Default Actions folder or else the script will not be able to run the Action.
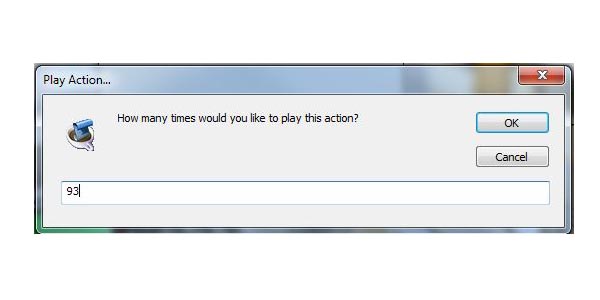
It will then ask how many times to repeat the Action. Press OK and it will start applying the Action to each layer, this may take some time.
(Don’t worry if your off a frame or two, you can always manually run the action if the script misses a few frames, However make sure you don’t tell the script to run more times than you have frames, once the script hits the last frame, it will start over with frame one.)
Step 9
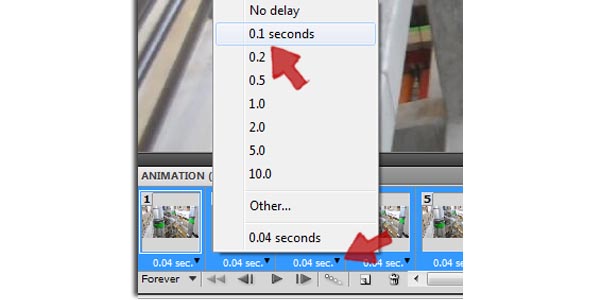
Once it’s done applying the effect, play the video through a couple times, If you are happy with the final effect, its time to render the video out. First step is to change the frame delay from it’s native 0.04secs to 0.1 secs. To change the delay, select Frame One then scroll down and Shift-Click on the last Frame, you should then see a blue outline around all the Frames. Click on on the small black arrow just under the right corner of the one of the Frames, and change the delay to 0.1 secs. Changing this setting’s will adjust the rendered video playback speed, leaving it at 0.04secs would have the video playing back a bit too fast.
Then Choose File > Export > Render video. Name your file and select where you want to save it. Then you have a couple of options for exporting your video.
Option One: Export as a compressed video file, perfect if the video is a stand alone piece.
Option Two: If your using this video as part of a larger project, export the video as an image sequence, you’ll retain the highest image quality possible, however this method will require the use of another program, such as After Effects, when it comes time to export the image sequence as a video file.
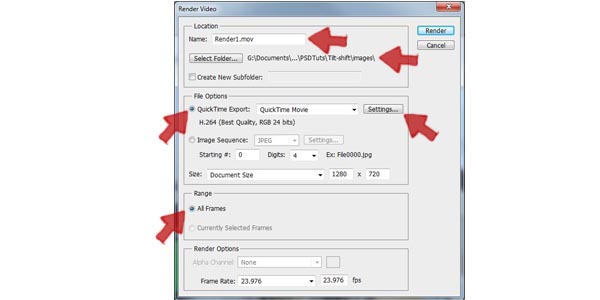
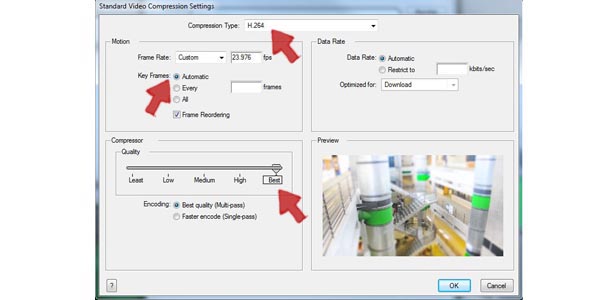
To render as a movie, click on Setting’s then on the Video Setting’s button
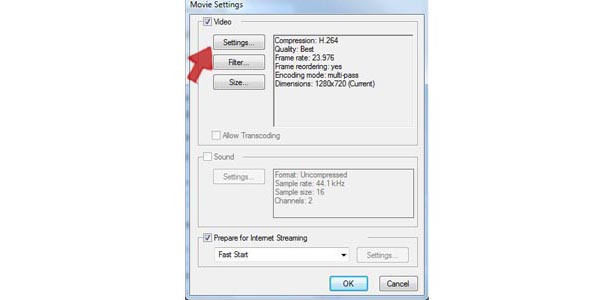
My personal preference leans to the .mov format using H.264, the file size will be tiny and the video quality will remain excellent. Press OK and in a moment your video will be ready to amaze the world.
Final Video
Automatically Save Your Work With PsdAutoSaver
2011-06-06 17:00:16 (читать в оригинале)Advertise here
We’ve all been there. You’ve been awake all night working on an amazing project. Everything is going perfectly, the design looks great, you’re proud of the job you’ve done, and then disaster strikes. Photoshop crashes and you lose all your work. Your first thoughts are “when was the last time I saved?” After restarting Photoshop and opening the file, you realize that it was hours ago and that you were putting so much effort into your design that you completely forgot to save. Wouldn’t it have been nice if Photoshop would have saved your work automatically along the way? Now it can!
An auto save feature has been something that many Photoshop users have been asking Adobe for, for quite some time. While there isn’t a native solution yet, the guys at Electric Iris have a nice workaround. A plugin that will save your work automatically.
PsdAutoSaver helps protect your work by automatically saving the files that you’re working on to one or more backup files. In the event that your computer crashes, freezes, or loses power, your work is protected.
Video Demonstration
You can see this plugin in action below.
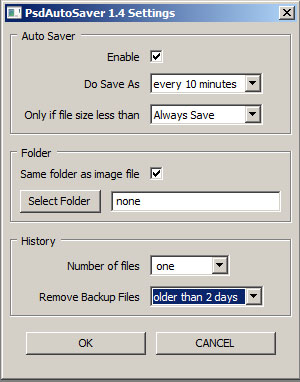
You can download a 30-day free trial of PsdAutoSaver from here. Give it a try and see what you think.
Download 30-Day Free Trial
Note: while this plugin works for both PC and Mac, it only works on Macs using Photoshop CS5 and above. PC users can use this plugin using Photoshop 7 and up in both 32 and 64 bit versions.
This post was sponsored by Electric Iris.
Massive Tuts+ Marketplace Sale in June
2011-06-05 19:30:10 (читать в оригинале)Advertise here
Guess what? For the entire month of June, we’ve slashed prices at our premium Tuts+ marketplace by as much as 80%! As your local car dealer would say: “These prices are insane!!!” What yesterday would cost you $5, today costs you $1. A buck! So mosey on over and check it out!

A Quick Sampling
- $3 – CSS: Noob to Ninja (12 Part Course)
- $1 – The Beginner’s Guide to Web design
- $2 – Venturing into Vim (4 Part Course)
- $4 – Object-Oriented JavaScript (3 Hours of Screencasts)
- $2 – WordPress: Beginner to Master
- $2 – The Ins and Outs of Amazon EC2
- $4 – Simple Development with jQuery Mobile (8-Part Course)
- $1 – Build an Awesome Status-Board
At the Tuts+ Marketplace, you can buy and sell tutorials and eBooks on topics like design, web development, audio, and computer graphics. The site is home to a bustling community of people learning and teaching across all skill levels and is the biggest marketplace of its kind.
So, if you haven’t already, stop by, say hello, and learn a new skill!
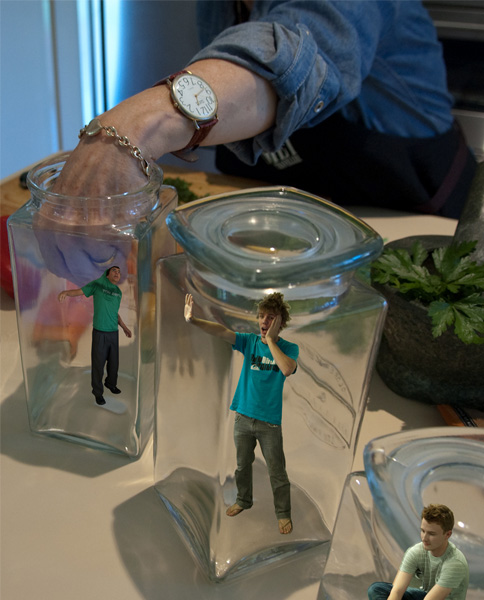
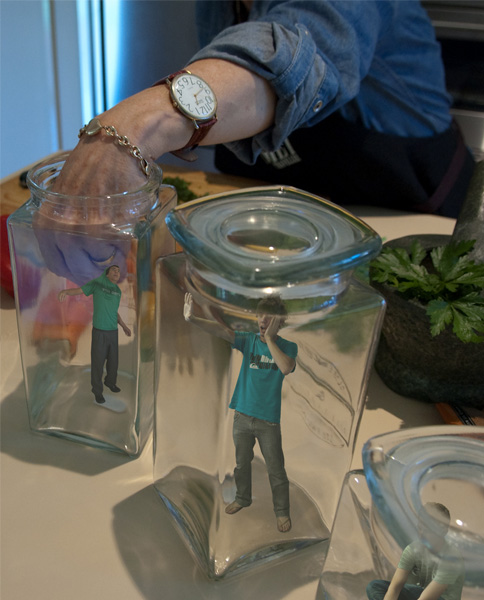
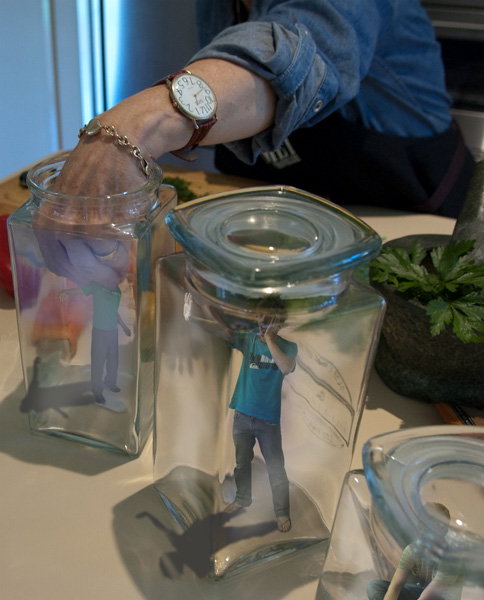
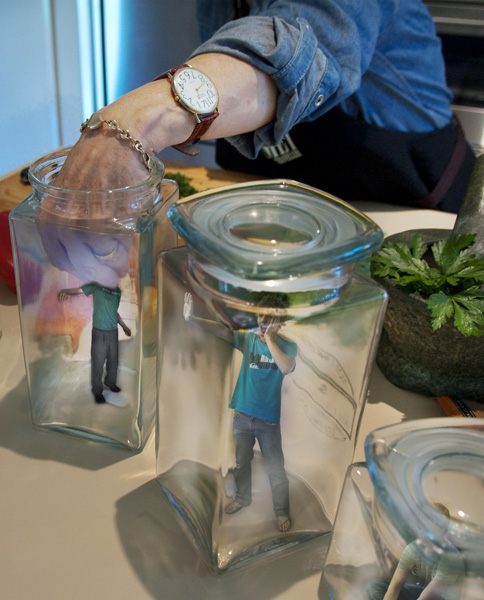
Trap Your Friends in a Jar Using Photoshop
2011-06-03 17:00:28 (читать в оригинале)Advertise here
Have you ever had a friend who was so great that you wanted to put them in a jar and save them for later? Ok, that might not be possible and may be a bit creepy but in Photoshop you can do anything right? In this tutorial we will learn how to take photos of your friends and place them into jars. This tutorial is a lot of fun and is something that you can do with practically any digital camera and Photoshop. Let’s get started!
Tutorial Assets
The following assets were used during the production of this tutorial.
- Base Image 1
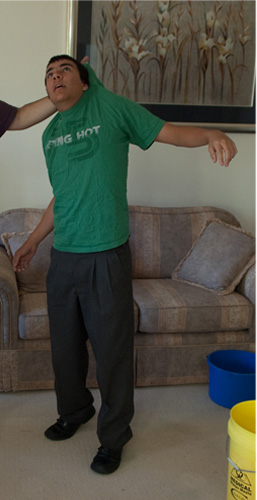
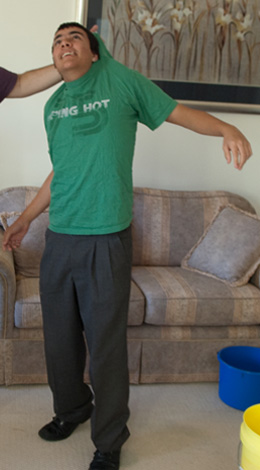
- Boy Being Pulled 1
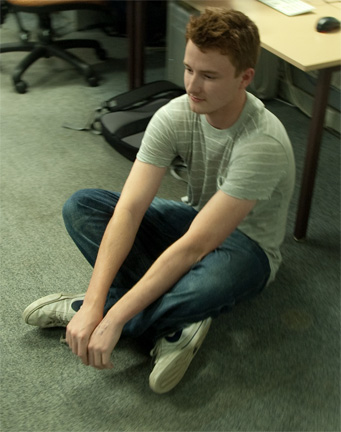
- Boy Sitting 1
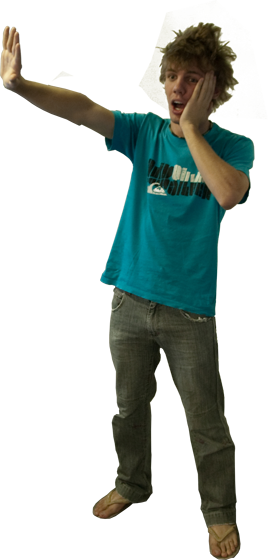
- Boy Standing 2
Step 1 – Take Your Photographs
The great part about finding subjects for your composition is that you don’t have to look too far, grab some of your old photos of your friends if you like or take some when your hanging out because in this tutorial you don’t need a fancy camera and a tripod!
As with a lot of subject images, they don’t always have the light source we want for applying them straight away into the base image – so what I will show you later in the tutorial is how to blend these images to look more realistic in your final composition.
The first thing you need to do is think about what you want to create. It is a lot easier to create your composition if you know what your general concept will be. The second thing you’ll want to do is take as many pictures as possible so you have a bigger range to experiment with – that way it is more likely you will get the correct angle when applying your subject into the image. In my case I took around 10 photos at different angles for the base and around 5 for each of the boys.(however for simplicity purposes I will only show a few examples)
If you are using photos already taken, try and find ones that will suit. The main thing to worry about is placement; you want to have your subject in a position that looks more realistic for your composition. For example if you want to create something like I have done using your own friends, make sure you have full body shots and not cut off at the torso. You’ll notice in the photographs I took, I had a general idea of what I wanted to make and I wasn’t concerned with light or the environment they were in. Try and be creative with it!

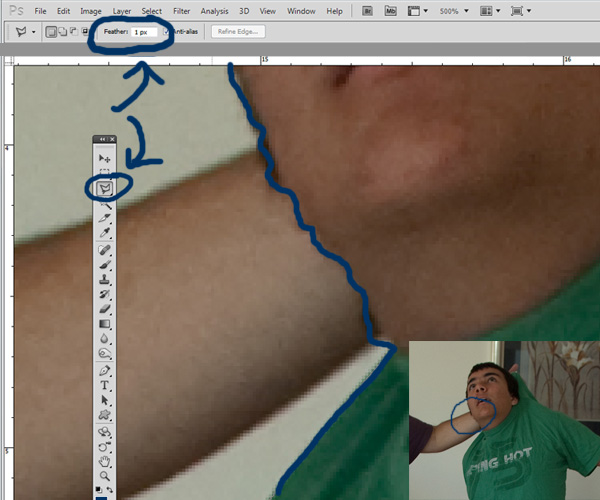
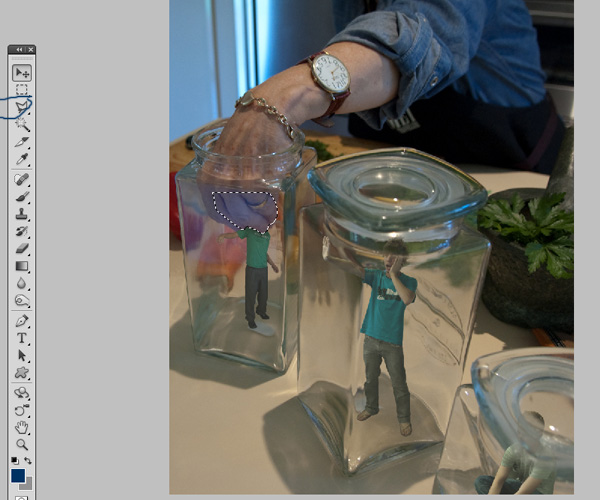
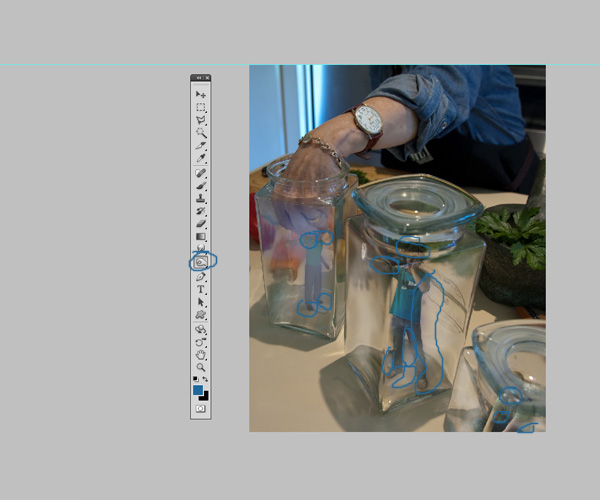
Step 2 – Extract Your Images
The next step is to extract your images. The best way to extract is to use your RAW or high quality image and zoom in about 500%. This way you get the best accuracy you can while cropping and when it comes to sizing/positioning your subject the quality is going to be at its peak.
I crop my images with the polygon lasso tool, using a 1px feather and paste it on a new layer. Using a feather leaves the pasted selection without jagged edges. You can repeat this process for however many people you would like to be in your work.
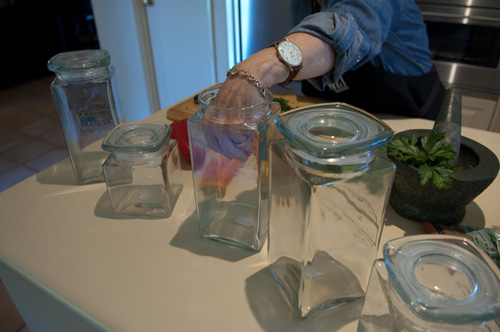
Step 3 – Position Your Images
Now place the extracted images as shown below.
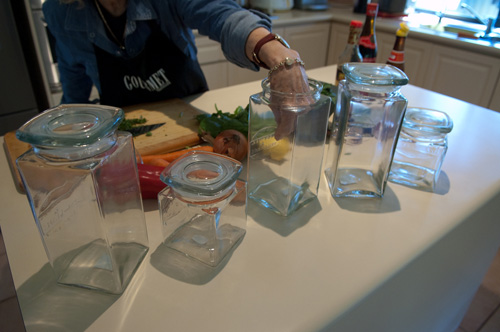
Step 4 – Distorting Your Subjects
We now want to edit our subjects. Grab a small brush with low opacity, and gently brush away parts of their body which would -in reality- be obscured by the thick parts of the glass. This is the beginning of the illusion that they are in the glass.
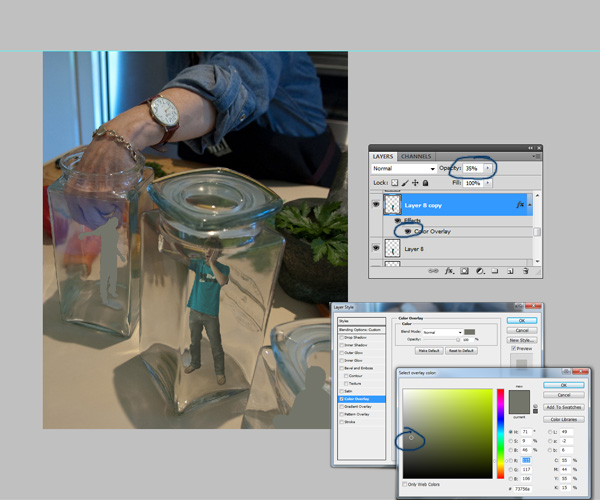
Step 5 – Creating Subject Layers
If you have ever noticed when you look through glass it is not 100% see through. So what we are going to do is add a slight tint to the subjects so they are not as clear. To do this duplicate (Command/Ctrl + J) your subject layer and give them a colour overlay of grey, I used #73756A. Do this to all of your subjects and then decrease the opacity of each to around 35% or your best judgment.
Optional: Duplicate your subject layer, and add a slight Gaussian blur (Filter > Blur > Gaussian Blur) and lower the opacity to about 15%.
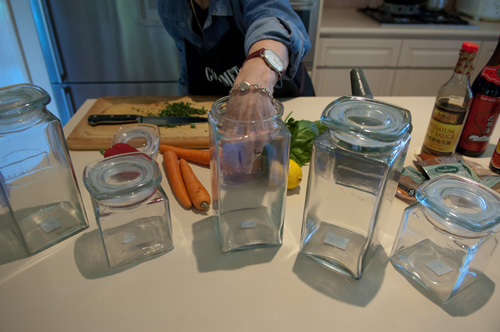
Step 6 – One Jar at a Time
Starting with jar one, we want to get the hand to hold the subject. There are various ways one can attempt this, my way is making a selection (just like Step 2) of the hand, and the pasting that above the subject layer, however using a layer mask on the subject itself would be just as effective. It just depends what you are used to.
Step 7 – Distorting Your Subjects
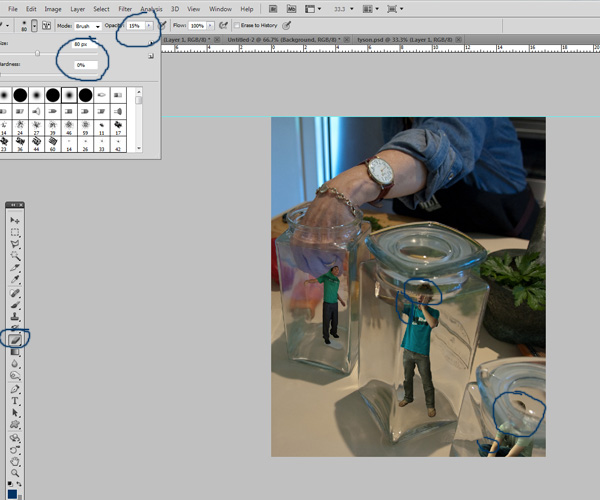
We are now going to want to go through each jar and finish making the subject look like it’s inside it. In my case, I added a slight grey/blue overlay (using a soft brush) to the subject so the light matched better. This is an optional step, as it might differ depending on the work your doing. If you need to match light on the subject better, a nice technique is to take the eyedropper and take a sample of the light colour on the main image. From there, use a soft brush with low opacity with that colour and brush over the subject. You can then chose to overlay/multiply this coloured layer until you have the desired effect. Another option is to duplicate your subject and then bring up hue/saturation adjustments (Command/Ctrl + U), hit colourize and set it to the colour of the light. Then using a layer mode of your choice (usually overlay) with a lower opacity.
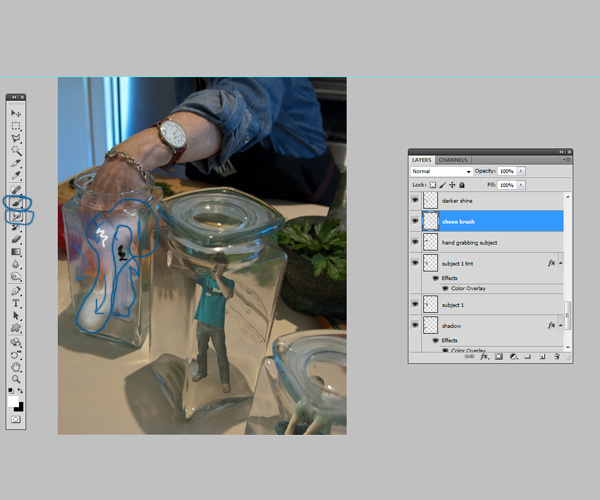
From there, to create that ‘trapped’ look, we are going to create a fake shine. To do this, grab a large soft brush at about 30% opacity and do a quick diagonal brush on the jar. This is the tricky part. What you’re going to want to do is get the smudge tool, and smudge the white brush to go along with the contours of the jar. For example: Do not put the white brush on corners, because glass doesn’t shine the same on the corner. Once you have properly smudged the brush, put the opacity down to whatever looks good for you, in my case it was 33%
Optional: Grab a soft brush eraser at 10% opacity and erase some bits of the white so you get slightly more depth
The last thing we need to do is add a slight shadow to the subject. Now on my image we can see that the light is coming from around the top right area, judging by the shadows of the jars. So from here the best way to create a shadow is to copy the subject layer, and using blending options like Step 5, fill it with black. From here go to Filter > Blur > Gaussian Blur and you will want to blur the shadow enough so that its fuzzy, yet you can still make out the figure. (I won’t post a number because it’s different in every case). From there using the transform tool (Command/Ctrl + T), transform it so it fits in with the other shadows. Then lower the opacity until satisfied. (Mine was 20%)
We can then use this same technique, and apply it to the other two jars.

Step 8 – Finishing Touches to your Subjects
We are now ready to add some finishing touches to our subjects and the areas around our subjects. Grab the burn and dodge tool, and go around your subjects where there would be darker areas. In this case because our subjects are confined by an object there would be slightly darker areas around their body. You don’t need to get every single area however in my case the main areas were: The hand grabbing the head, the hand pressing against the glass, needed more light. (as an option you could also grab the liquify tool and expand the skin slightly for extra realism), foot shadows and areas where thick glass is on top of the subject.
Secondly, I used some soft black/white brushes in spots around my composition set on overlay so I could increase the effect of the light source and increase the effect of my fake shine.
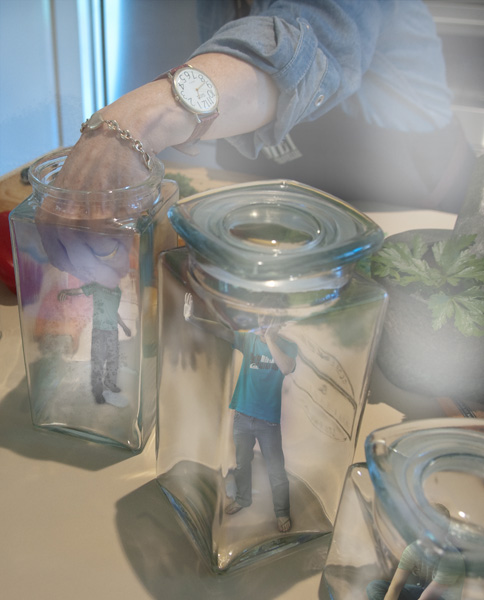
Step 9 – Finishing Touches
Now I know what you are saying, " it hasn’t really blended that well". Well this is my favourite part because with this technique, it can blend your colours, light, and subjects all together nicely while still creating a unique style of photo manipulation.
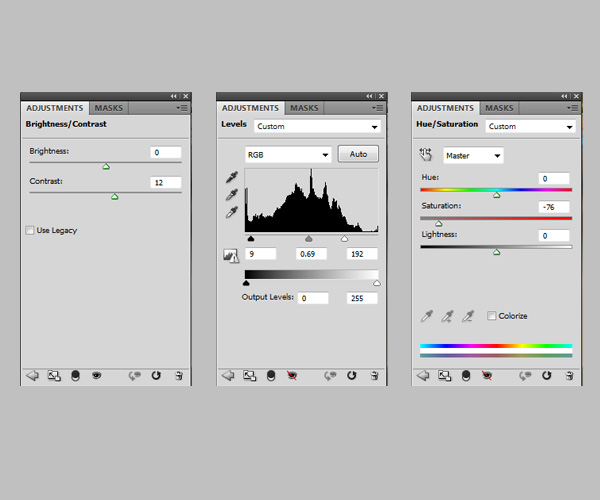
Using Layer > New Adjustment Layer > Hue/Saturation. Layer > New Adjustment Layer > Levels. Layer > New Adjustment Layer > Brightness/Contrast
Levels – Using levels will enable you to make a really strong composition. Levels will enhance your fake shine, general contrast and really make those jars the focal point of your composition.
Hue/Saturation – As levels will generally create a high contrast of colours, slightly de-saturating the colours calms everything back down. It allows colour to be shown without having that harsh contrast of varying colour.
Brightness/Contrast – Just used as a failsafe and to be used to tweak slightly more if needs be.
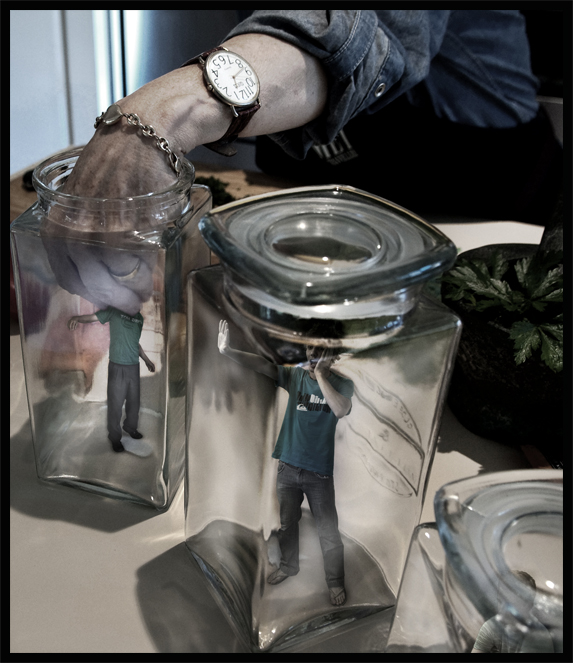
These three adjustments are entirely up to you and how you want your final piece to look If you want to experiment, you can use Curves and Colour balances as well. Finish off your composition by adding a thick black stroke.
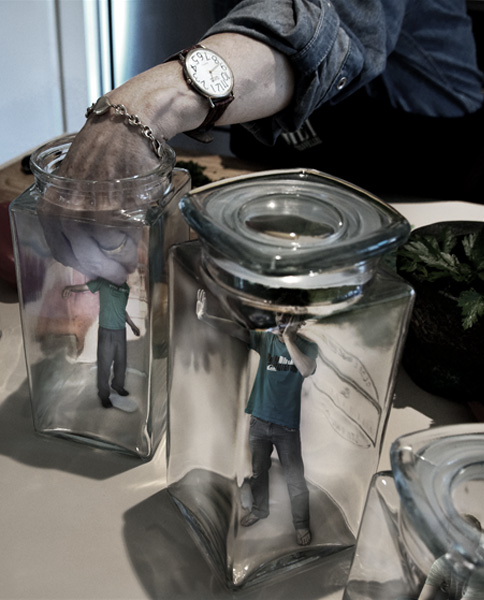
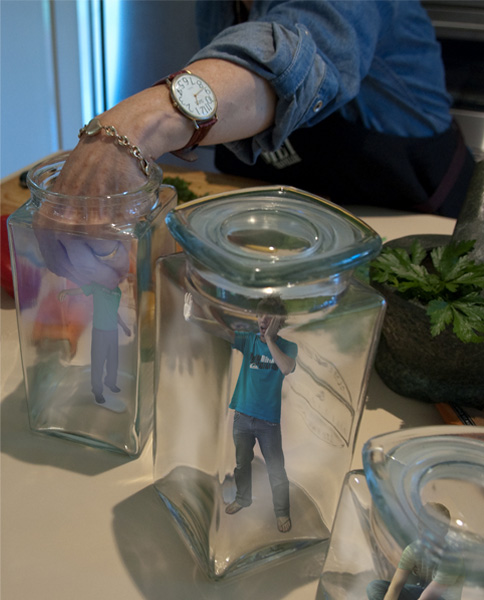
Final Image
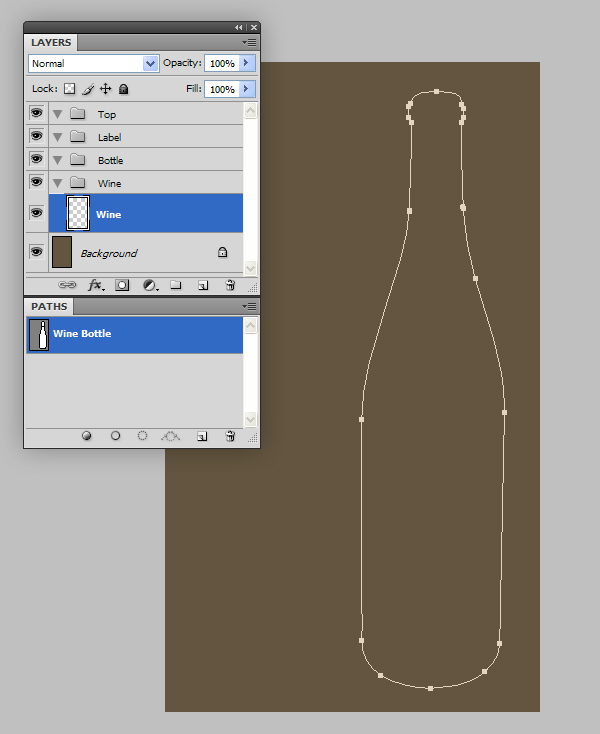
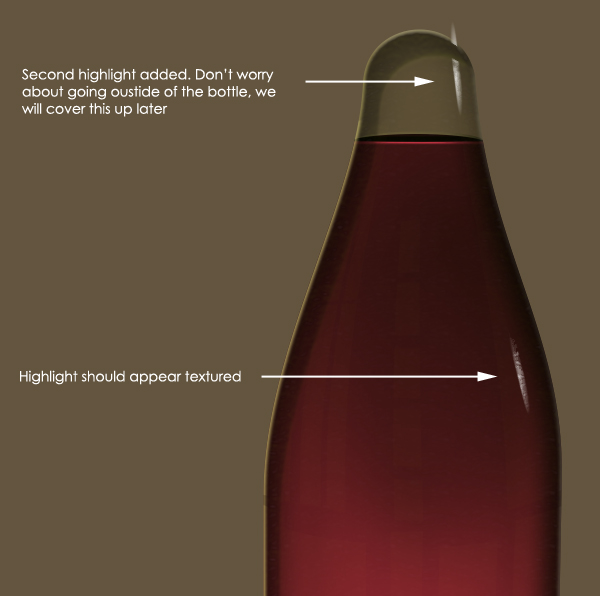
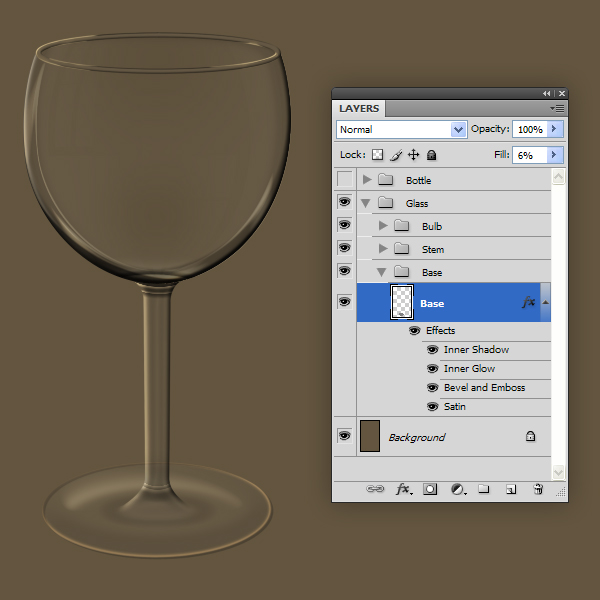
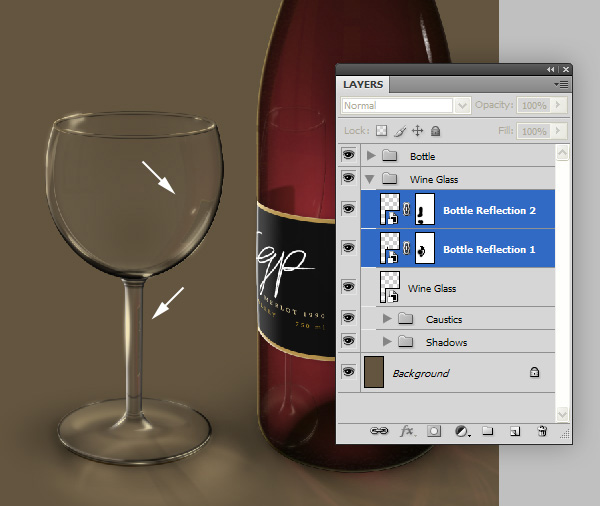
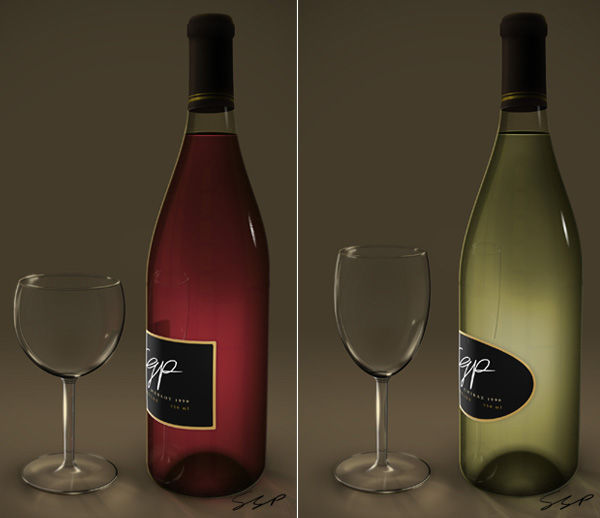
Create a Wine Bottle and Glass with Smart Objects – Psd Premium Tutorial
2011-06-02 17:00:36 (читать в оригинале)Advertise here
Smart Objects are very powerful layers in Photshop. In this Psd Premium tutorial, author Stephen Petrany will show you how to create a wine bottle and wine glass using Smart Objects as well as demonstrate their benefits. This tutorial is available exclusively to Premium Members. If you are looking to take your photo manipulation and digital painting skills to the next level then Log in or Join Now to get started!
Professional and Detailed Instructions Inside
Premium members can Log in and Download! Otherwise, Join Now! Below are some sample images from this tutorial.
Final Image
Psd Premium Membership
You can join Psd Premium for as little as $9/month. Premium membership gives you access to the source files for all our tutorials as well as access to premium tutorials like this one. This also includes the rest of the sites in our network including Vectortuts+, Webdesigntuts+, Phototuts+, Nettuts, and more! Premium Members can Log In and download this tutorial. Otherwise you can Join Today!

|
| ||
|
+127 |
129 |
Simple_Blogger |
|
+104 |
122 |
Фрагменты |
|
+28 |
126 |
Снимаем видео на фото и DSLR камеры |
|
+5 |
6 |
Борис Немцов |
|
+2 |
47 |
Доска объявлений |
|
| ||
|
-3 |
2 |
dmitrydibrov |
|
-7 |
5 |
Любер |
|
-13 |
24 |
Программа Грядка с Андреем Тумановым |
|
-17 |
3 |
Я В БЛОГЕ |
|
-36 |
4 |
Форум satwarez |
Загрузка...
взяты из открытых общедоступных источников и являются собственностью их авторов.