Create a Cybernetic Woman in Photoshop
2011-08-01 17:00:47
... with the opposite
effect as the ... off the darkening
effect of this ... see here the
effect our texture ...
+ развернуть текст сохранённая копия

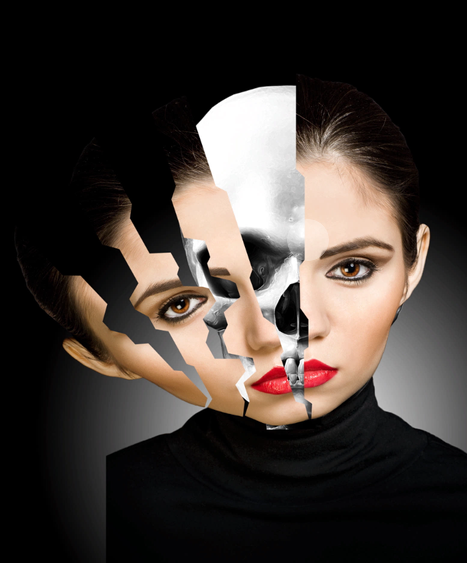
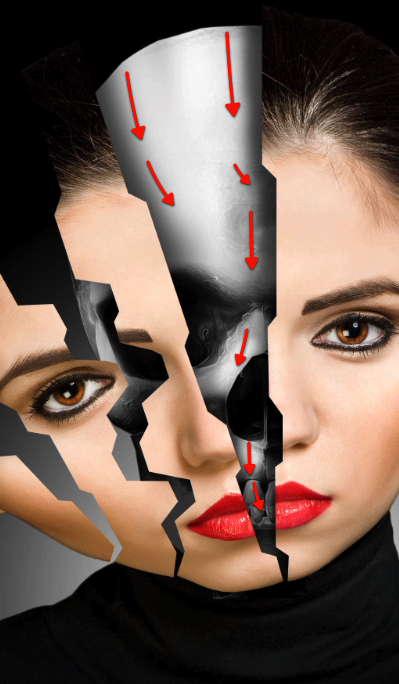
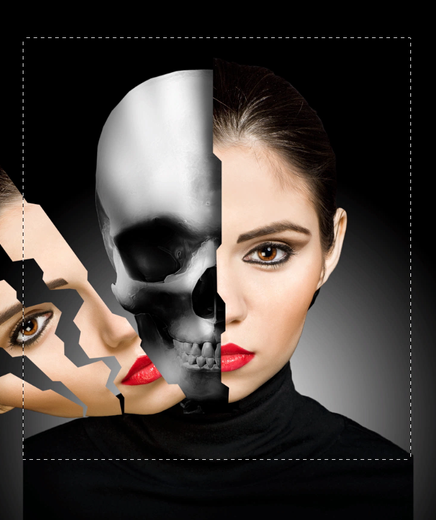
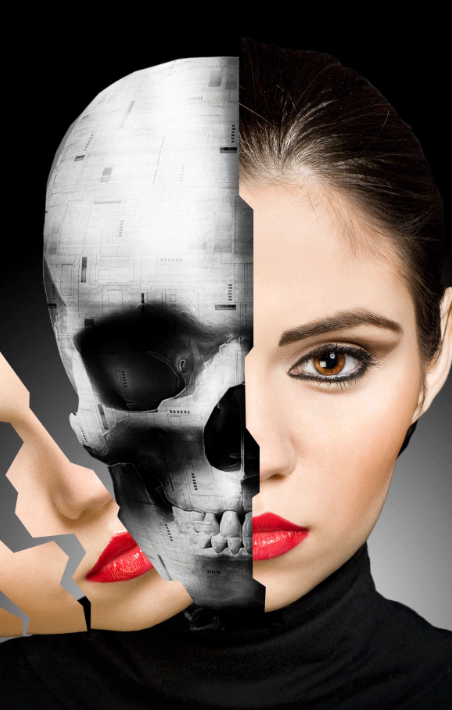
Photoshop can let us do some amazing things. In this long and detailed tutorial we will demonstrate how to create a cybernetic woman using a photo of a model and a few stock images. This content includes written and video content. Let’s get started!
Tutorial Assets
The following assets were used during the production of this tutorial.
- Image 1
- Image 2
- Image 3
- Image 4
- Image 5
- Model
- Skull
- Gradient File
Before We Begin
Special thanks to the model Ana Ilinca and Her husband Daniel Ilinca the photographer for providing the brilliant sharp image which we will use for this tutorial, pay them a visit, both are very talented and available for work.
Step 1- Setup the skull
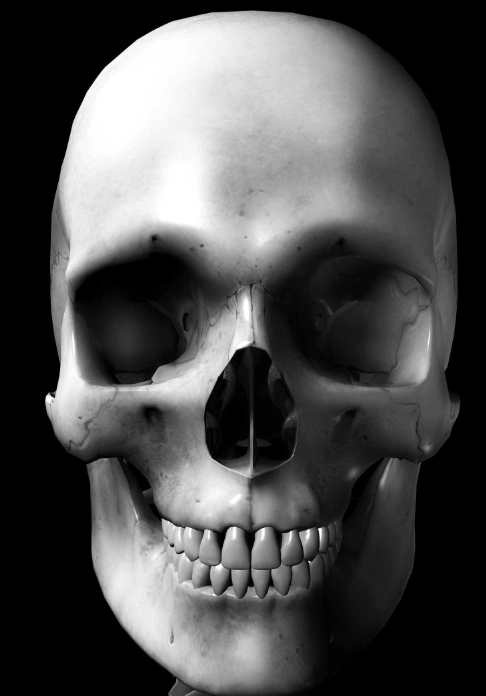
OK let’s get started, we will begin with this stock image from a skull that we will setup to fit the cybernetic mechanism we are trying to represent.
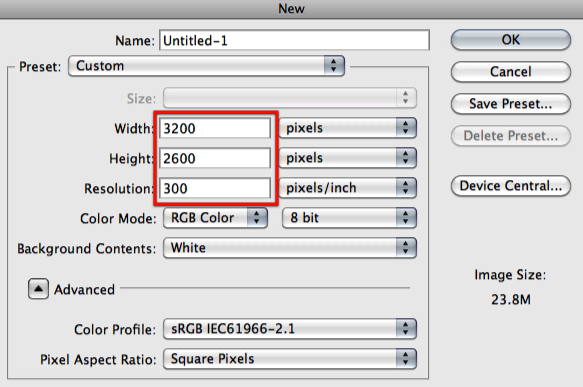
First off let’s create our document with these settings and size here.
Fill in the background with a plain black.
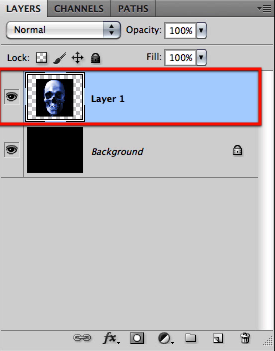
Then copy and paste the image of the skull into a new layer.
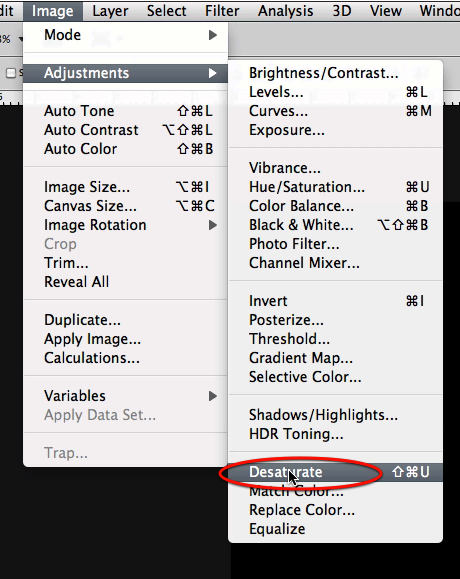
OK now that we have our skull let’s desaturate it to get rid of all the original color.
OK looking much better already, now we need to remove the black background from it.
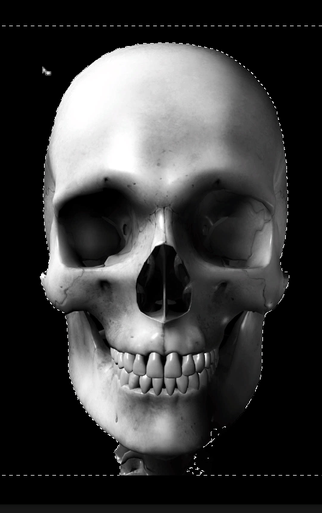
Since we have a great deal of contrast between the back and the skull we can use the magic wand tool to make a quick selection.
Set the tolerance to 2 and make a selection of the black around the skull; be sure that all around the skull is selected.
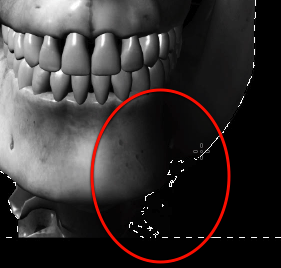
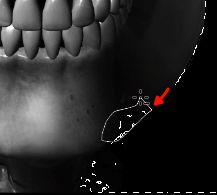
Now there will probably be some spill of the selection in the lower section of the skull so we will quickly use the lasso tool to fix this.
So just the lasso tool to remove this section from inside the skull area from the selection.
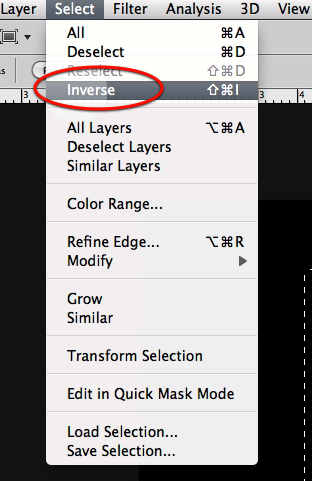
Once this is ready, inverse the selection and on the top bar click on refine edge.
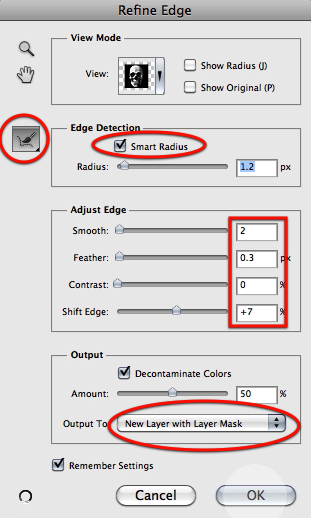
On the dialog box let’s make all these adjustments to refine the selection a bit.
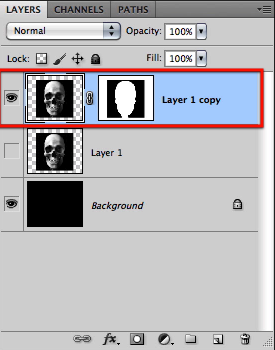
Once you click OK on the dialog box and the modifications are applied, just create a new layer mask.
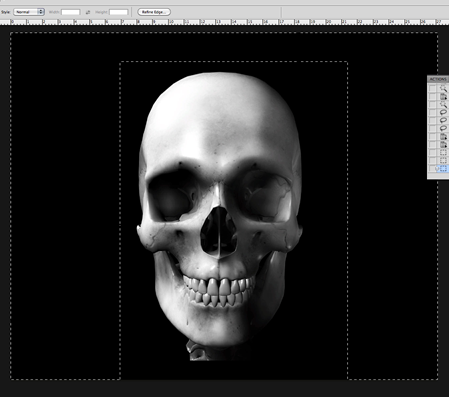
Now let’s use the rectangular selection tool, so go ahead and select it.
Let’s make selections of what is left so we can complete the mask for our skull.
Now just fill in with black the rest of the mask.
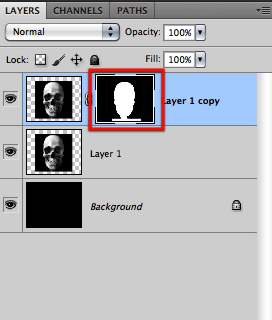
You should end up with the skull shape clearly defined with white in the layer mask.
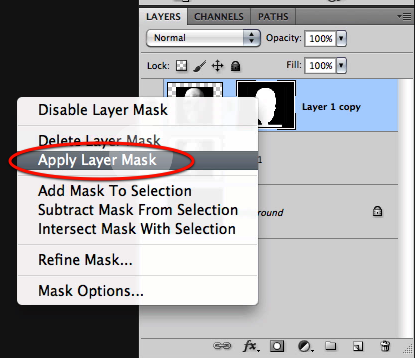
Then let’s apply the layer mask.
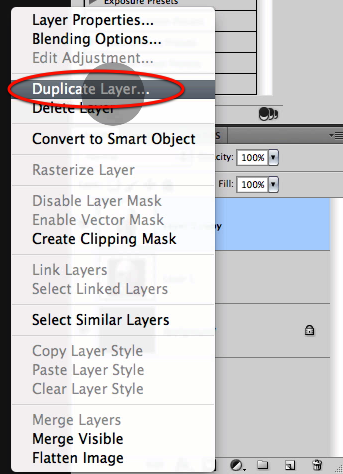
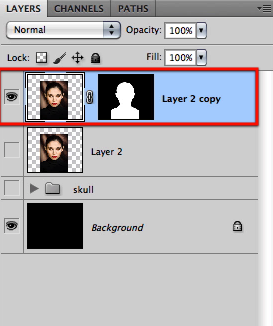
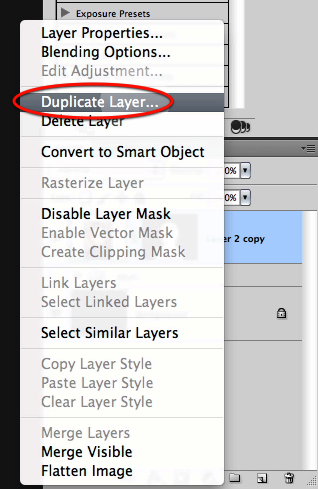
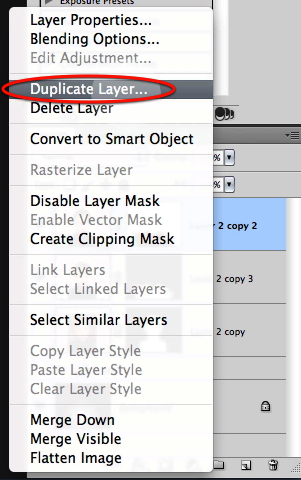
And let’s make a duplicate of it.
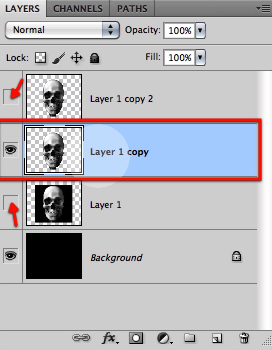
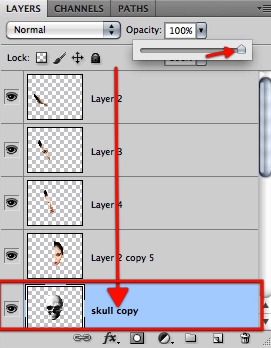
Now let’s hide these other two layers so we can work on the first copy.
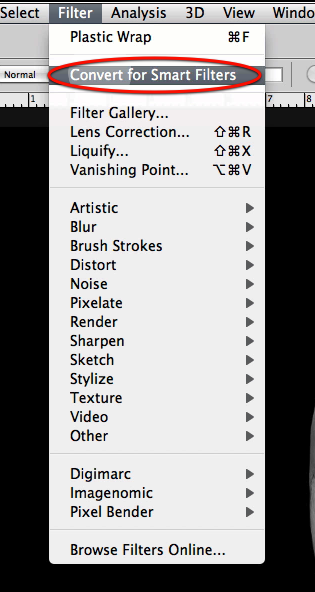
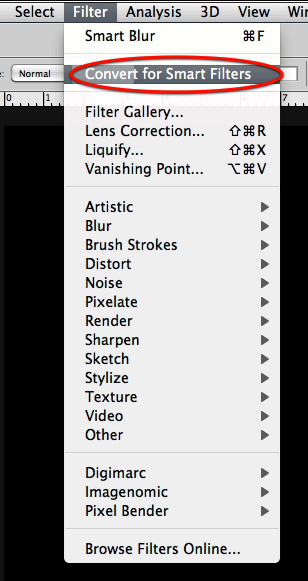
Now go to the filter menu and select "convert for smart filters"
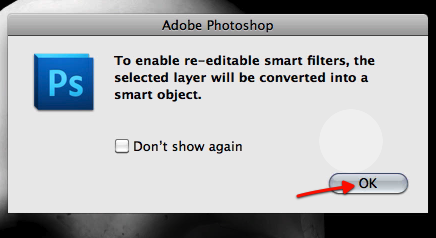
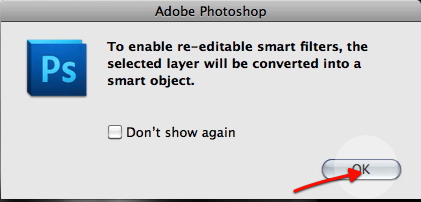
You will get this warning box from Photoshop, so just hit OK.
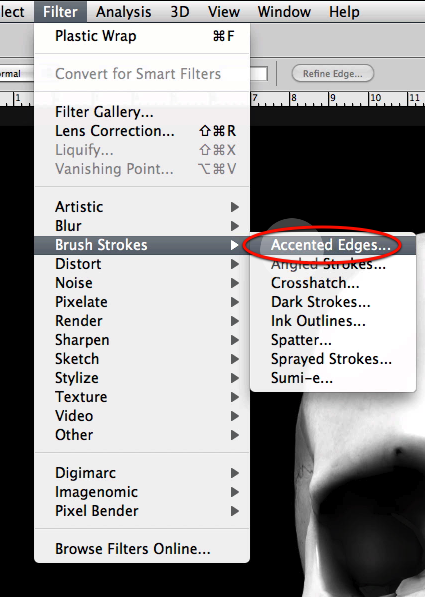
Now we can apply all the filters we want in a non destructive manner to this layer, and also disable them or adjust them at any time, just like adjustment layers. So let’s select the accented edges filter.
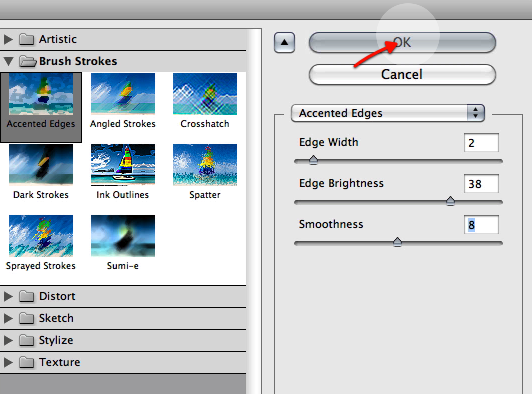
Adjust the settings for the filter as shown here.
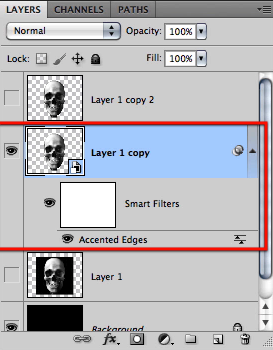
Once applied this is the stack you get that shows the edit able filter at the bottom and a mask you can use between the layer and the filter.
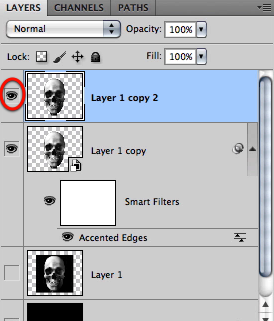
Let’s now go to the top layer so enable its viewing icon.
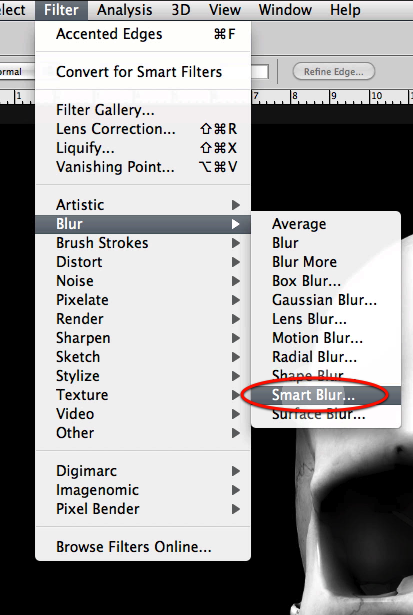
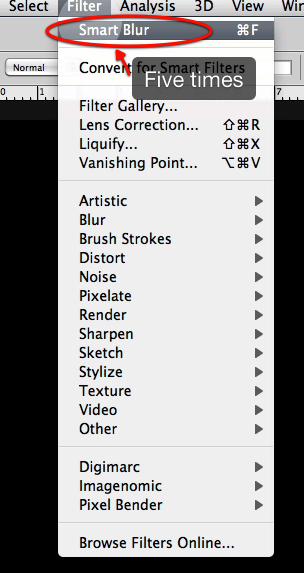
We will first apply a smart blur filter directly.
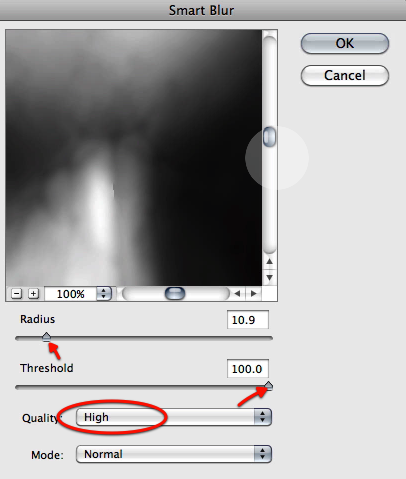
Adjust the settings as shown and re-apply the filter five times.
Now we can do the same as the other and convert the layer for smart filters
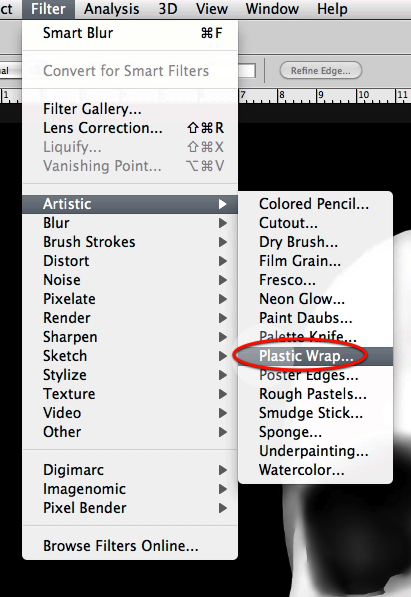
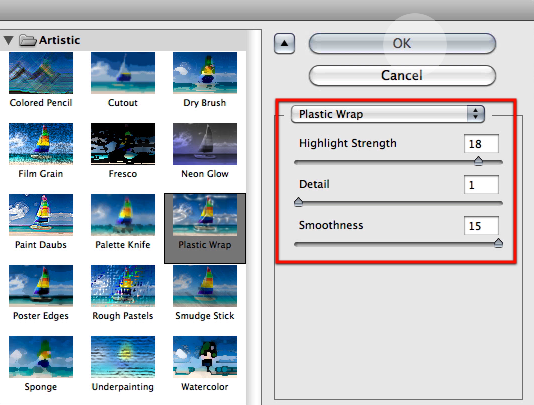
Hit OK on the dialog box and select plastic wrap from the filters.
Adjust the settings as seen here.
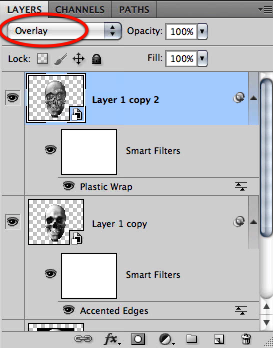
Then set the layer mode to overlay.
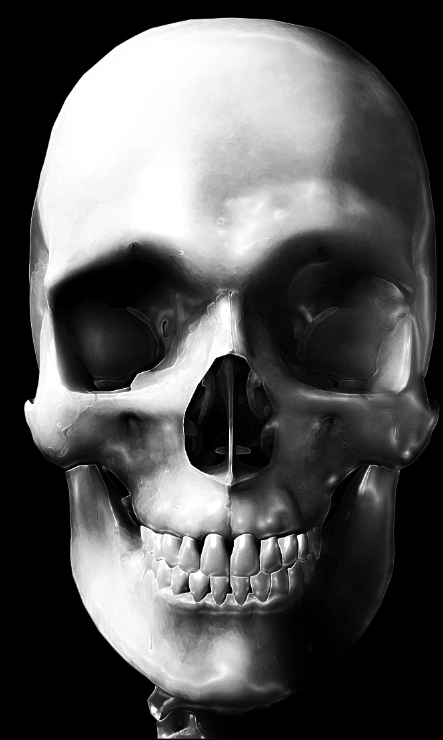
And this is what we have so far, a smoother skull with a metal appearance to it.
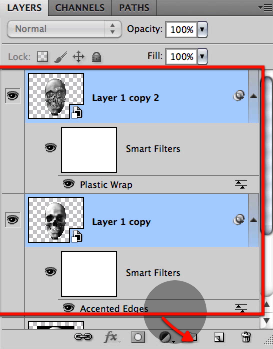
Now let’s grab all of our skull layers and group them together.
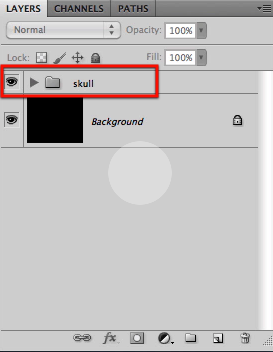
Then just to finalize this step name the group skull.
Step 2 – Mask the model
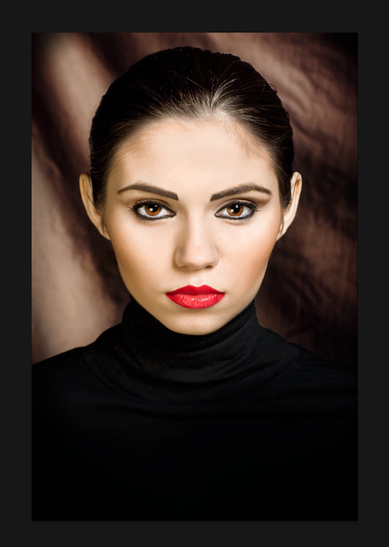
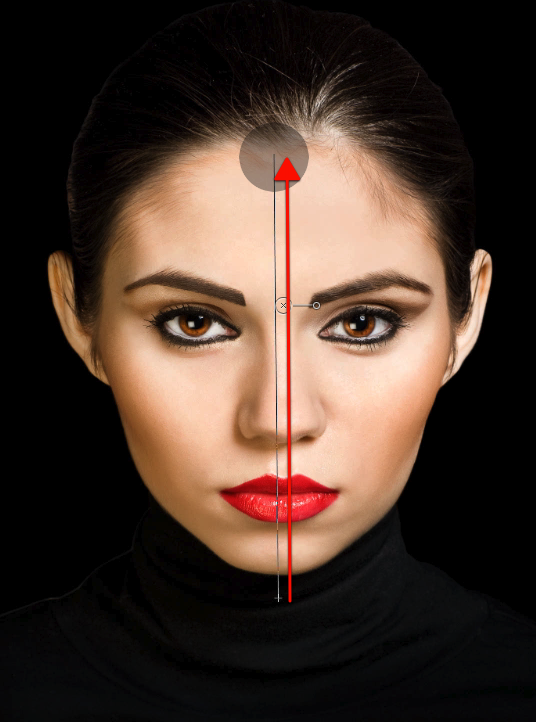
On this step we will be working with the main character image of the model and we will extract her from the backdrop, plus we will be separating her into just the face and the torso, so go ahead and open the image shown here.
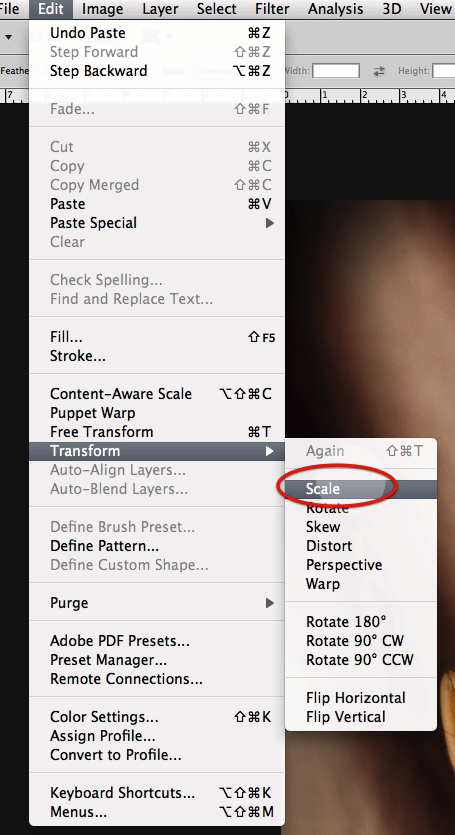
Copy and paste it on to a new layer and select the scale command so we can re size it.
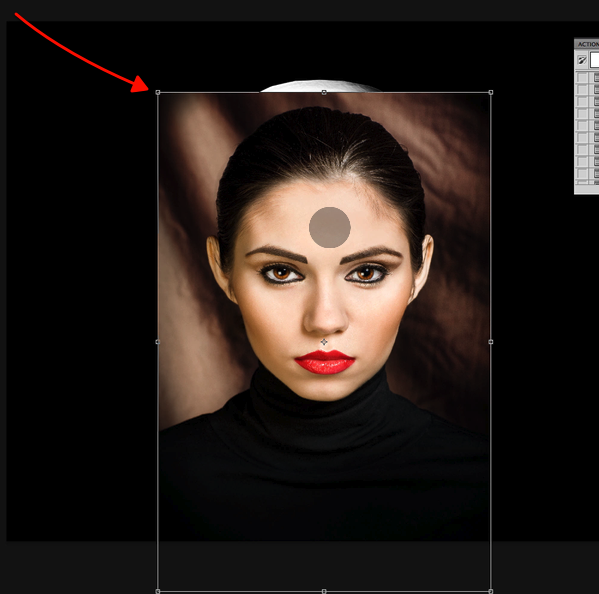
Scale down the image as seen here.
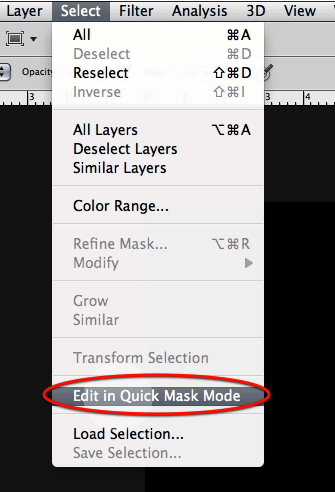
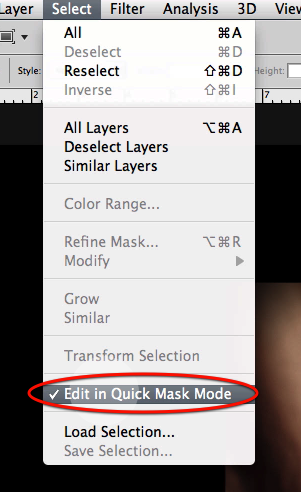
Then in the select menu access the quick mask mode.
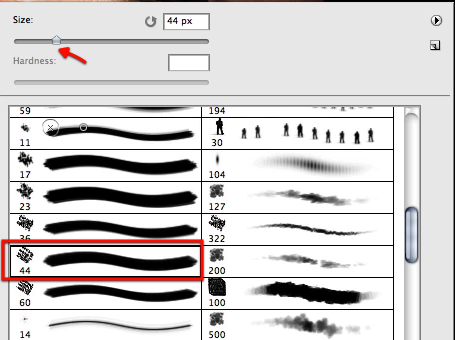
Then select the paintbrush tool and choose this tip here.
Be sure that the brush is set to 100% opacity.
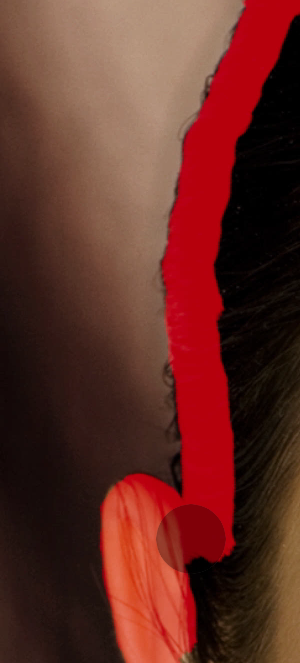
Now while you are in quick mask mode, everything you paint will appear in red if you haven’t altered the standard quick mask color preference. So start defining the border of the model.
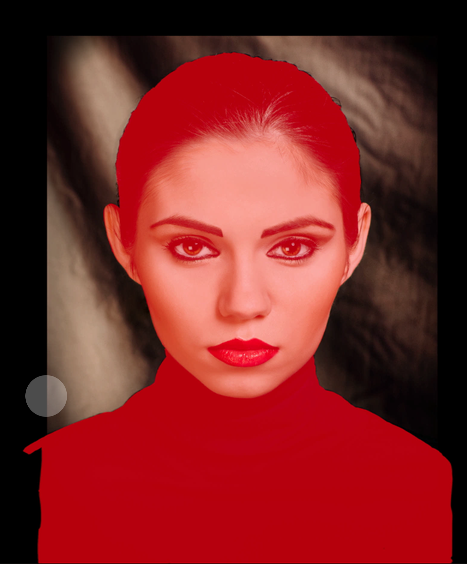
Just work around the edge detail until you have all of her covered in red, and of course change the brush size as needed.
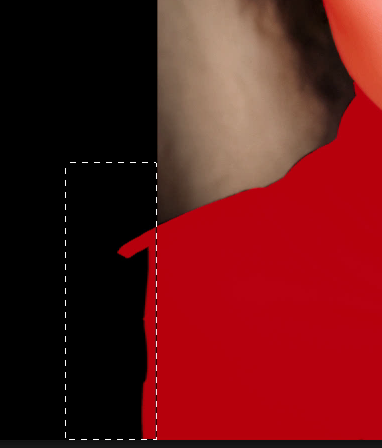
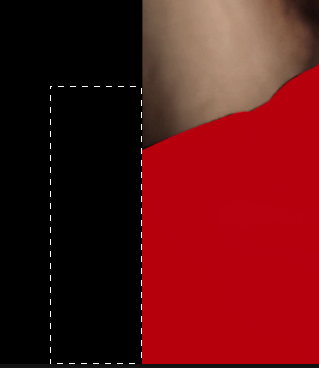
Now for the edges of the missing shoulders we will make those sharp using the rectangular selection tool.
Just drag a selection as shown here right at the border of the image.
Then select the eraser tool
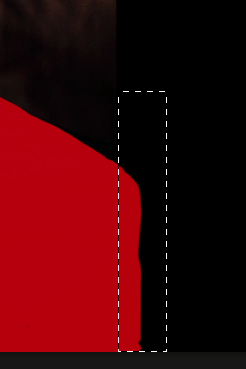
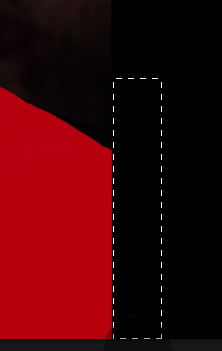
And erase the mask as shown here.
Now do the same for the other side of the image.
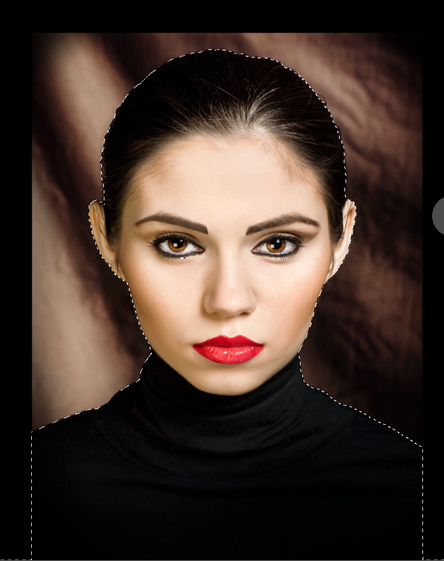
Then go again to the select menu and disable the quick mask mode.
As soon as you disable it, you will get a selection in place of the mask.
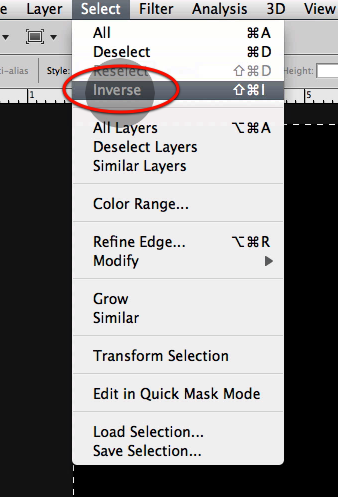
On the select menu inverse the selection
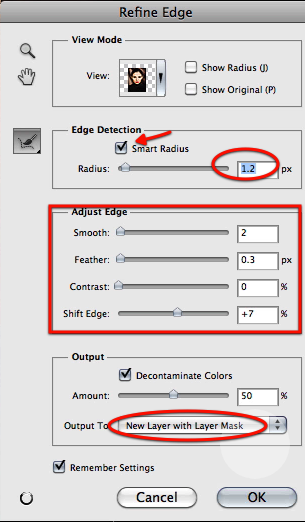
Once you have inverted the selection access the refine edge tool.
On the dialog box adjust the settings for it as shown here.
You will get a new layer with a layer mask already in place.
Right away let’s make a duplicate of the layer.
Now we have two layers, one for the face and one for the torso.
Before we continue working with the image let’s make a gradient for the back so its not all solid black.
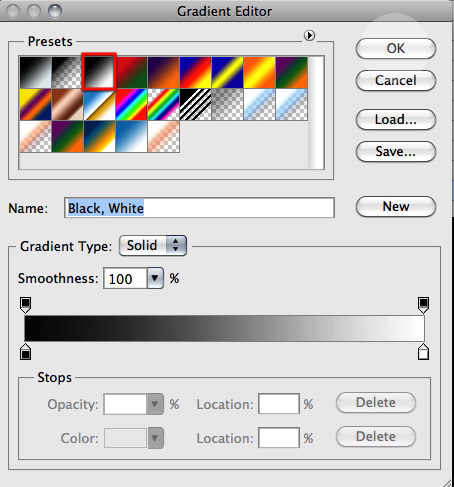
Select this simple black to white gradient.
Make sure you have the circular gradient icon selected.
And while you have the background layer selected drag the big gradient as shown here.
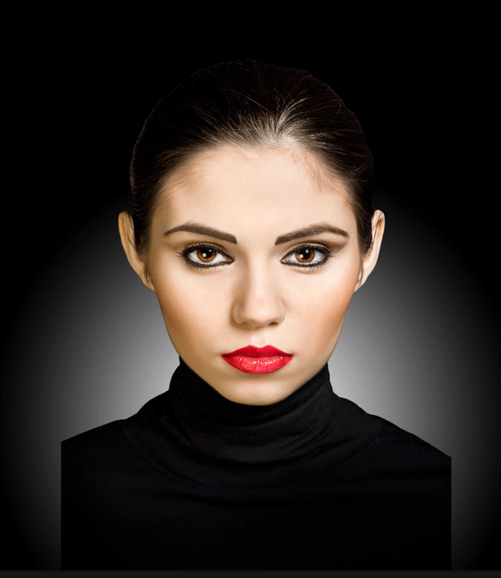
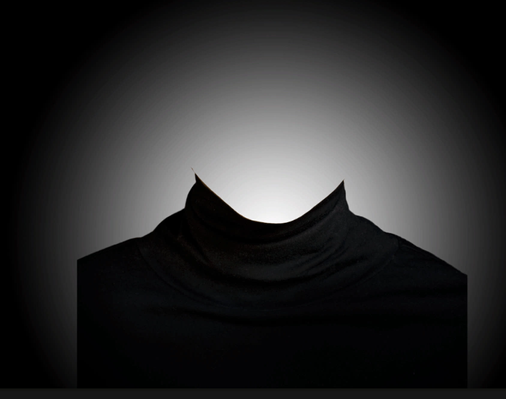
This is the result you should get where we can see a bit of the missing shoulder sections.
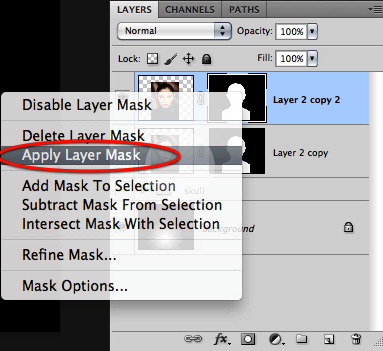
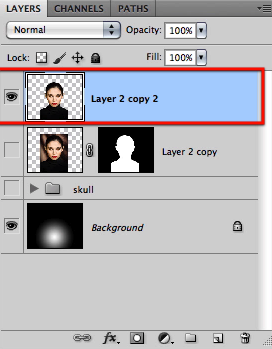
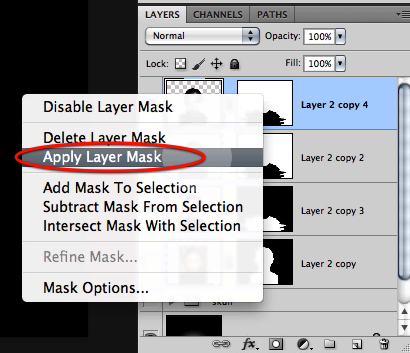
Then for the top layer go ahead and apply the layer mask.
This gets rid of the mask and makes the cutout permanent, so be sure you have the mask perfect before applying this change.
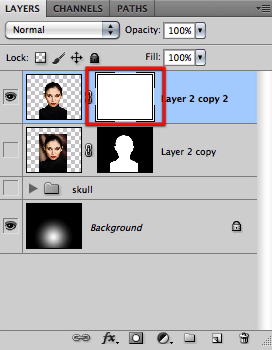
Now to continue working we will create a new layer mask.
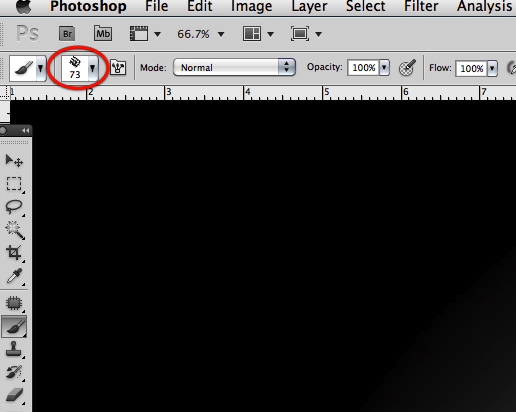
Then make the same black brush we have been using about 73 in size
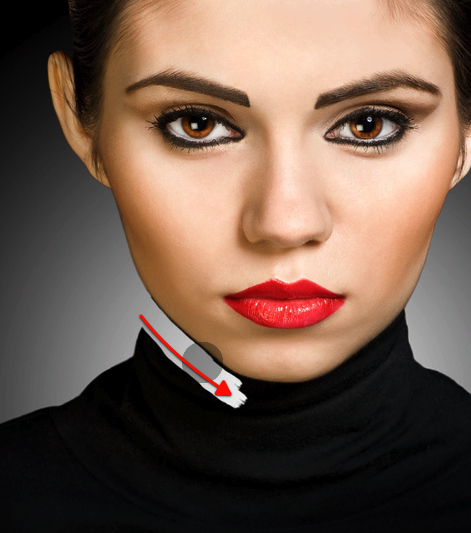
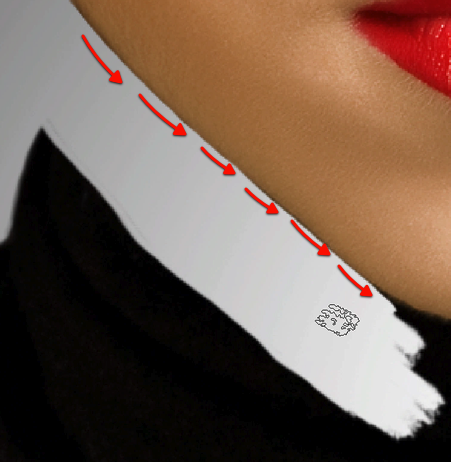
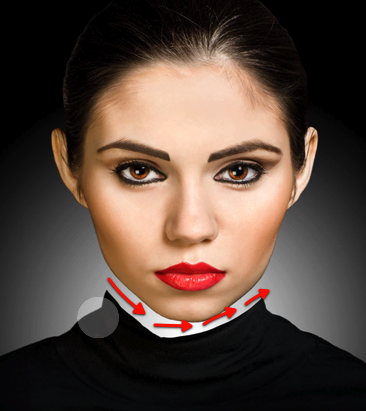
And start masking off all the black blouse as shown here.
Then re size the brush to about 30 px
And detail the edge where the face starts.
Continue with this process until you have masked all of the neck.
Then increase the size of the brush to 141 px
And mask off the rest of the black clothing.
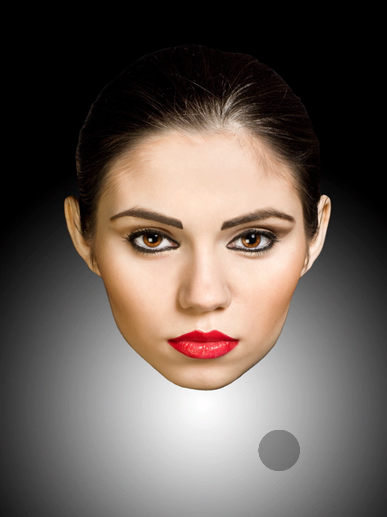
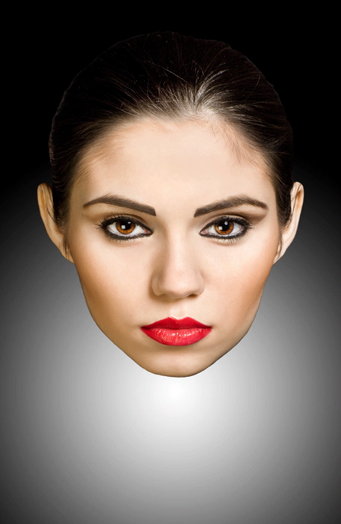
You should end up with just the head as shown here.
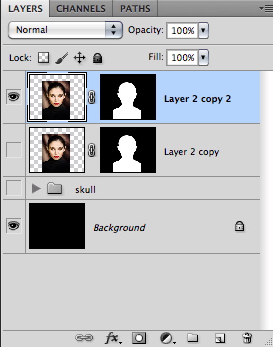
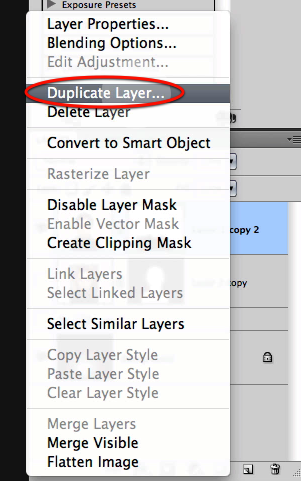
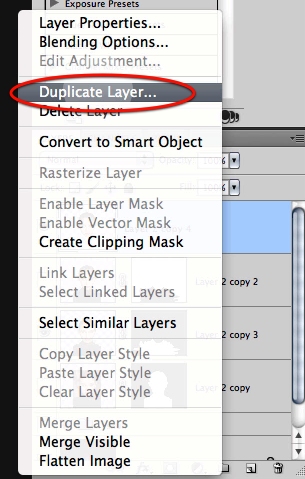
Then let’s duplicate this layer
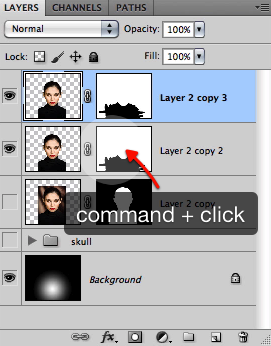
Let’s now make a quick selection of the mask.
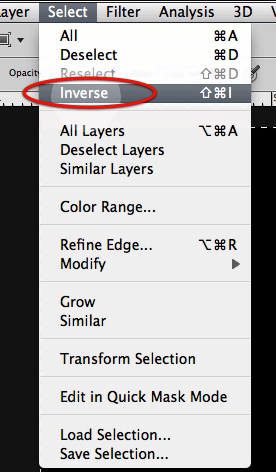
And then inverse the selection.
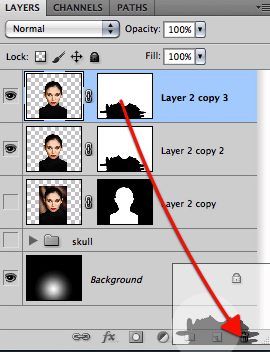
Without deselecting, go ahead and delete the layer mask as shown here.
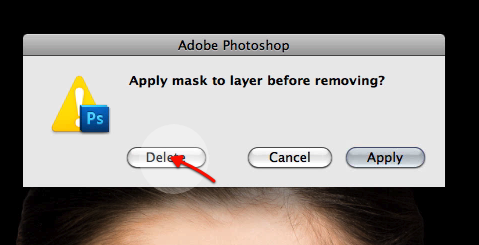
You will get this dialog box; just hit delete.
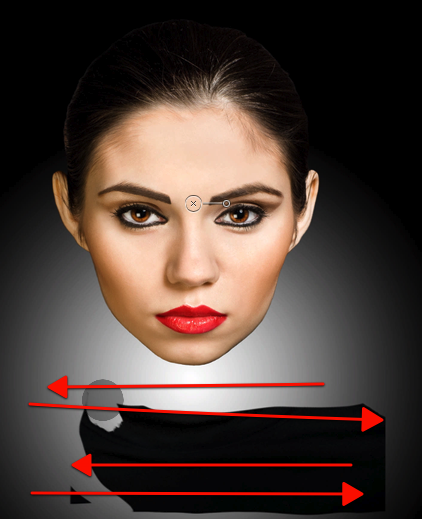
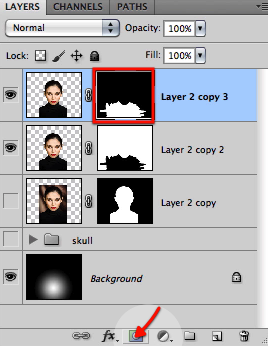
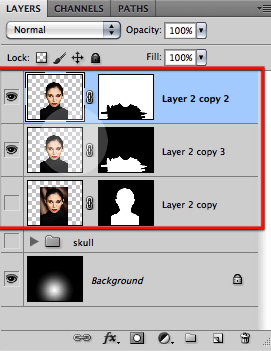
And now click on the new layer mask icon so we get a new mask but with the opposite effect as the previous layer.
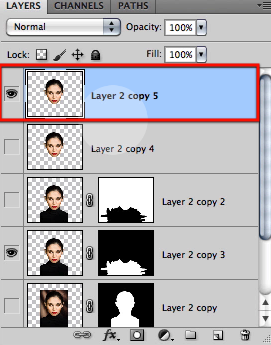
Now we have detailed sections for the torso and for the head in separate layers.
And we have finalized this step resulting in three layers that we will use for the rest of our work.
Step 3 – Section the face and adjust the skull
To start off let’s duplicate the face layer first.
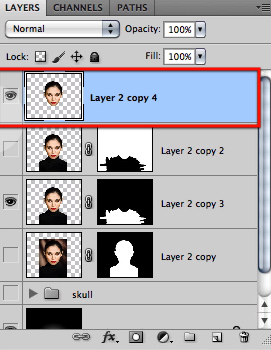
Then apply the layer mask for this new duplicate.
OK these leaves us with a layer of the head that we can work with to create the sections.
Let’s just now duplicate this last layer to keep safe in case we mess up.
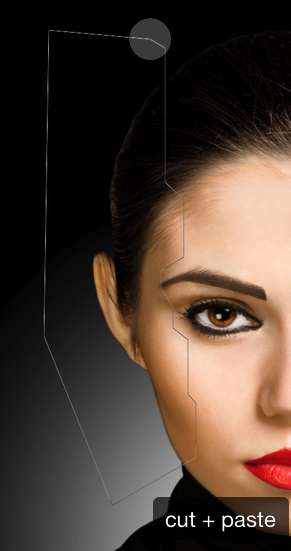
Now go ahead and select the polygonal lasso tool.
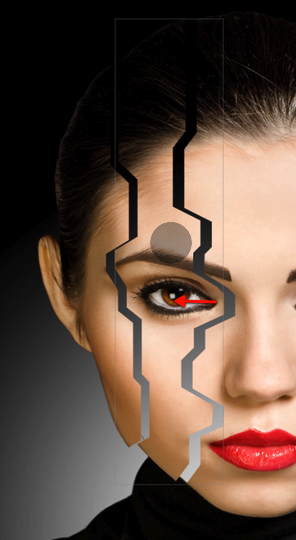
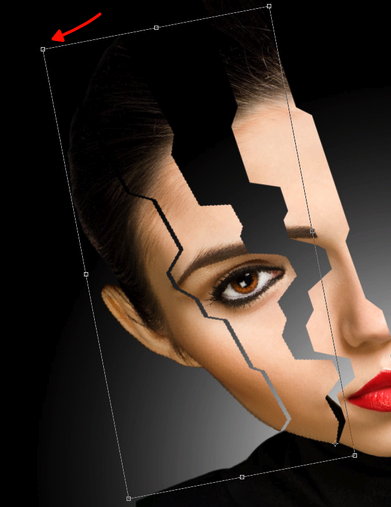
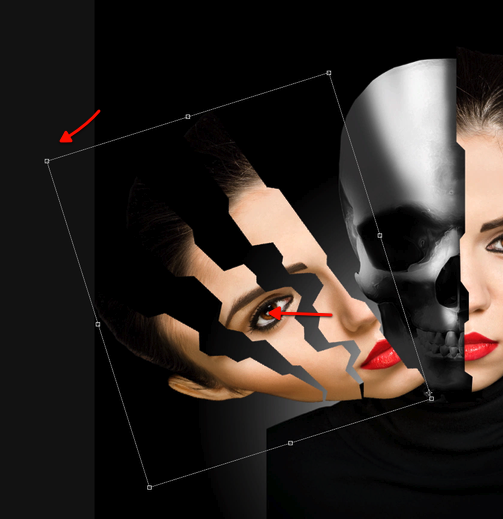
Then simple enough we start on the left side of the head and define a cut as you can clearly see here; and then just cut and paste the section on to a new layer.
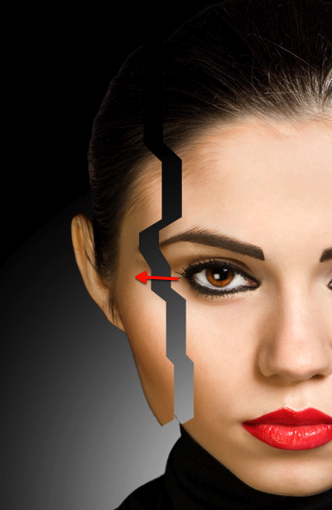
Once you have the section in a separate layer just reposition it a bit further out as seen here.
Now go back to the main face layer and define another cut section as shown here.
And repeat the same steps, cut and paste the section to a new layer and move it a bit to the left.
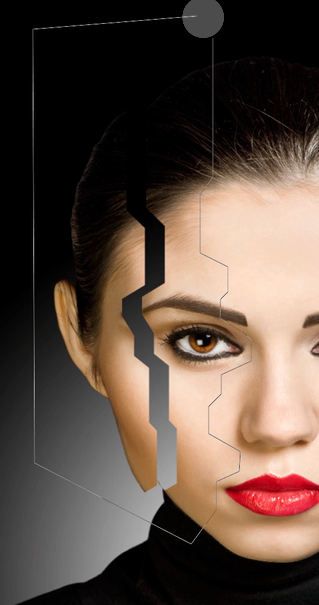
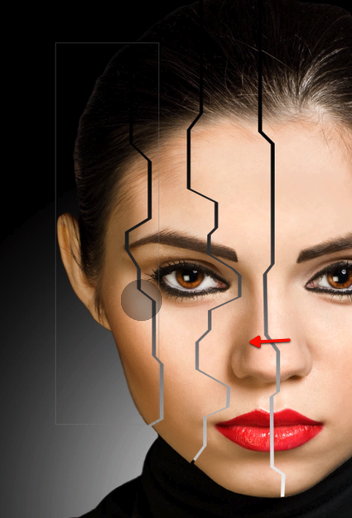
Let’s repeat this once more for one last final cut in the face section as shown here, right about the middle of the face.
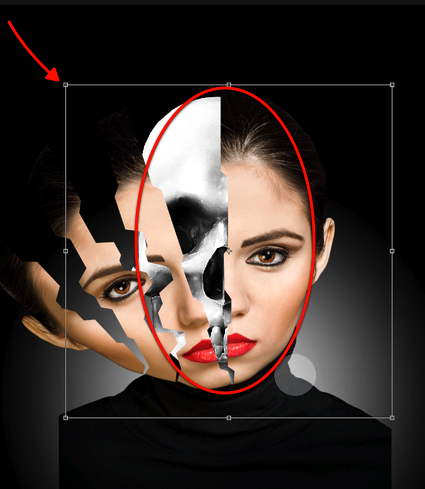
Then move this third piece a bit to the left so you have all pieces with just a small gap between them.
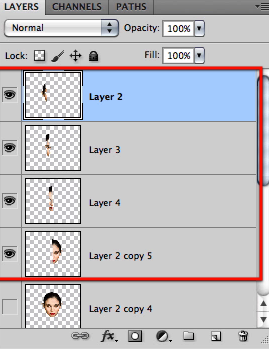
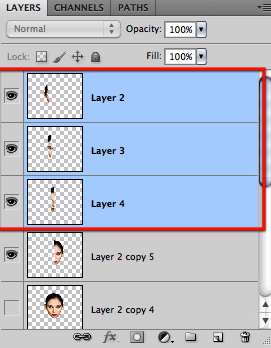
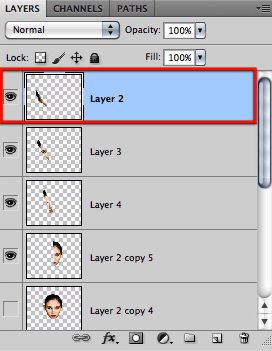
OK now you should have these four layers each containing a section of the face.
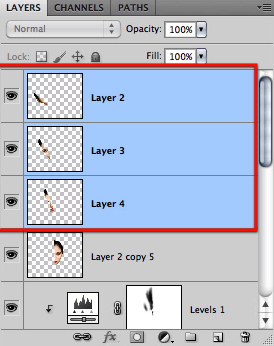
Let’s now select the three smaller sections only, leave out the big piece.
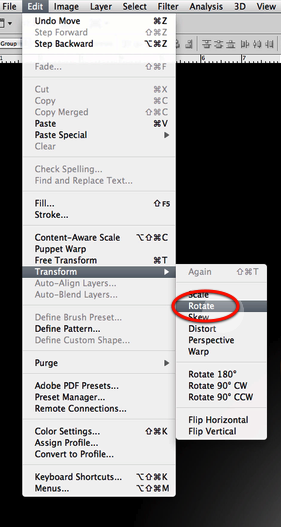
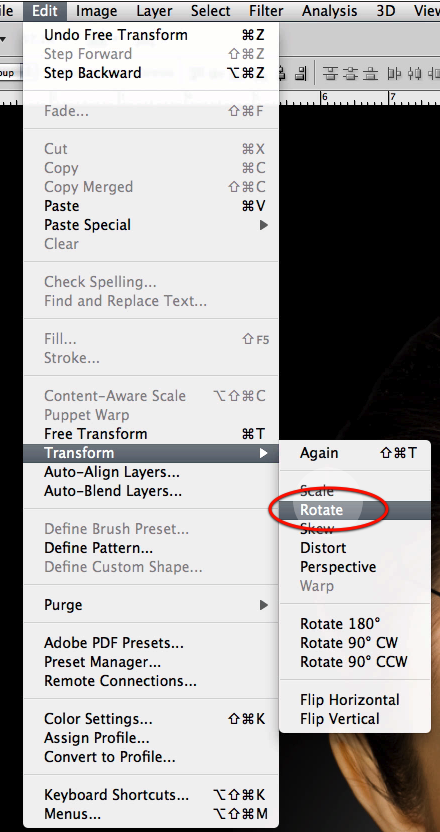
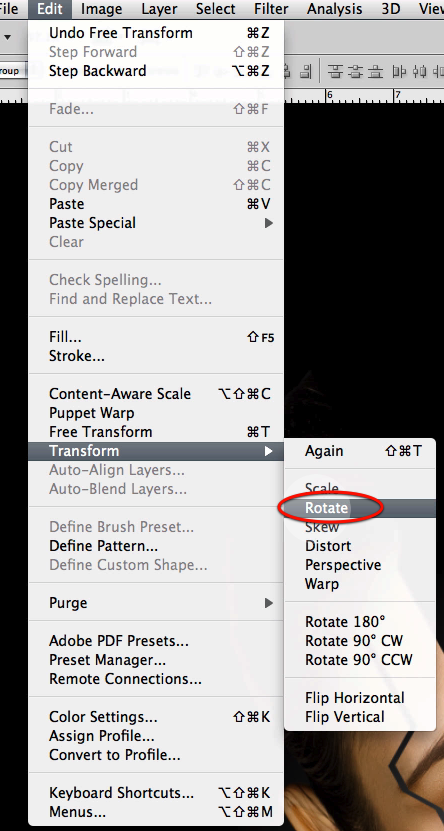
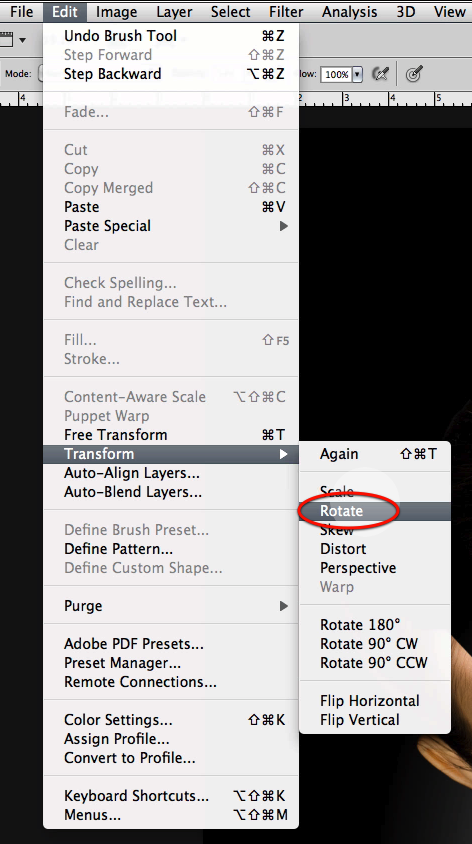
Select the rotate command.
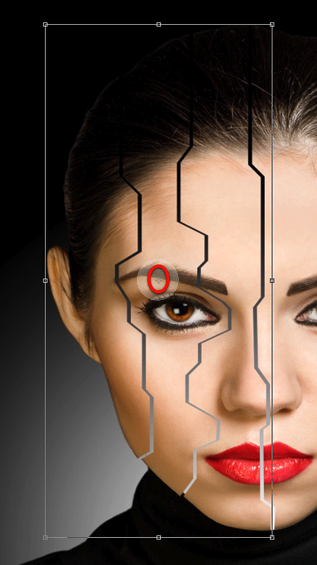
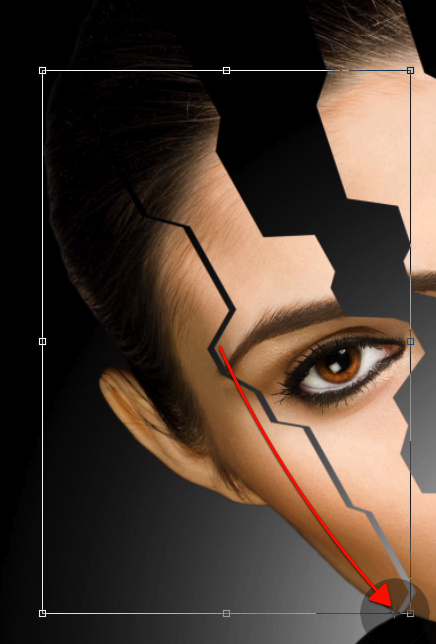
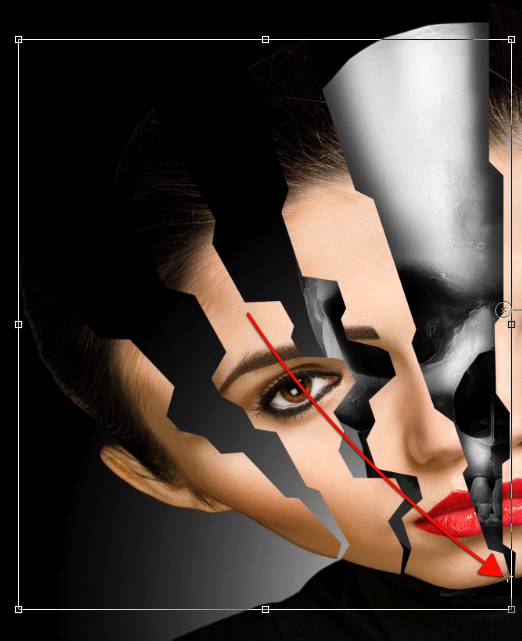
Now before we rotate, find the central anchor point of this selection.
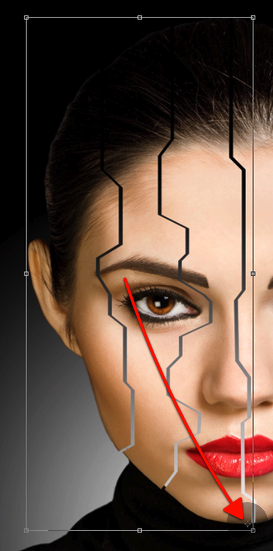
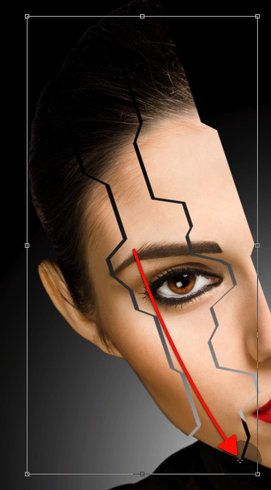
And drag the anchor point all the way down to the lower right corner at the tip of the section.
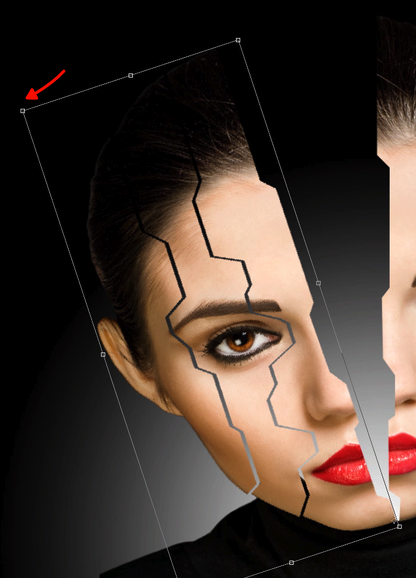
Now you can rotate, and you will see how the lower right corner stays put while the rest rotates.
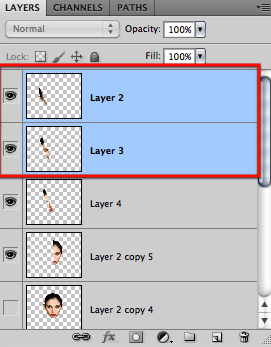
Now let’s just select these two pieces, drop the one closer to the rest of the face.
And again access the rotate command
Move the anchor way down right at the tip of the middle cut section as shown.
And now rotate these two pieces as shown here.
Now let’s just select the last piece further left (the one with the ear)
And once again access the rotate command.
Move the anchor point.
And rotate the last piece as shown here.
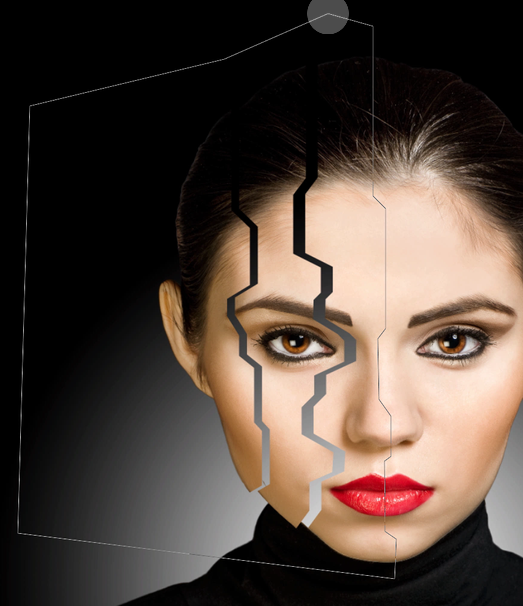
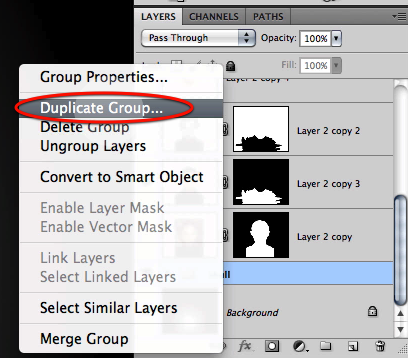
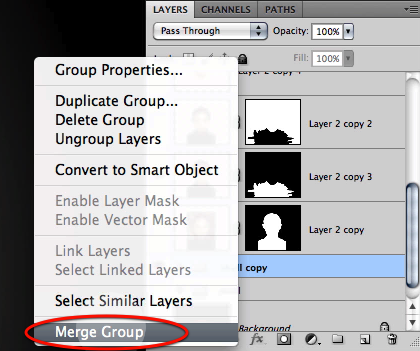
OK now we have our pieces spread nicely; let’s go back to the skull group, duplicate it and merge the duplicate.
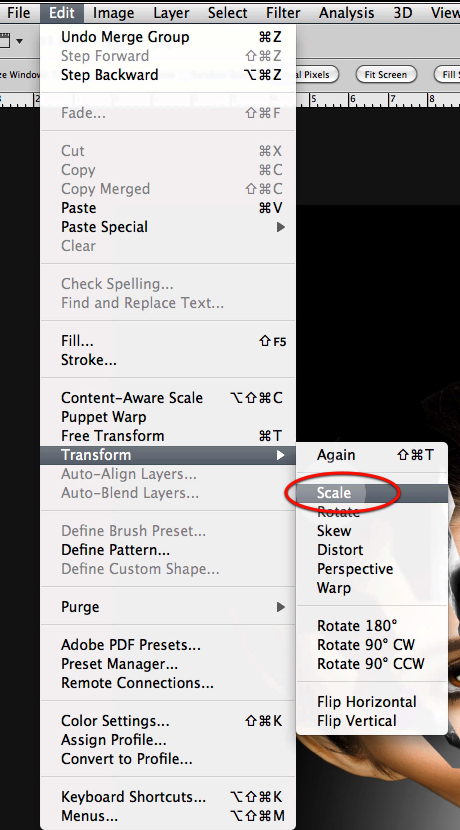
Now go to the scale command
And scale the skull as needed so it fits evenly for the head proportions.
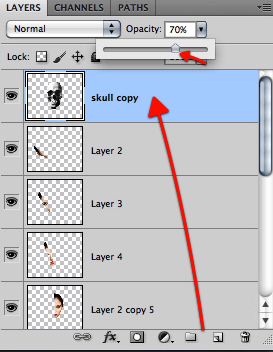
Now drag the skull merged group layer all the way to the top for now and reduce its opacity just a bit.
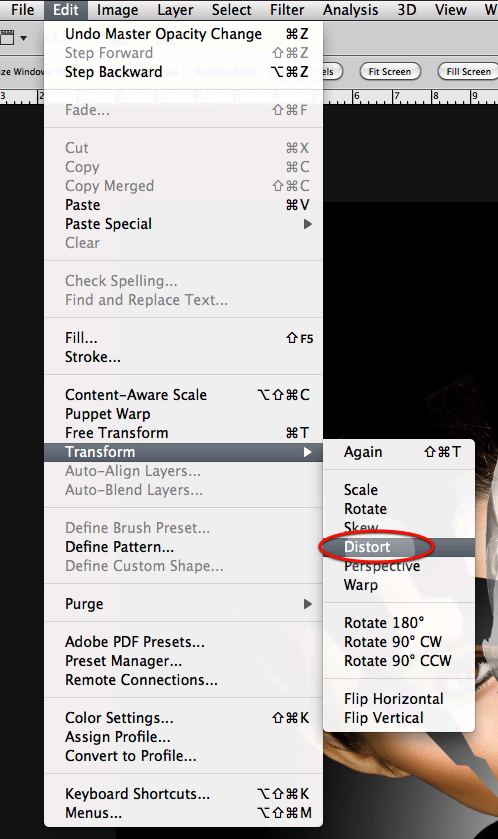
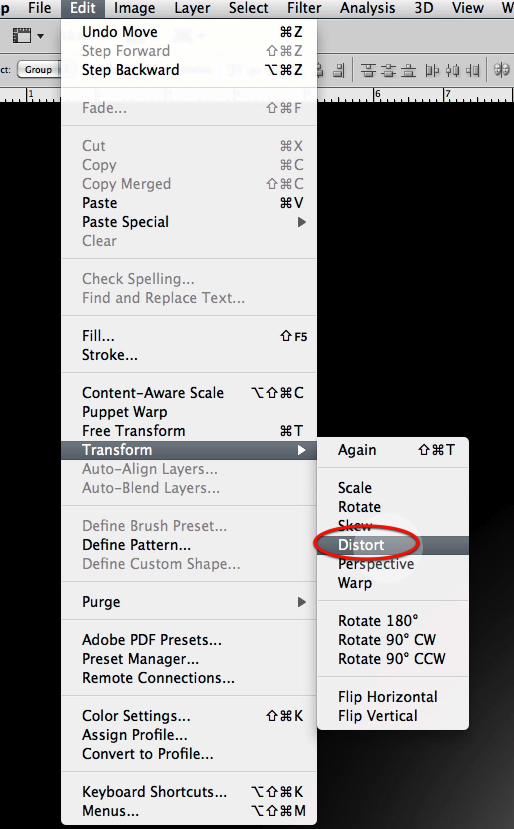
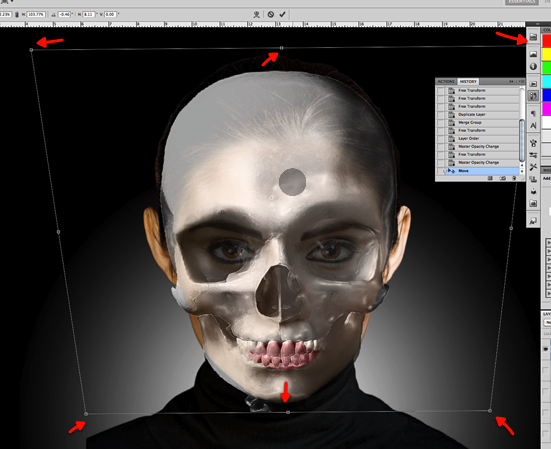
Go to the edit menu and select the distort command.
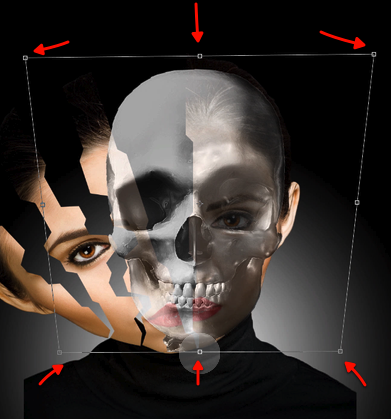
We need to make the skull fit our model so go ahead and distort evenly as shown here.
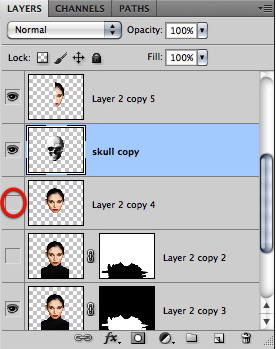
OK for now let’s hide all the pieces layers and enable the full face layer so we can clearly see the boundaries of it.
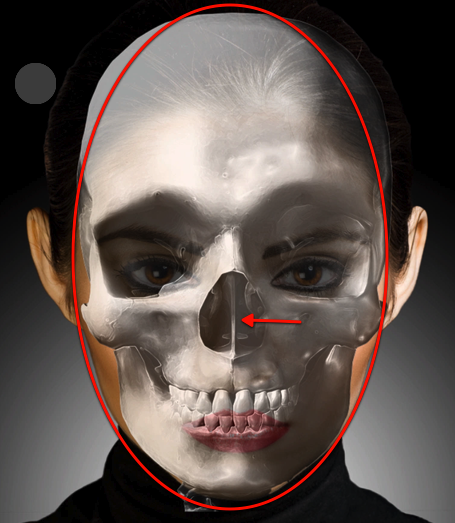
Let’s first center the skull in the face as indicated here.
And once again access the distort command
Fine tune the skull shape to fit the face as needed.
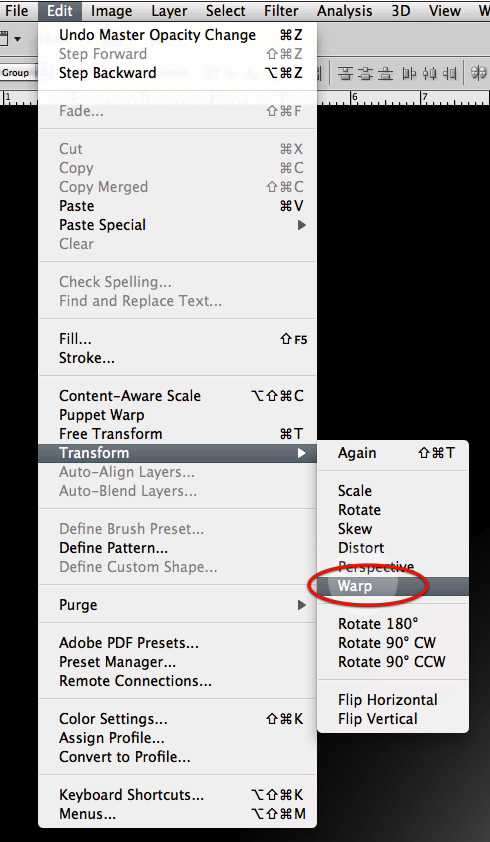
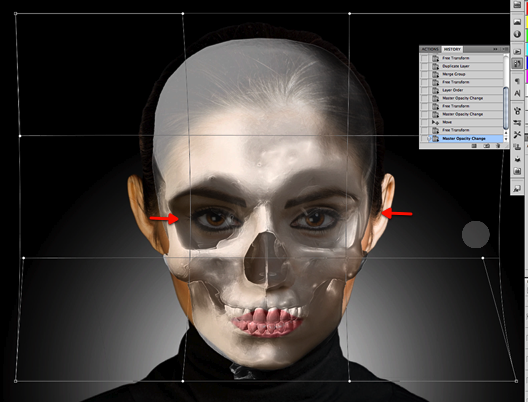
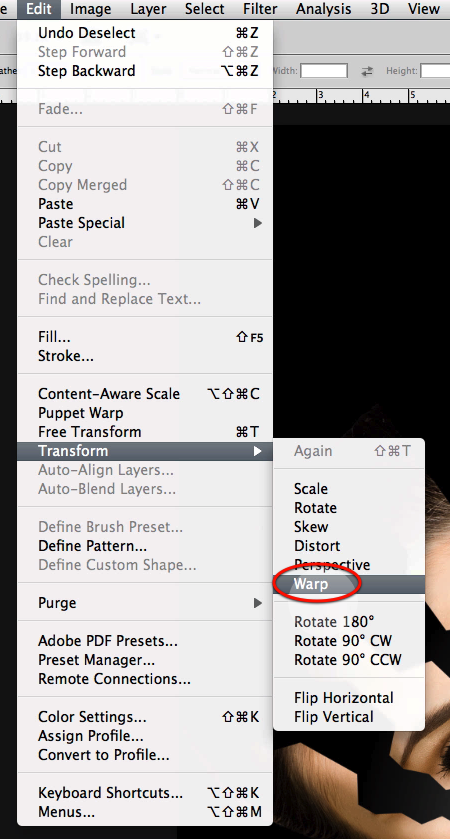
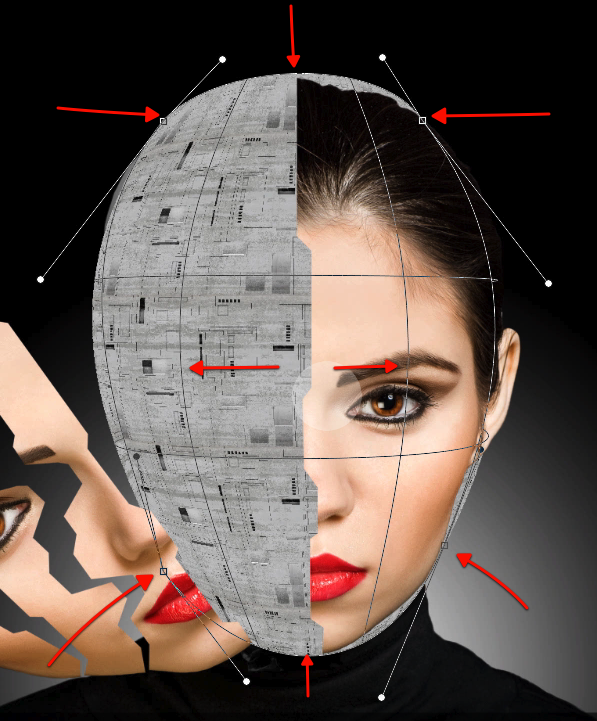
Now let’s use the warp command from the edit menu.
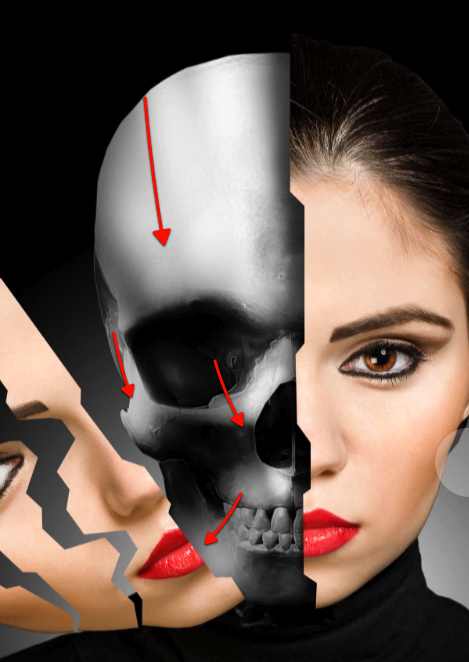
Use the lines to distort the skull a bit more so it fits inside the head boundaries and the eyes and nose align with the model.
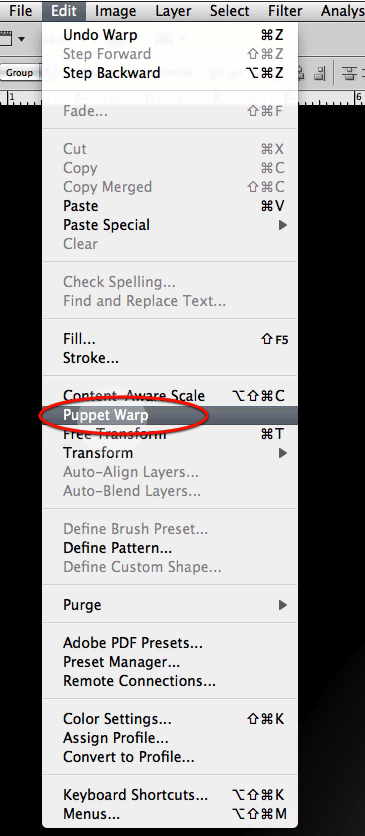
OK now to finalize we will access the puppet warp command from the edit menu.
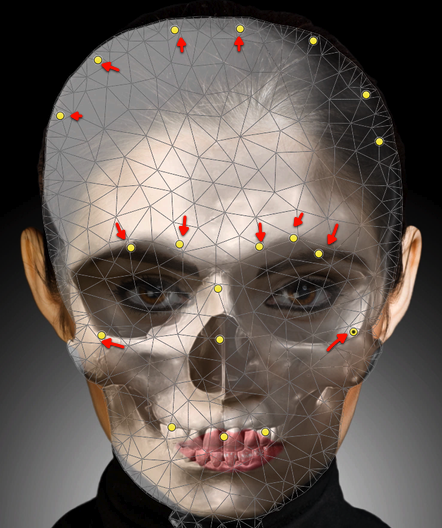
Once you have enabled the puppet warp, you will get a grid that covers all the selected layer content; now each time you click over the image you get a yellow anchor handle; so go ahead and click until you get all these, and then reposition them as shown to alter the shape of the skull a bit.
Now we can drag the layer down and restor its opacity to full.
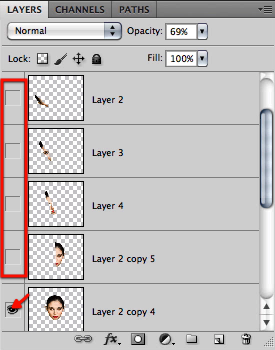
Also enable the face sections above and hide the full face layer below.
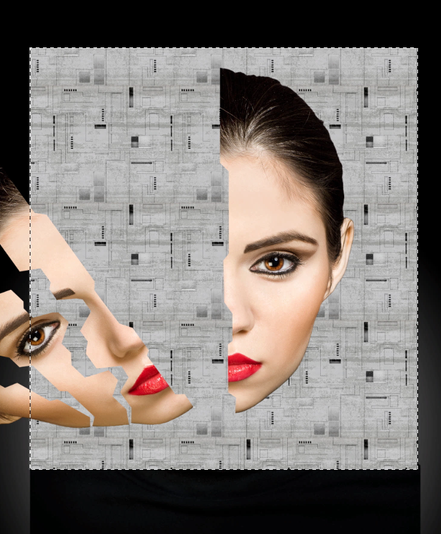
And here is what we have so far.
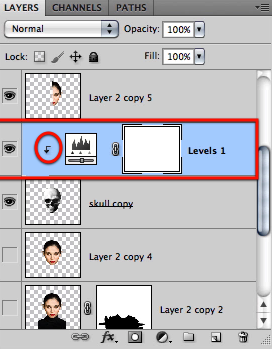
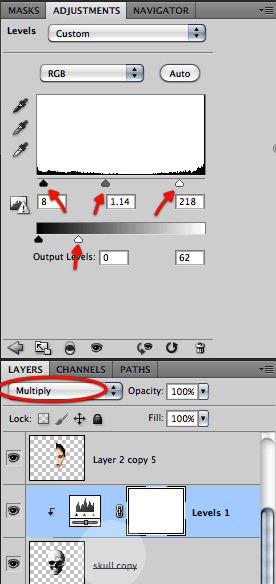
OK to continue we will ad a shadow layer for our skull; so go ahead and create one over the skull and make it a clipping mask.
Now adjust the layer as shown here and set its mode to multiply.
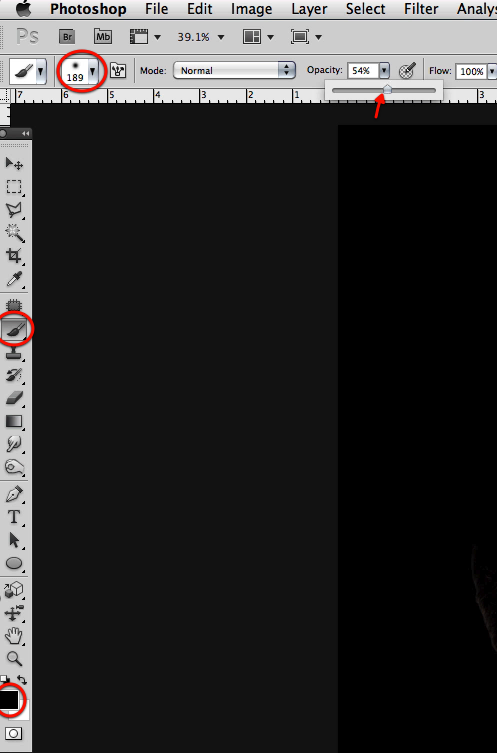
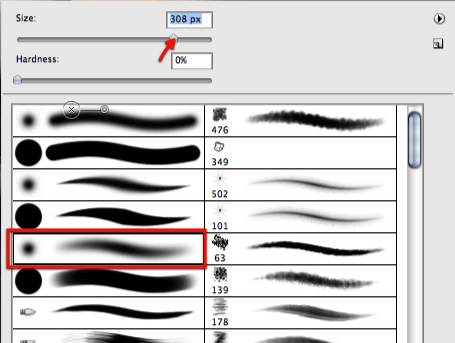
Let’s use a big soft brush and reduce its opacity a bit.
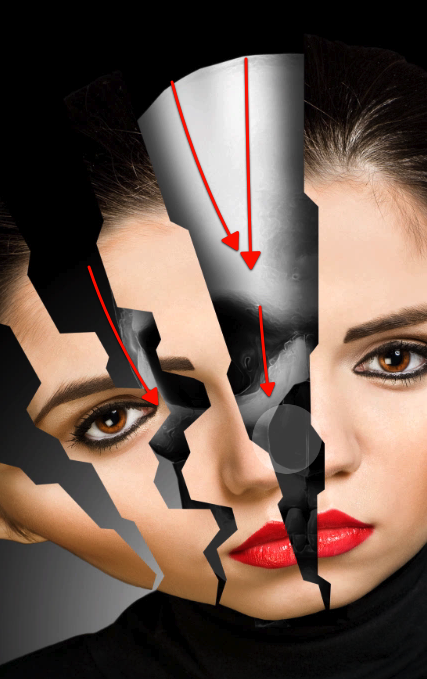
Now mask off the darkening effect of this layer where we would get light on to the skull in between the face pieces.
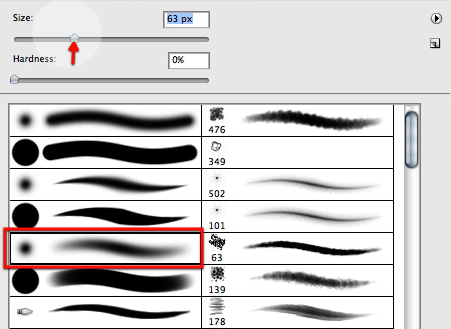
Now reduce the brush size a bit.
And refine the shading as indicated here.
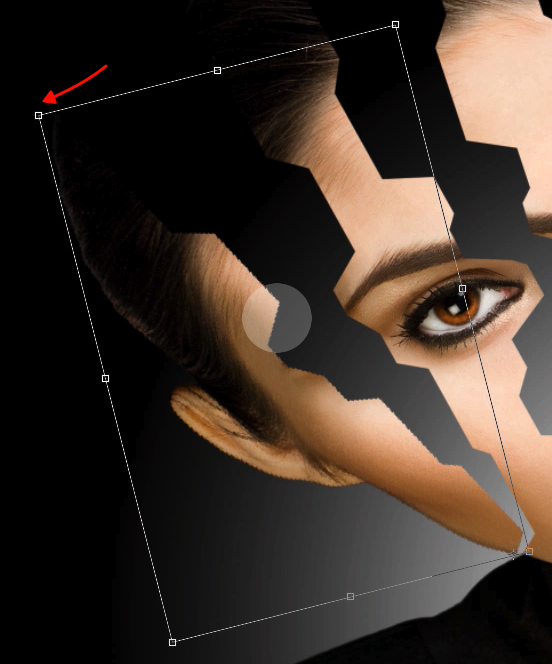
At this point I decided that the face sections are too much on top of the skull so let’s rotate them a bit more; so go ahead and select the three face piece layers.
Access the rotate command.
As we have done before readjust the central anchor point.
Then rotate a bit more so we can see almost all that half of the skull.
Let’s grab our soft brush again at about 300px
And let’s mask off the shading to adjust for the changes.
Now we will be adding some texture to the skull so create a new layer as shown here.
Let’s use the rectangular selection tool
Drag a square selection as seen here.
Fill the selection in the new layer with black.
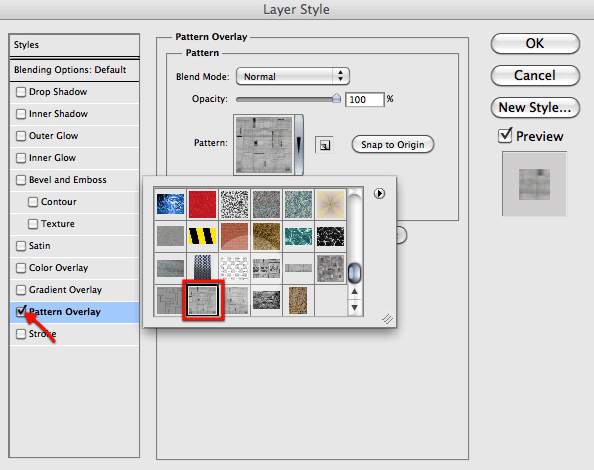
Once you have it filled, access the layer style by double clicking on the layer; and then enable pattern overlay, and select this pattern from the pat. file.
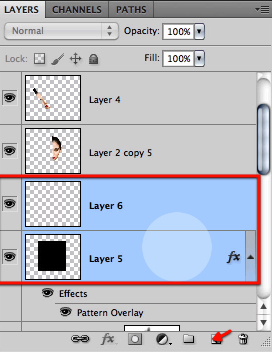
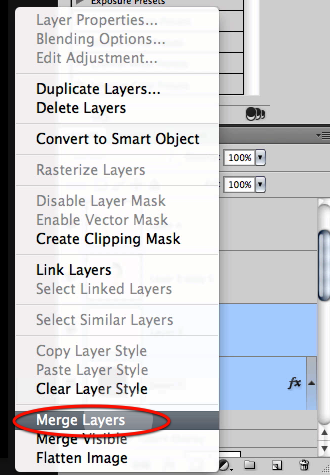
Then simply create a new layer and merge both so they are flattened.
This gives us a layer that now we can manipulate to fit our skull.
Then go ahead and access the warp command again.
We will do extensive use of this tool as shown here so we can reshape the texture to the shape of the skull.
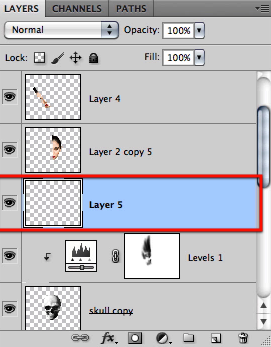
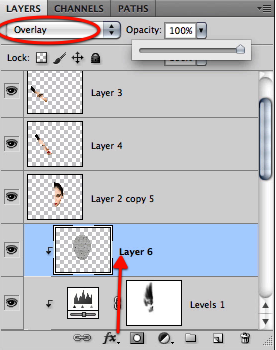
Then make the layer clipped to the skull layer, set its mode to overlay, and drag it on top the levels layer.
You can clearly see here the effect our texture provides.
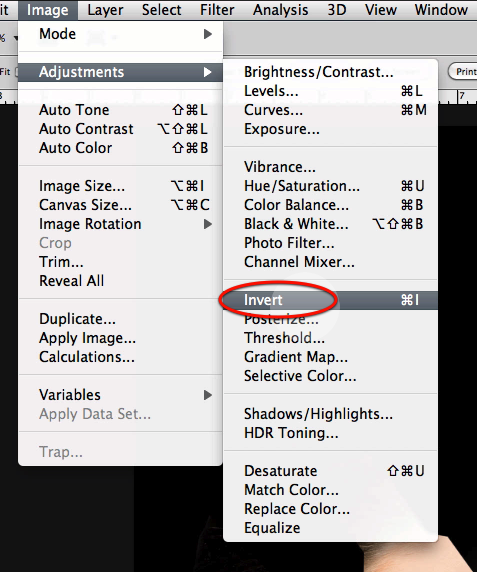
Finally just invert the layer.
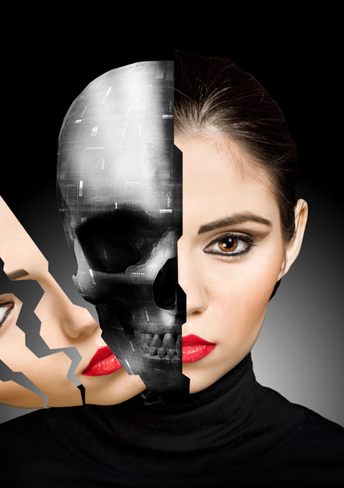
And we have our pieces cutout and a nice looking texture for our skull.


Тэги:
effect,
photo,
video
How to Create Eroded Metal Text With Photoshop
2011-07-29 19:00:38
... eroded metal text
effect. Throughout this ... Drag the
Effects of this layer ... of this
effect by changing ...
+ развернуть текст сохранённая копия

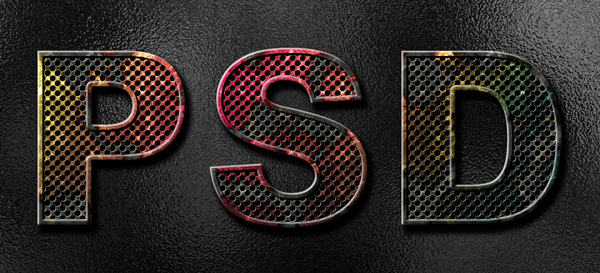
In this tutorial I’ll show you how to create an eroded metal text effect. Throughout this tutorial we’ll make use of various drawing techniques, channels, and patterns. Let’s get started!
Editor’s note: This tutorial was originally published on Psdtuts in September 2009.
Step 1
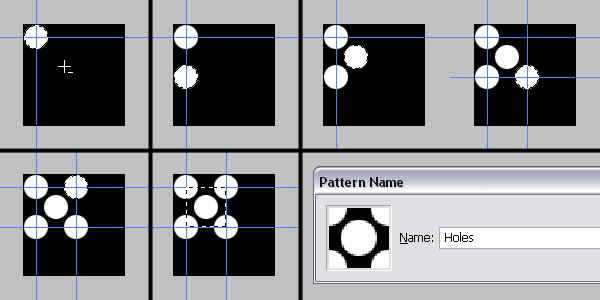
First we need to define a pattern of dots. Lets start by creating a new document 100 pixels wide and 100 pixels high, with a Resolution set to 300 pixels/inch. Fill the "Background" layer with black. Grab the Elliptical Marquee Tool, set the Style to a Fixed Size and set the Width and Height to 24 pixels. Click anywhere inside the canvas, then click inside the selection, drag and position it in the top-left corner of the canvas.
Fill the selection with white. Drag one vertical and one horizontal guide to the center of the selection. Hold down the Shift key, press Down the Arrow key four times to move the selection down 40 pixels. Fill it with white. Now move the selection 20 pixels up and 20 pixels right, then fill it with white again. Move the selection this time, 20 pixels down and 20 pixels right and fill with white.
Now drag two more guides to the center of the selection as in the image below. Move the selection 40 pixels up and fill with white once again. Now grab the Rectangular Marquee Tool and select the area between the crossing guides as shown below. Go to Edit > Define Pattern and name the pattern "Holes." Now that we have defined our pattern, you can close this document.
Step 2
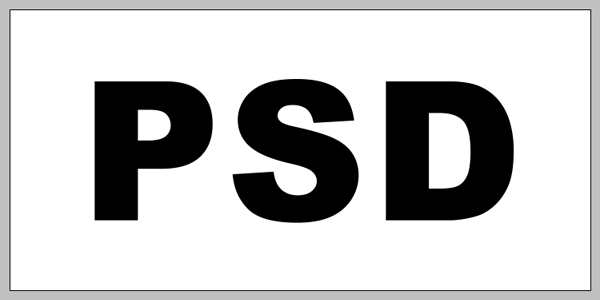
Now create a new document 1450 pixels wide and 700 pixels high at a resolution of 300 pixels/inch. Make sure the Color Mode is set to RGB. Use the Horizontal Type Tool to type your text. I used Arial Black at a size of 116 pt.
Step 3
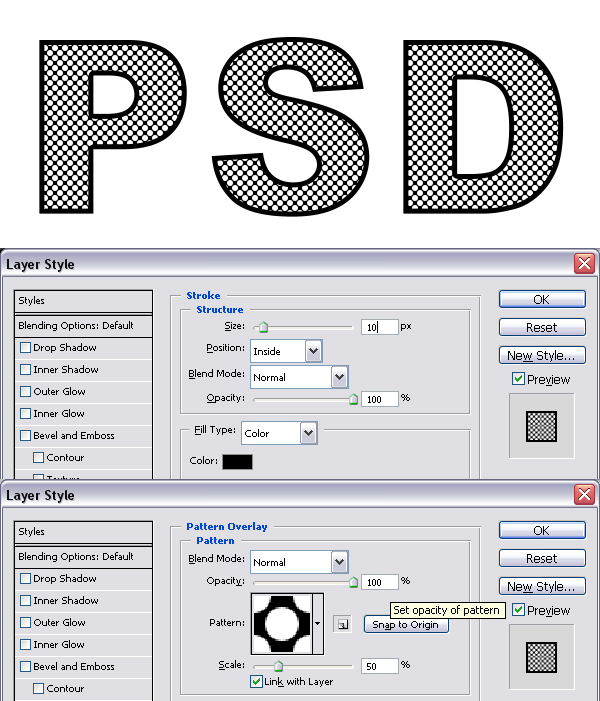
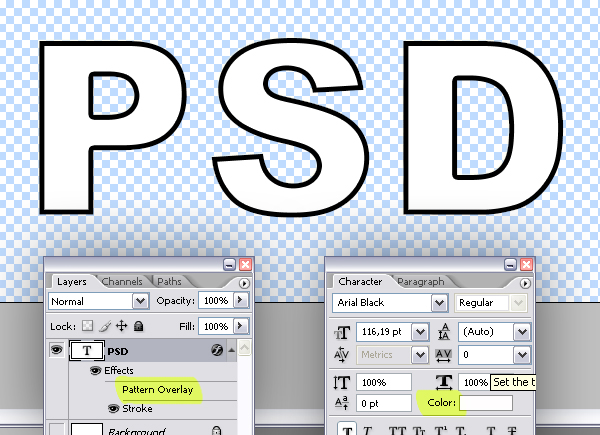
Now we’ll apply two Layer Styles. First apply a Stroke using these settings: Size set to 10 pixels, Position set to Inside, Blend Mode of Normal, Opacity at 100% and color set to black. Then apply a Pattern Overlay and use the following settings: Blend Mode set to Normal, Opacity at 100%, Pattern set to “Holes,” and scale set at 50%.
Step 4
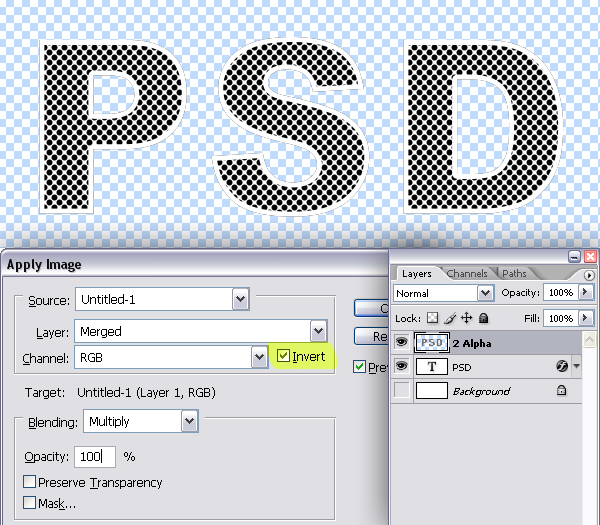
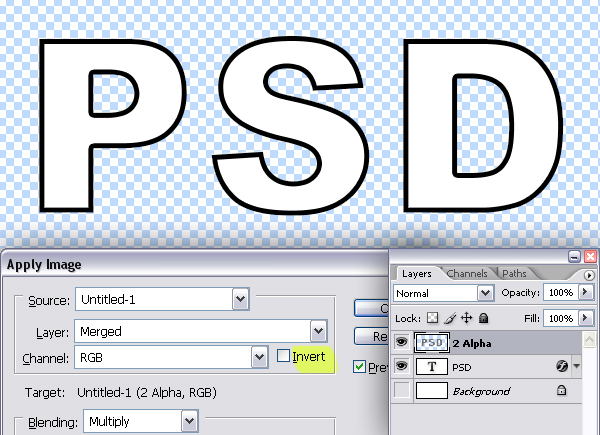
Make the "Background" layer invisible and create a new layer on top and name it "2 Alpha." Go to Image > Apply Image and check Invert. This will flatten the current visible layers in the selected layer and invert it.
Step 5
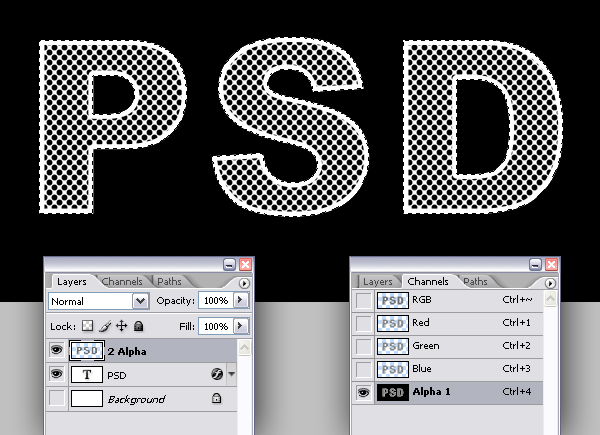
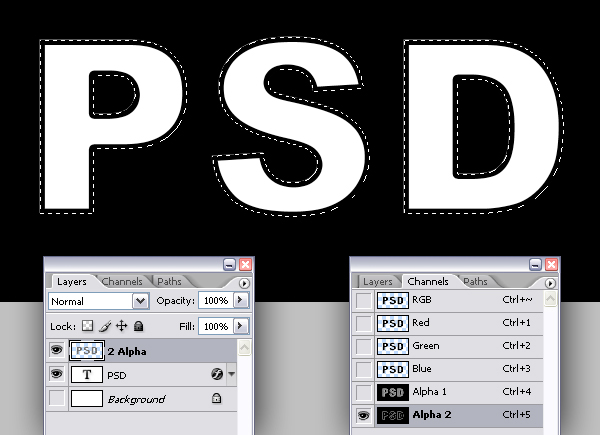
Command-click the "2 Alpha" layer to load the selection and hit Command + C to copy. Go to the Channels Palette and create a new Channel. Hit Command + V to paste. Hit Command + D to deselect.
Step 6
Go to the Layers Palette. We don’t need "2 Alpha" layers anymore so delete it. Turn off the visibility of the Pattern Overlay style of the "PSD" layer and set the Text Color to white. The layer is named "PSD" because I typed the text: "PSD". Your text layer is named whatever you typed.
Step 7
Create a new layer on top and again name it "2 Alpha" because this one will be going to an alpha channel. Make sure the "Background" layer is still invisible. Go to Image > Apply Image and uncheck Invert.
Step 8
Now Command-click the "2 Alpha" layer to load the selection and hit Command + C to copy, go to the Channels Palette and create a new channel, then hit Command + V to paste. While you’re in the Channels Palette, Command-click the "Alpha 1" channel to load the selection.
Step 9
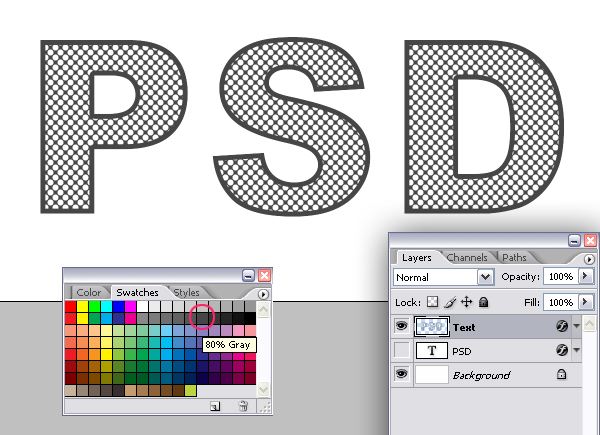
Go to the Layers Palette and create a new layer named "Text." Set your Foreground Color to 80% gray by hitting Alt + Backspace, then Deselect.
Step 10
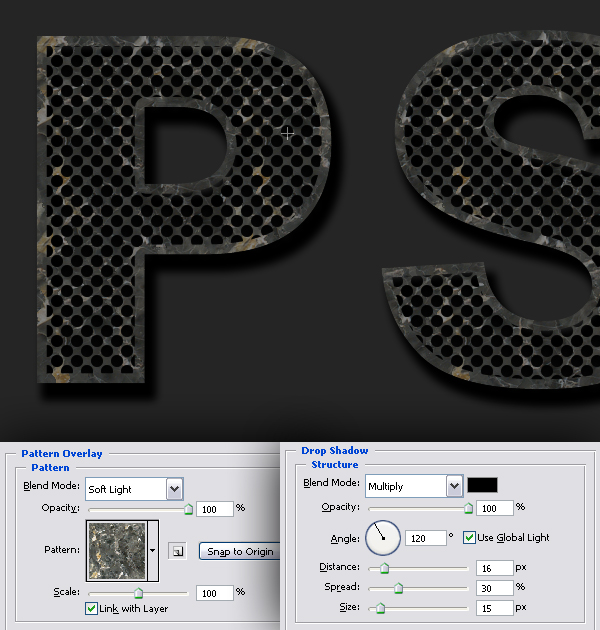
Since we’ll have a dark background in our final image, it’s a good idea to make the background darker now. So fill the "Background" layer with 90% gray. Now we’ll apply two Layer Styles to the "Text" layer. The first one is a Pattern Overlay with these settings: Blend Mode set to Soft Light, Opacity at 100%, Pattern set to “Black Marble,” which is located in the “Rock Patterns” and Scale set at 100%. The second Layer Style is a Drop Shadow with these settings: Blend Mode set to Multiply, Opacity at 100%, Angle set to 120 degrees, Distance set to 16 pixels, Spread set at 30% and Size set to 15 pixels.
Step 11
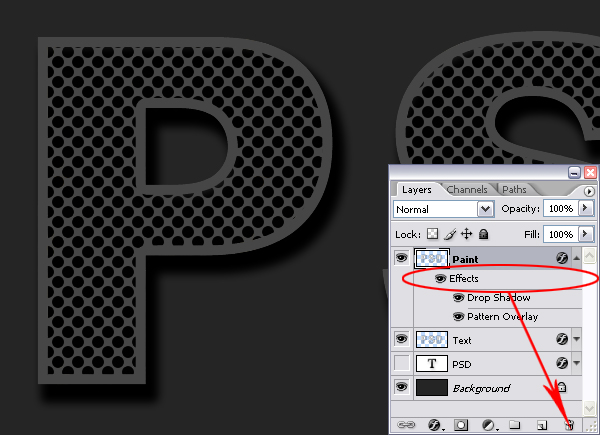
Go to Layer > Duplicate Layer and name the duplicate "Paint." Drag the Effects of this layer to the trash in the Layers Palette as shown below.
Step 12
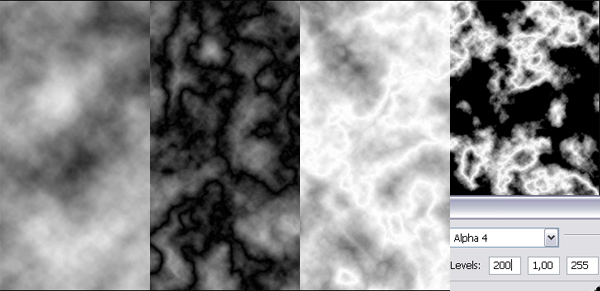
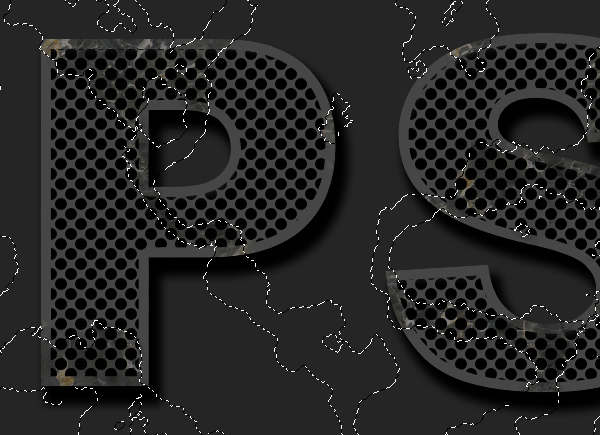
Go to Channels Palette and create a new channel. Go to Filter > Render > Clouds. Now go to Filter > Render > Difference Clouds. We’ll apply this filter twice more, so Press Command + F twice. Now go to Image > Adjustments > Invert. Go to Image > Adjustments > Levels (Command + L) and set the Input Levels to 200, 1, 255. The white areas in this image is going to be the eroded parts of the paint. Command-Click the channel to load the selection.
Step 13
Go to the "Paint" layer in the Layers Palette and hit Delete to clear the selected area. Go to Layer > Duplicate Layer and name it "Grain." Make the "Grain" layer invisible for now, then Deselect.
Step 14
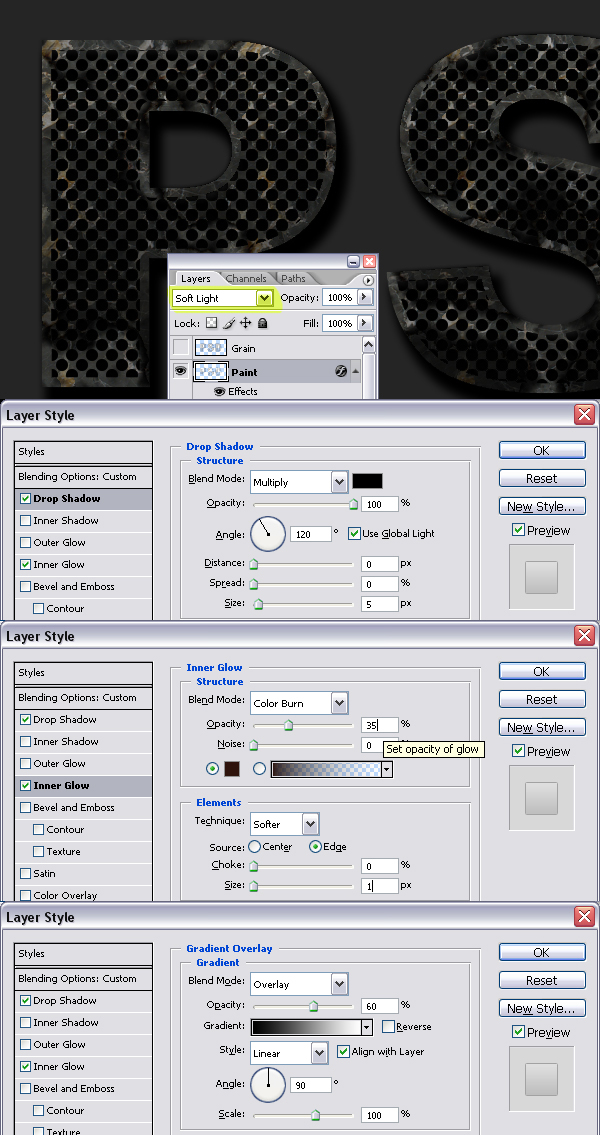
Go back to the "Paint" layer and apply a Drop Shadow Layer Style with these settings: Blend Mode set to Multiply, Opacity at 100%, Angle set to 120 degrees, Distance and Spread set to 0, and Size set to 5 pixels. Apply an Inner Glow and use these settings: Blend Mode of Color Burn, Opacity at 35%, and Size set to 1 pixel. Now apply a Gradient Overlay with these settings: Blend Mode set to Overlay, Opacity at 60%, Gradient set to Black and White, Style set to Linear and Angle set to 90 degrees. Set the "Paint" layer Blending Mode to Soft Light.
Step 15
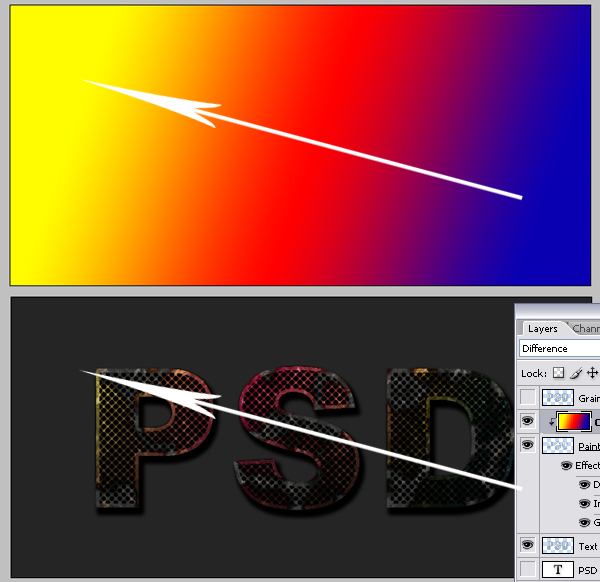
Create a new layer above the "Paint" layer and name it "Color." Grab the Gradient Tool, open the Gradient picker in the Tool Options and pick: Blue, Red, Yellow. Set it to Linear Gradient and fill the layer as shown below. Hold down the Alt key and click the line between the "Paint" and "Color" layers to define the "Paint" layer as a Clipping Mask. Set the "Color" layer Blending Mode to Difference.
Step 16
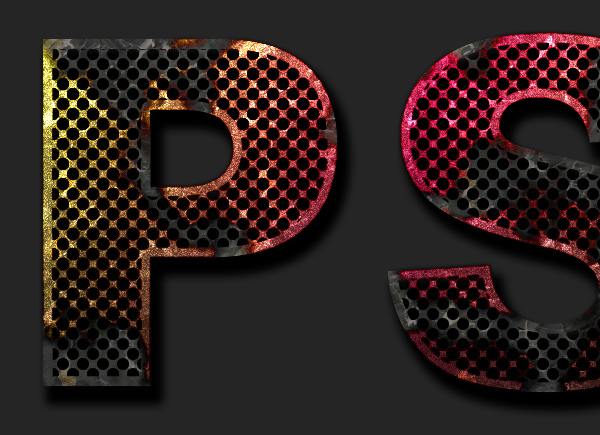
Go to the "Grain" layer in the Layers Palette and make it visible. Go to Filter > Artistic > Film Grain. Set the Grain to 10, Highlight Area and Intensity to 0, and set the Blending Mode for the layer to Color Dodge.
Step 17
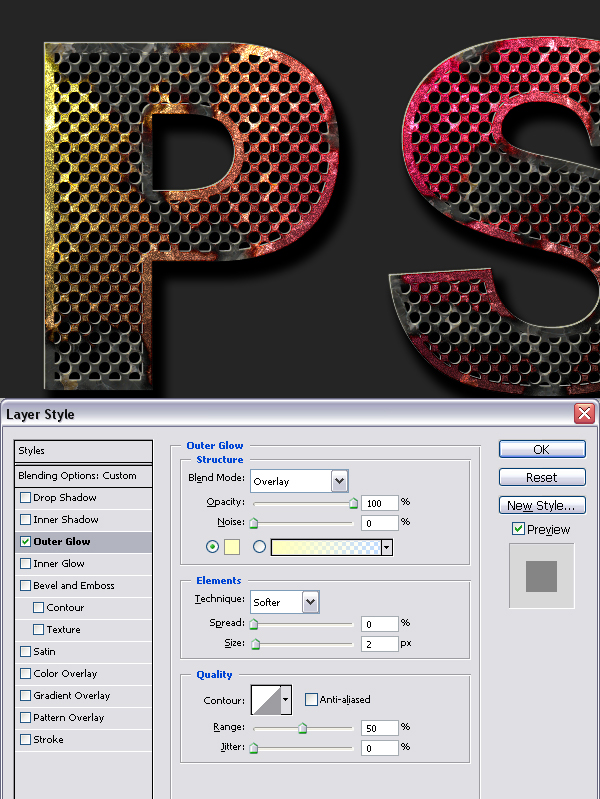
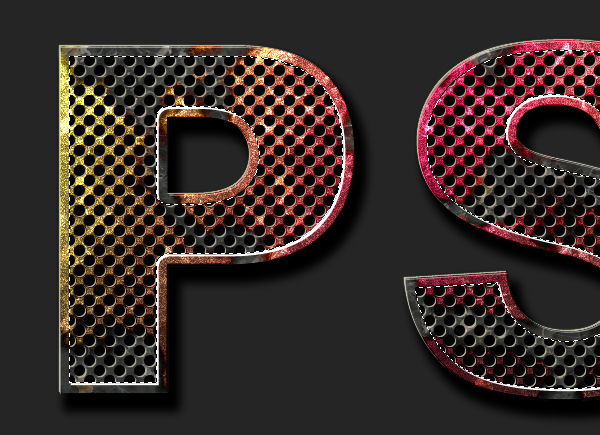
Command-click the "Text" layer to load the selection. Create a new layer on top and name it "Highlight." Grab the Elliptical Marquee Tool and use the Arrow keys to move the selection 1 pixel left and 1 pixel up. Fill the selection with white. Move the selection 1 pixel right and 1 pixel down, back to where it was and hit Delete to clear. Apply an Outer Glow Layer Style to the "Highlight" layer using these settings: Blend Mode of Overlay, Opacity at 100%, and Size set to 2 pixels.
Step 18
Go to the Channels Palette and Command-click "Alpha 2" to load the selection. Go back to the Layers Palette and create a new layer on top. Name it "Highlight 2." Move the selection 2 pixels right and 2 pixels down. Fill the selection with white. Now move the selection 2 pixels left and 2 pixels up and hit Delete to clear. Now deselect.
Step 19
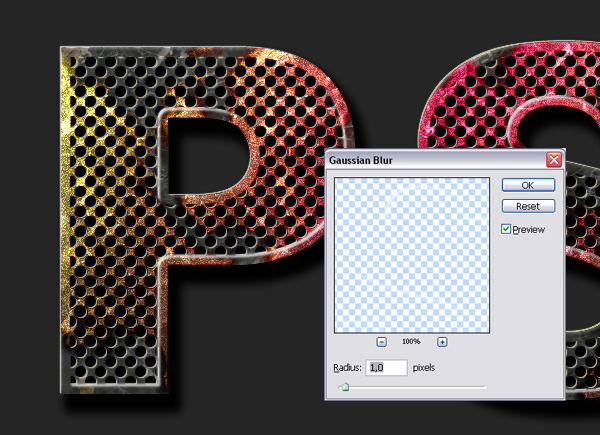
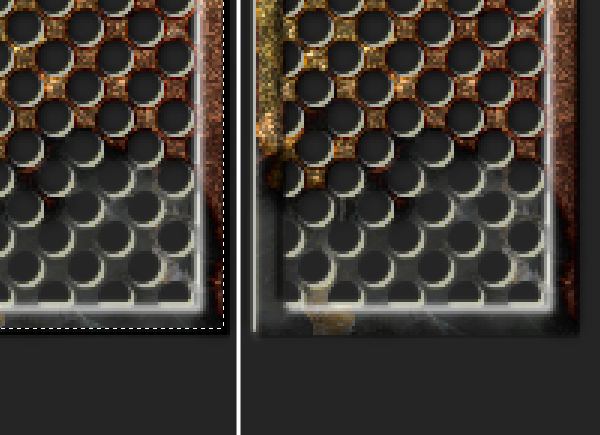
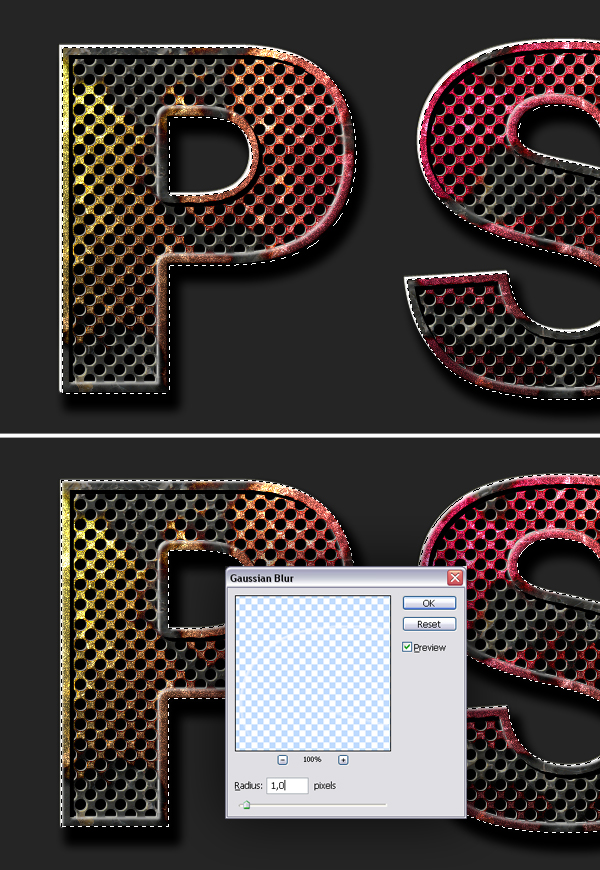
Go to Filter > Blur > Gaussian Blur and apply with a Radius of 1 pixel. This is going to smooth the highlight.
Step 20
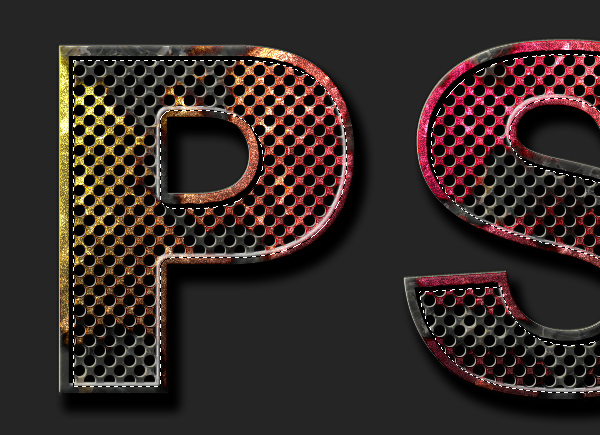
Go to the Channels Palette and Command-click "Alpha 2" to load the selection again. Go back to the Layers Palette and create a new layer on top and name it "Shade." Move the selection 2 pixels left and 2 pixels up. Fill the selection with black. Now move the selection 2 pixels right and 2 pixels down and hit Delete to clear.
Step 21
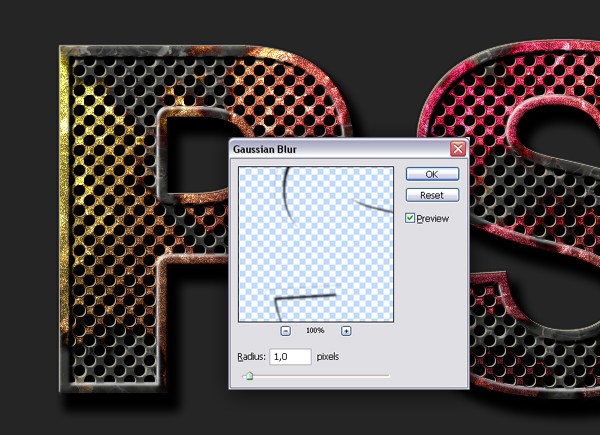
Deselect by hitting Command + D. Go to Filter > Blur > Gaussian Blur and apply with a Radius of 1 pixel.
Step 22
Command-click the "PSD" layer to load the selection. Create a new layer on top and name it "Shade 2." Fill the layer with Black. Move the selection 2 pixels up and 2 pixels left, then hit Delete to clear. Command-click the "PSD" layer again. Go to Filter > Blur > Gaussian Blur and apply with a Radius of 2 pixels.
Step 23
Command-click the "PSD" layer again and load it’s pixels. Create a new layer on top and name it "Highlight 3." Fill the selection with black. Move the selection 2 pixels down and 2 pixels right and hit Delete to clear. Command-click the "PSD" layer and load the selection again, because we don’t want this highlight to be blurred towards the outside. Now go to Filter > Blur > Gaussian Blur and apply with a Radius of 1 pixel. Deselect by hitting Command + D.
Step 24
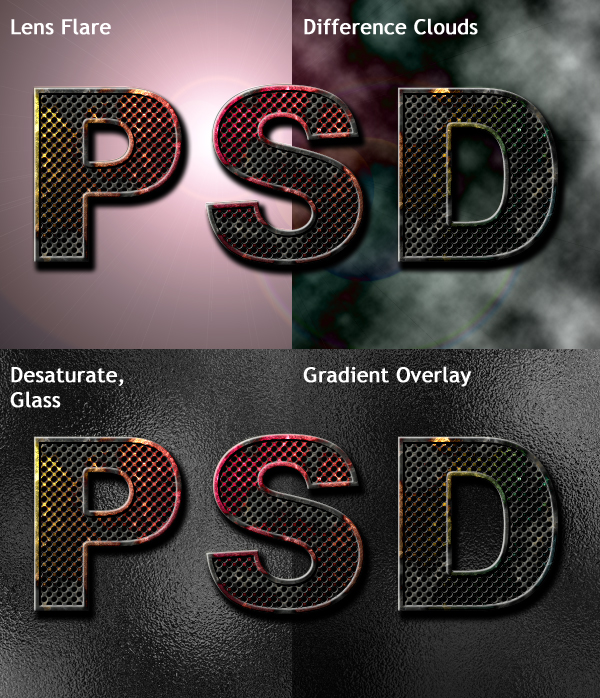
Create a new layer above the "Background" layer and name it "Texture." Fill the layer with black. Go to Filter > Render > Lens Flare. Set the Brightness at 160% and set the Lens Type to 50-300 mm zoom. Then go to Filter > Render > Difference Clouds. Go to Image > Adjustments > Desaturate. Apply a Glass filter by going to Filter > Distort > Glass and use these settings: Distortion set to 20, Smoothness set to 2, and Scaling set at 100%. Finally, apply a Gradient Overlay Style to this layer and use these settings: Blend mode of Multiply and Opacity set at 70%.
Step 25
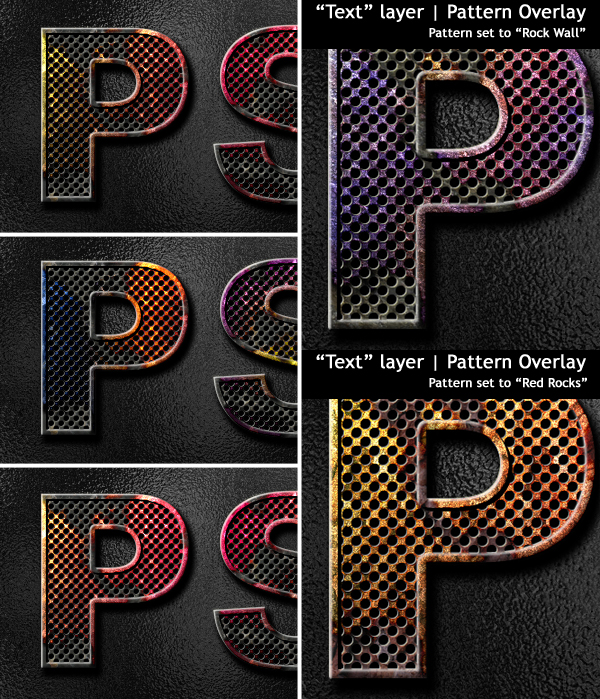
You can achieve different variations of this effect by changing the gradient or color of the "Color" layer and changing the Texture of the Pattern Overlay Layer Style of the "Text" layer.
Conclusion
Yes that’s it! I hope you learned something new and enjoyed this tutorial!
Subscribe to the Psdtuts+ RSS Feed for the best Photoshop tuts and articles on the web.


Тэги:
effect,
text
Create a Surreal Advertising Photo Manipulation – Psd Premium Tutorial
2011-07-28 17:00:53
... pull off this
effect, we’ll ...
+ развернуть текст сохранённая копия

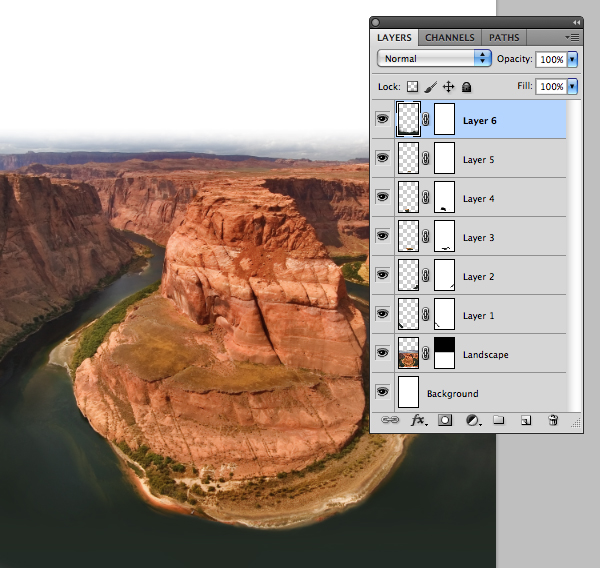
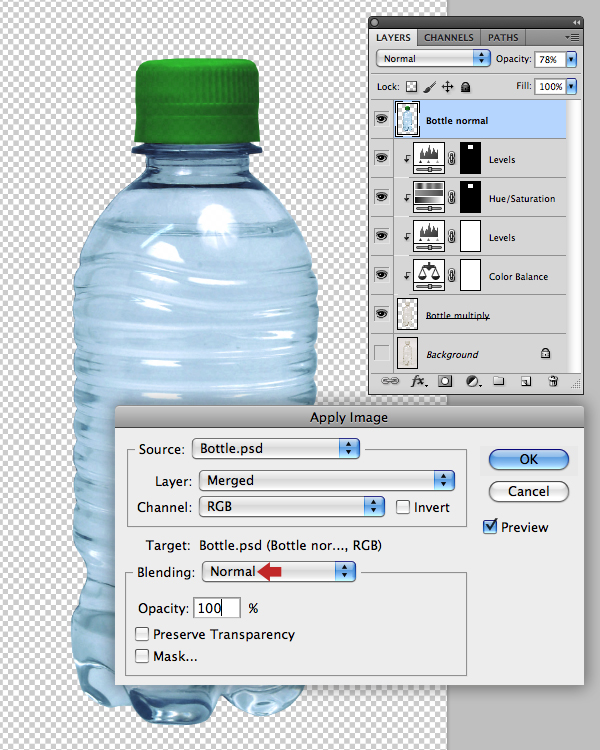
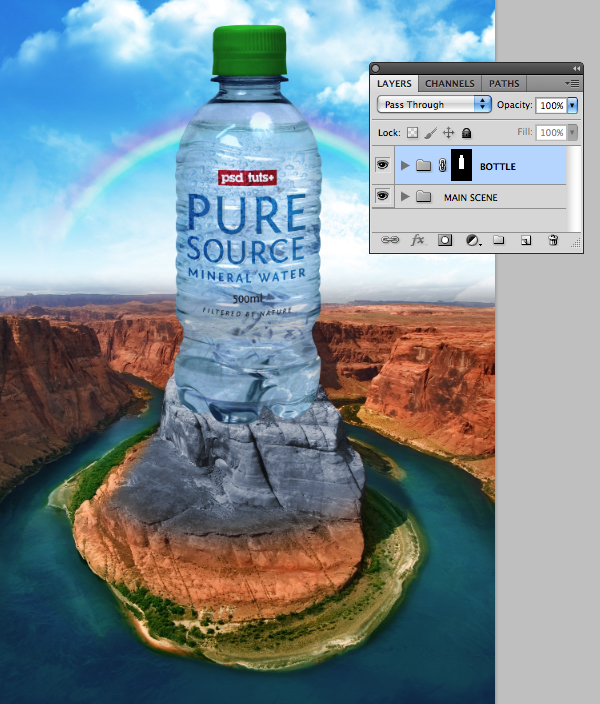
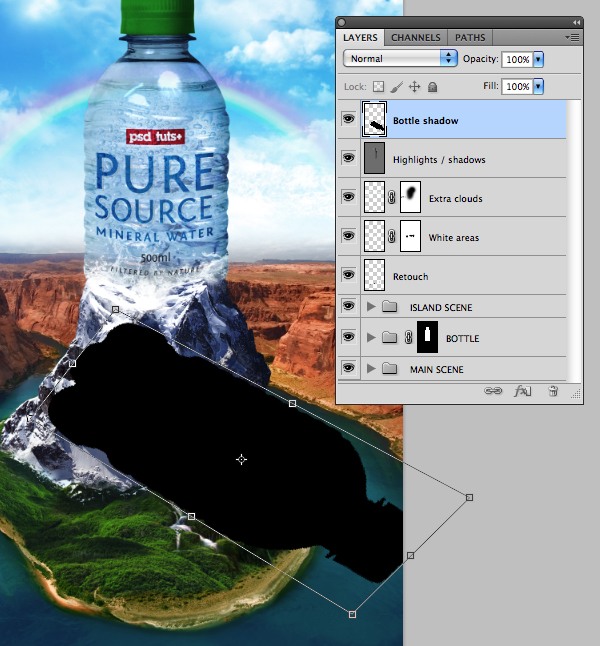
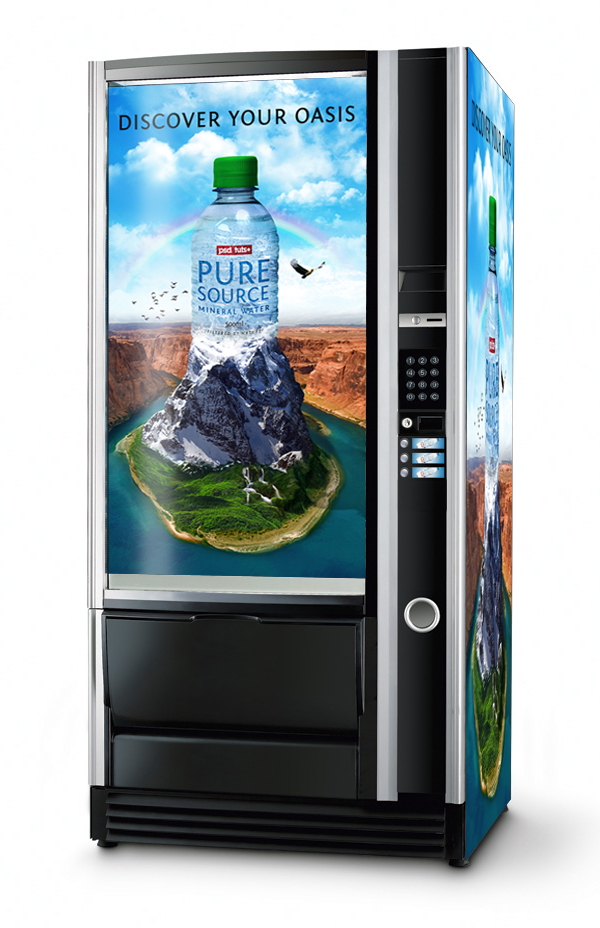
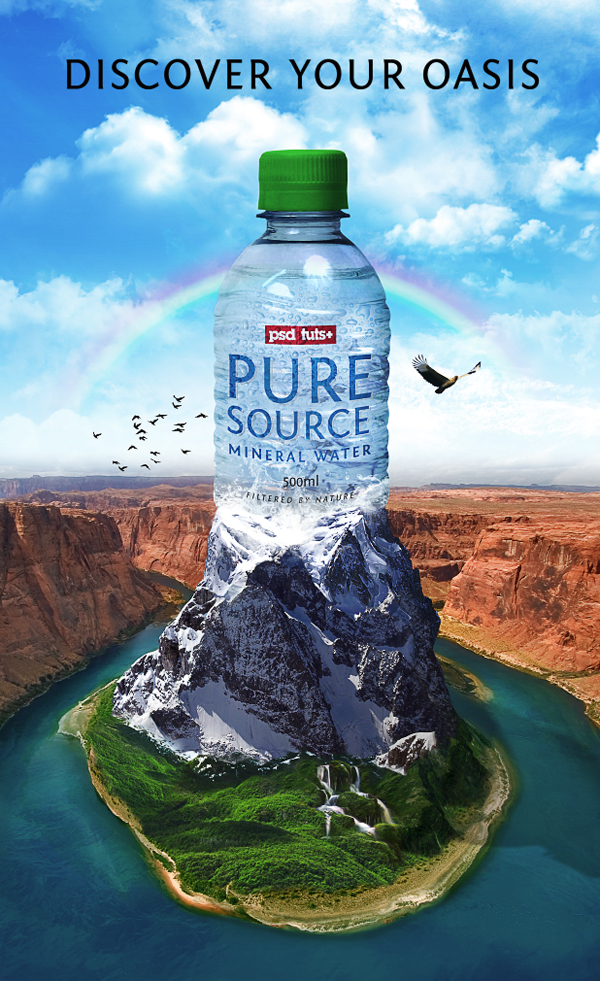
This Psd Premium tutorial by author Mark Mayers will take inspiration from the surrealist art movement and will demonstrate how to blend stock images to create an illustration that could be applied to anything from drinks machines to point-of-sale displays. Observing how light reacts in the real-world is a key factor when combing multiple photographs – all of which have different degrees of light, shadow and color. To pull off this effect, we’ll make extensive use of Adjustment Layers as well as some advanced masking techniques. This tutorial is available exclusively to Premium Members. If you are looking to take your print and t-shirt design skills to the next level then Log in or Join Now to get started!
About the Author
Author Mark Mayers is a talented designer and illustrator from the UK. He has worked as a designer and creative director for several design/advertising agencies and specializes in print, branding, packaging, and exhibition graphics. Mark began his career when the tools of the trade were markers, layout pads, and most importantly, the ability to draw, but he embraced the digital revolution in the early 90′s and swapped his drawing board for a Mac. Today, Mark freelances from his studio in Cornwall for such clients as American Express, BMW, Future Publishing, IDG Communications and Imagine Publishing.
Professional and Detailed Instructions Inside
Premium members can Log in and Download! Otherwise, Join Now! Below are some sample images from this tutorial.
Final Image
Psd Premium Membership
As you know, we run a premium membership system here that costs $9 a month (or $22 for 3 months!) which gives members access to the Source files for tutorials as well as periodic extra tutorials, like this one! You’ll also get access to Net Premium and Vector Premium, too. If you’re a Premium member, you can Log in and Download the Tutorial. If you’re not a member, you can of course Join Today!


Тэги:
effect,
photo,
premium
Create a Panoramic Photo Manipulation in Photoshop (Part 1: Making The Panorama)
2011-07-25 17:00:55
;return false"><small>+ развернуть текст</small></a> <a href="/blogs/73492/posts/id/4233271/create_a_panoramic_photo_manipulation_in_photoshop_part_1_making_the_panorama.php"><small>сохранённая копия</small></a><br />
<div id="post_4233271" style="display: none"><br />
<img src=)
This entry is part 1 of 1 in the series Panoramic Photo Manipulation
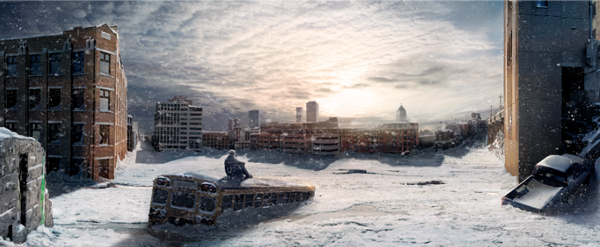
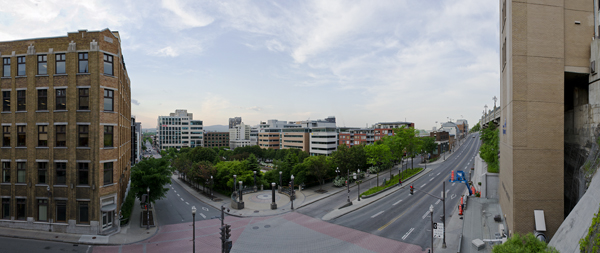
In this two-part tutorial, we will demonstrate how to create a panoramic post-apocalyptic photo manipulation in Photoshop. In part 1 we will explain how to shoot the needed photos, how to make batch adjustments in Camera Raw, automatic alignment and merging, and then how to correct the perspective. In part 2 we will show how to use this panoramic image to create a snowy, post apocalyptic photo manipulation. Let’s get started!
Preview of Part 2
In Part 2 of this tutorial, we will transform this scene into a post-apocalyptic matte painting. Stay tuned!
Before Getting Started
Now before we get started, Alvaro Guzman made a really good tutorial about making panorama on this site about which you can find here. I highly recommend you read this prior to this tutorial as the techniques he showed, especially the first 3 steps are good and I won’t cover them here. In this tutorial, we will use an alternative way to merge the pictures together.
In addition to his very useful tutorial, I would add three additional insights about shooting of the photos.
#1 – Use and SLR camera
If you plan on making a panorama, I highly recommend you use a professional camera. Those allow you to manage shutter speed and aperture by yourself, so you can make sure they stay the same for every shot, ensuing consistency throughout the pictures, which is indispensable for a quality panorama. I also recommend you set your camera on manual focus after you took the first picture to make sure the depth of field remain the same.
#2 – Set the image quality to RAW format
Another reason I recommend using a professional camera is because they come with the option to take your photo in RAW quality. I won’t go much into details about the format (you can get more information here, but you can see it as an unprocessed film in traditional photography: it gives you greater management over your photos, which we’ll get into later in this tutorial.
#3 – Place the camera vertically
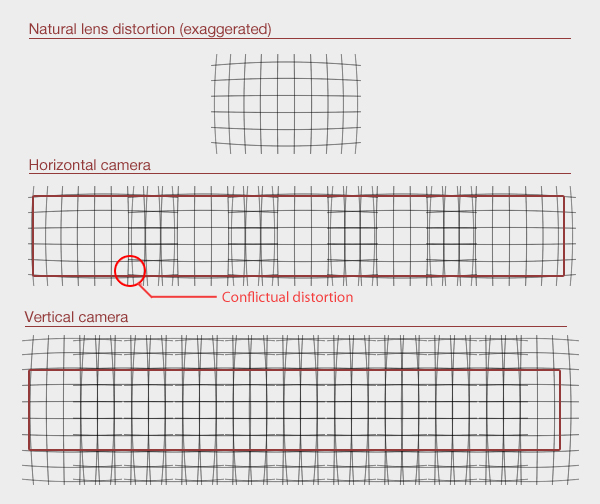
This is a really good tip when doing a horizontal panorama. Basically, every camera lens will cause a slight natural distortion in the picture. These would probably not even be noticeable on a single photo, but might become problematic when trying to stitch multiples photos together. Placing the camera in a vertical position will allow less distortion conflict since the left and right part of your picture will be less affected by the distortion. For a better understanding, you may refer on the following image.
However, I must point out that in our tutorial, this tip will not prove as helpful since we will be making a 3-row panorama in which distortion will be unavoidable.
Step 1 – Opening the images in Camera Raw
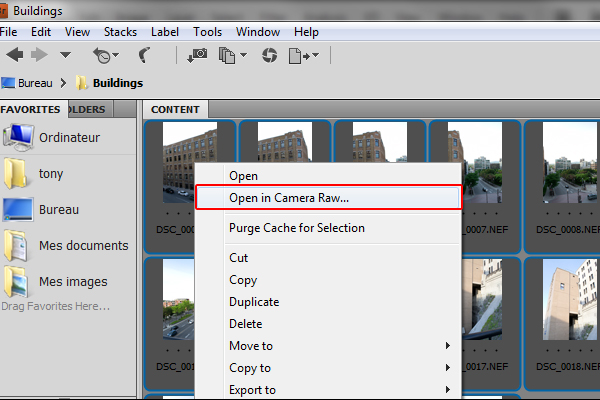
First off, lets start by opening Adobe Bridge. Locate your picture’s folder and open the “Building” folder. Select all the pictures in the folder, right-click and select “Open in Camera Raw”.
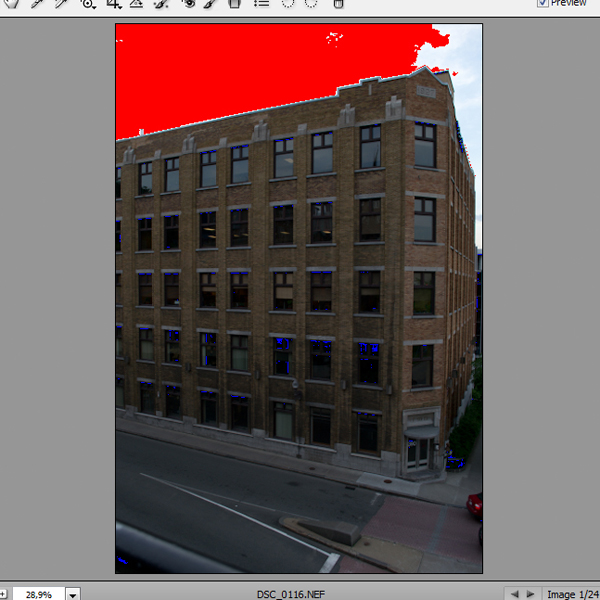
If you haven’t already, press U and O to toggle both the Shadow and Highlight Clipping Warning. You should get something like the image below.
You can see the sky is filled with red and that there are some blue areas on the buildings. This is a warning that, given these settings, the image will retain no color information except pure black and white for those area, which is usually a bad thing. Don’t worry, we will get to fix this later.
Step 2 – Camera Raw adjustments
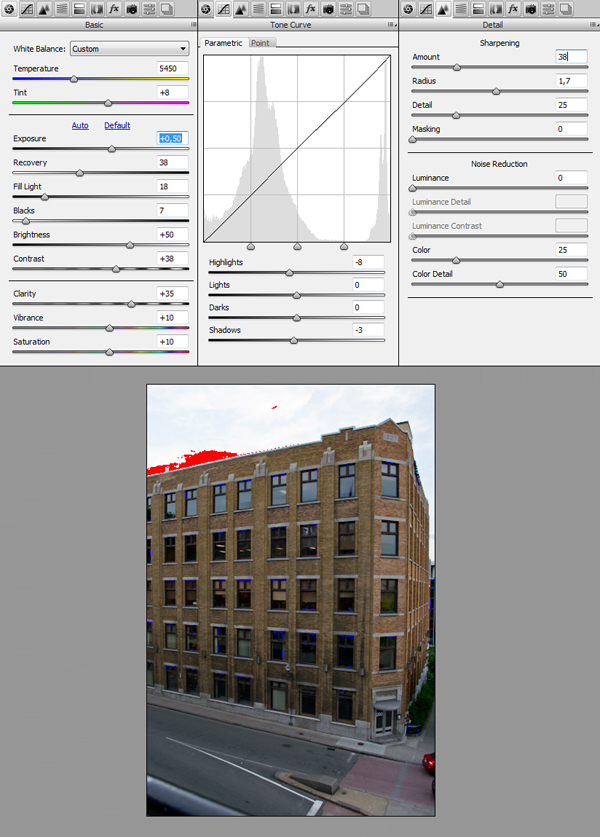
Now I am not a Camera Raw expert, but I added the following adjustments to my image. Basically, I tried managing the Temperature and the Tint so the gray areas have a balanced amount of red, green, and blue. I used the Recover and Fill Light slider to restore some of the burned black and white area. I also gave the image a little bit of sharpening and saturation.
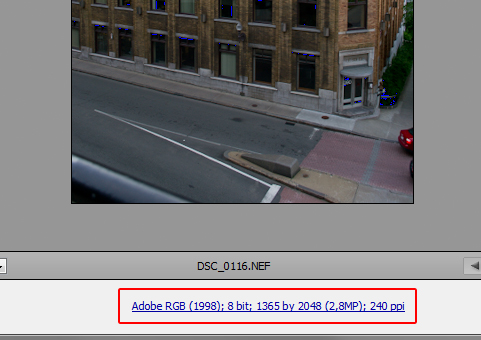
Once you are done, you can click on the little line of text underneath the preview area.
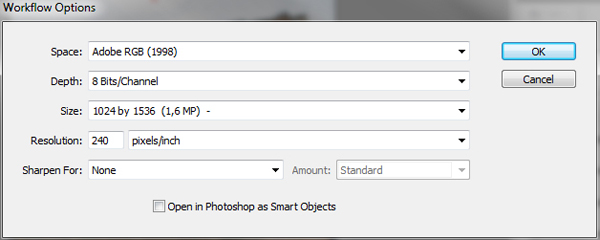
This area allows you to manage some technical aspects of your pictures. If it isn’t selected yet, pick the Adobe RGB (1998) color setting. Since this is just a tutorial and because the images are large and would take a long time to process later on, I dropped the size to 1024 by 1536 pixels. However, for a more professional result, or if you want to preserve your image’s quality, you should go with the setting that have no + or – at the end. Once you are done, press Ok.
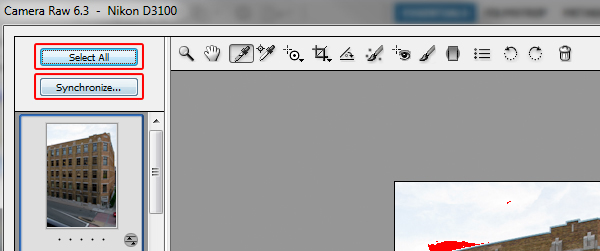
Once you are satisfied with the result, Click on the Select All button located in the top left area of the window, and then click Synchronize. Another window will pop up showing what setting you want to apply to your photos. Click Ok and then press Done to close the Camera Raw interface.
Step 3 – Photoshop alignment and merging
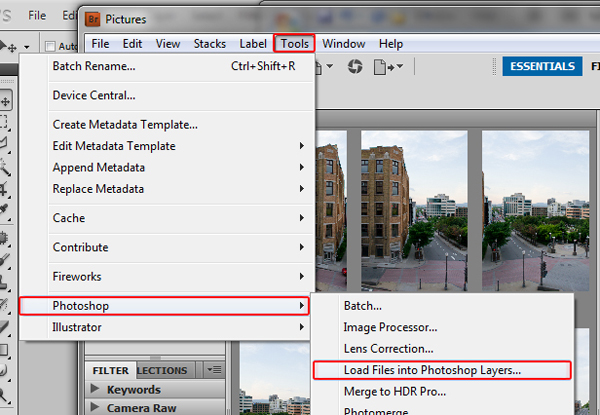
Back to Bridge, select you pictures once again, then this time, go to Tools > Photoshop > Load Files into Photoshop Layers. This process might take a while.
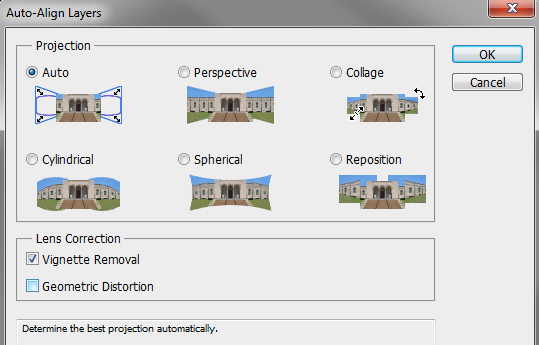
You should now have one Photoshop file with all the photos on individual layers. While having all your layers selected (click the first one, hold Shift and click the last one), go to Edit > Auto-Align Layers. A window should pop up offering multiples way of aligning your layers depending on what result you want. Pick Auto and check both Vignette Removal and Geometric Distortion, then press Ok. If you haven’t reduced the image size in the previous step, arm yourself with patience as this process might also take quite a while.
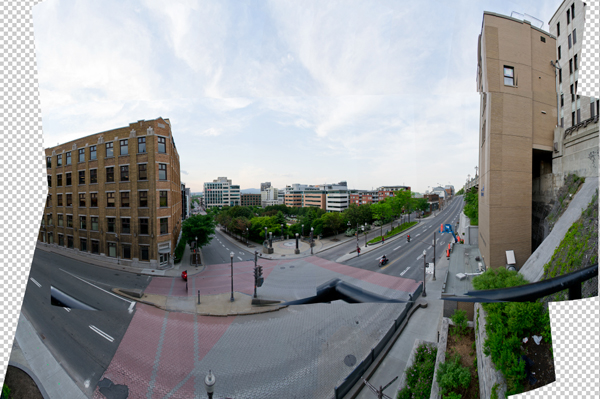
You should get something like this.
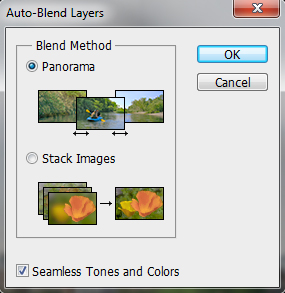
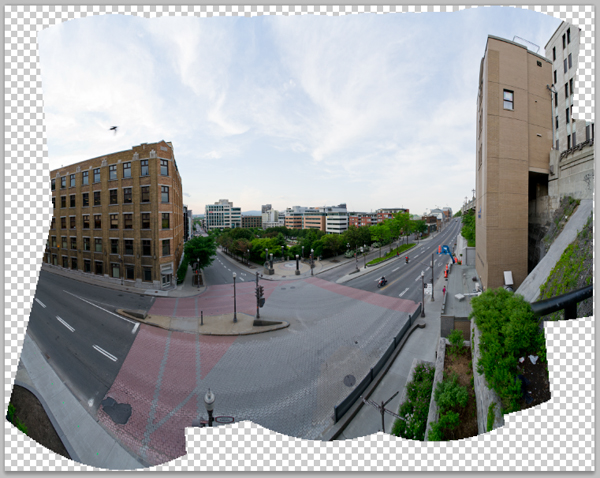
Then, with all your layers selected, go to Edit > Auto-Blend Layers. Another window should pop up asking you if you want a panorama or to stack images. Pick Panorama; check Seamless Tones and Colors, then press Ok. This should also take a while.
You should get this.
Step 4 – Cropping the image
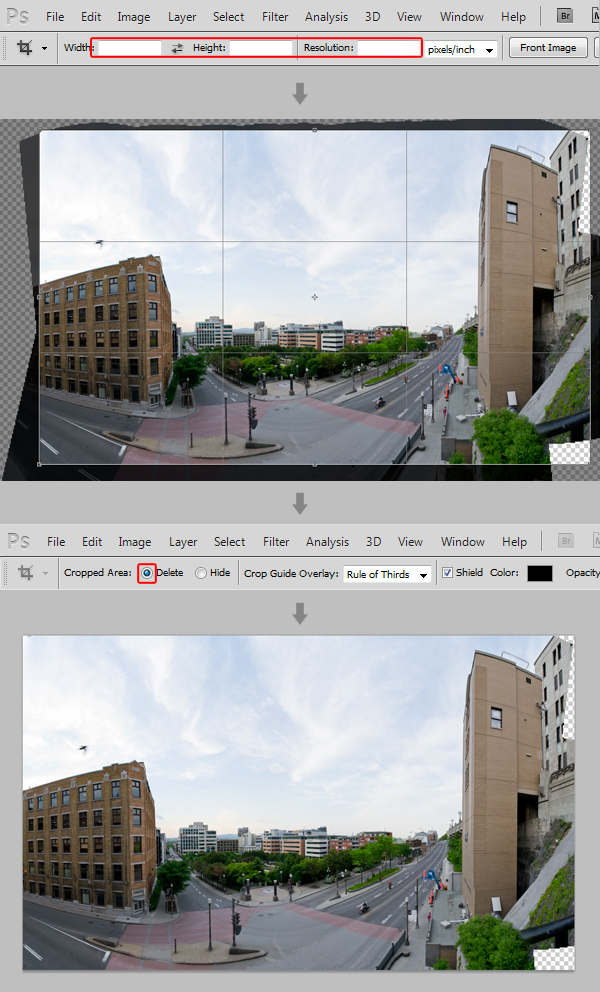
The panorama is done, but it’s all distorted. To make this easier to correct, we’ll need to give our image a rectangular shape first. Select the Crop Tool (C), make sure the Width, Height and Resolution fields are empty, and then drag this selection over your image. Remember to make the crop larger than what you want your final image to be. Then, make sure that the Cropped Area is set to Delete, and press enter.
Step 5 – Correcting the distortion
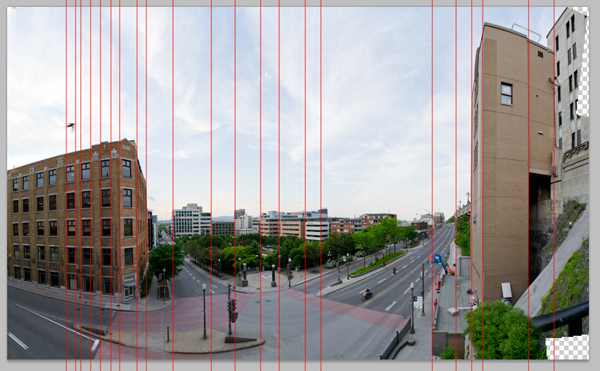
Before making any changes to your image, I suggest you save your file. Press Command/Ctrl + R to make your rulers appear. You can now click and drag on your rulers to place guides over your canvas. Place vertical guides wherever you see visual lines created by the elements within your image.
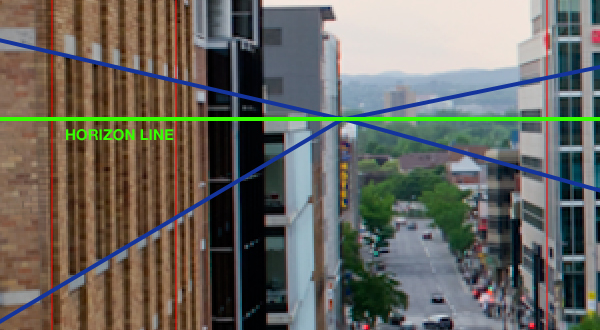
You could also place a guide on the horizon line. A good tip to find it is to look for converging visual lines like the windows on the building.
If your camera wasn’t perfectly horizontal when you took the pictures, you might need to rotate the image for it to match your horizon line. However, in our case, we won’t need to.
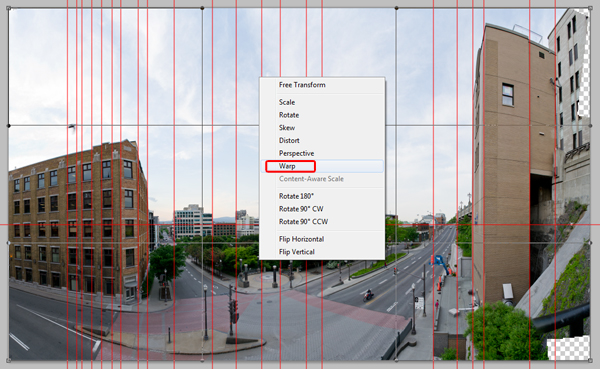
To correct the distortion, we will use the Warp Transform tool. Select your layer, then go to Select > All (or hit Command/Ctrl + A) to select the whole image. Then go to Edit > Transform > Warp, or simply hit Command/Ctrl + T, right click and choose Wrap.
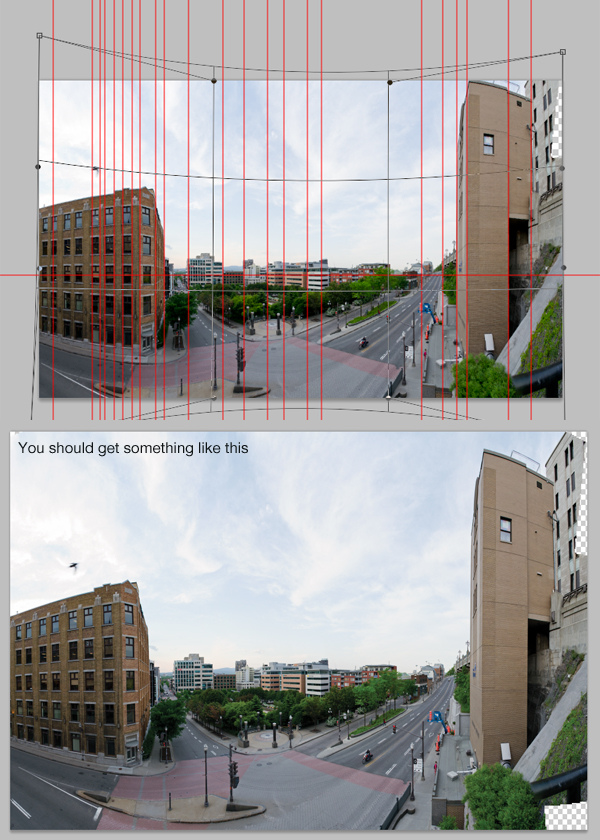
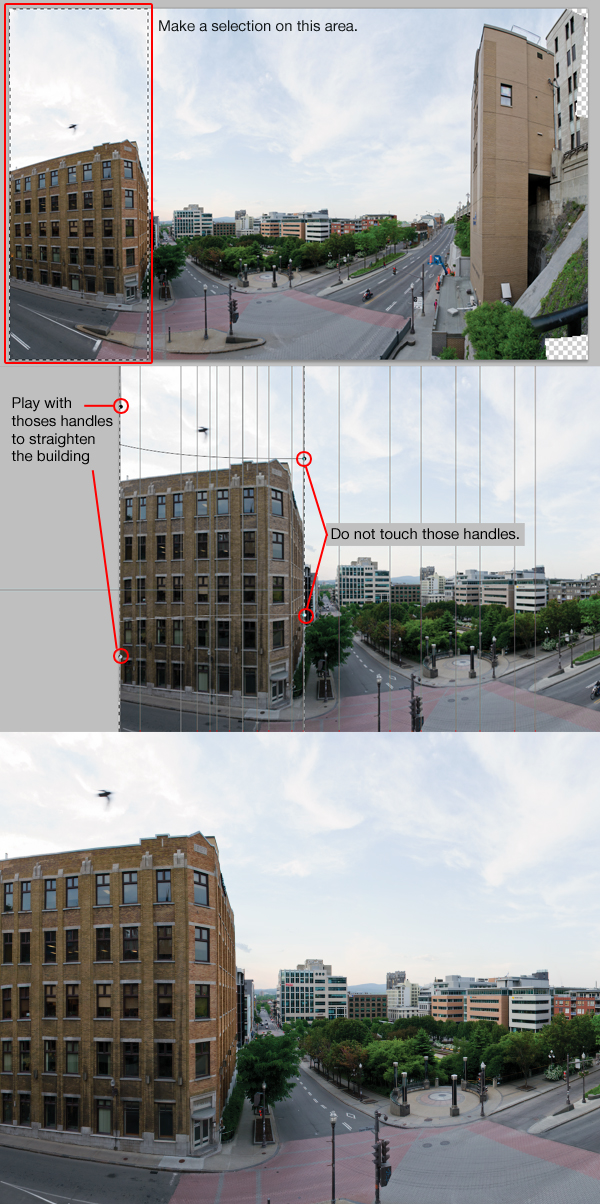
Now we can start playing with the handles to correct the perspective. The trick here is to have the vertical lines created by the architectural elements match your vertical guides. Also, we will try to fix the fish eye distortion we got when aligning our layers. Start by giving the image a good once over by dragging the top left and top right handles up, and the bottom left and bottom right handles down. Press enter to confirm.
Some parts of the image, like the left and the right building will be easier to fix if done individually using selections. Let’s start with the left building. Take the Rectangular Marquee Tool (M) and make a selection on the left building. Then, once again, enter the Wrap transformation mode and play with the left handles to straighten the building.
Next, let’s do the same for the building on the right.
The left and right buildings are slanted outward a bit. To fix this, select the Rectangular Marquee Tool, make a selection on the left building. You can use the Polygonal Lasso Tool and remove some of the selection in order to only have the left building. Then, using the Warp transformation tool, make the building match the vertical guides we previously created.
Then, do the same for the right building. For this one, we’ll have to do it in two steps.
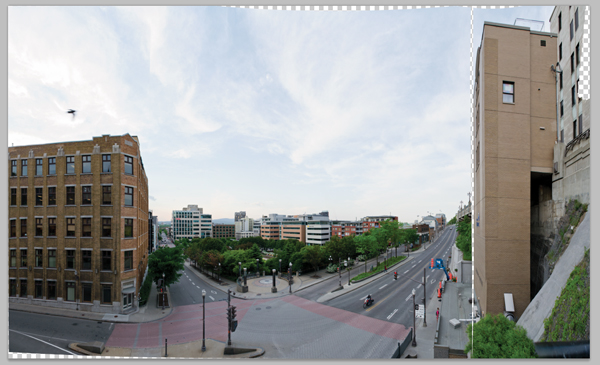
In the end you should get something like this. This is not 100% perfect, but it will be enough for what we are trying to achieve. Feel free to go more in detail to get a better result, but please note that every time you apply a transformation, the image’s quality is lowered. So try doing it with a limited number of transformations.
Step 6 – Filling the transparency holes
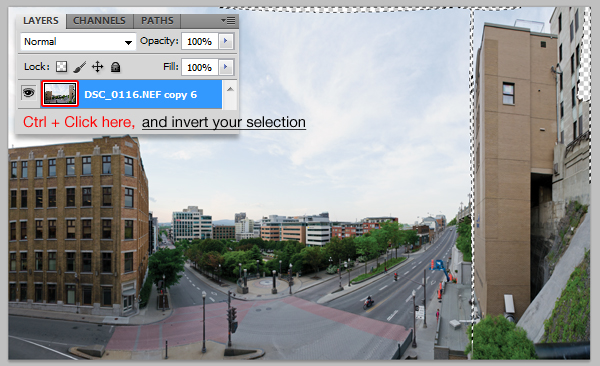
Our transformations have created a few empty areas in our image we’ll need to fix. Command/Ctrl + Click on your image to create a selection of it, then invert it (Command/Ctrl + Shift + I or Select > Invert).
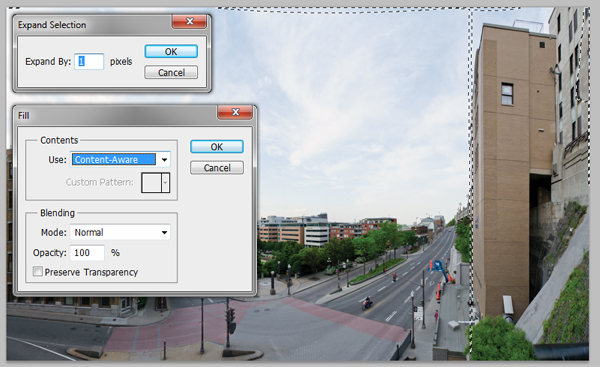
Go to Select > Modify > Expand and expand your selection by 1 pixel. Then, go to Edit > Fill (Shift + F5), and choose the Content-Aware fill in the Contents drop down menu. Press Ok. Make sure you keep your selection for the next step.
Step 7 – Fixing the imperfections
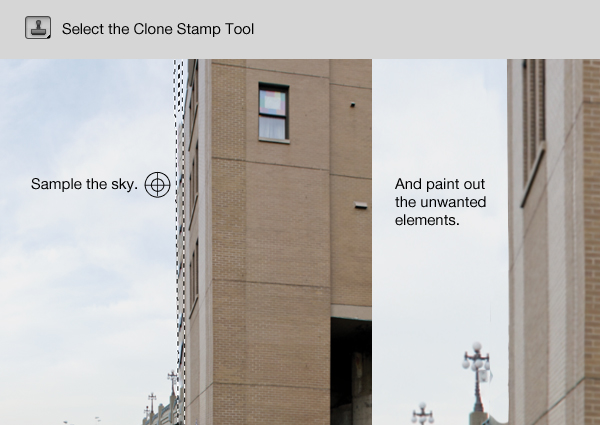
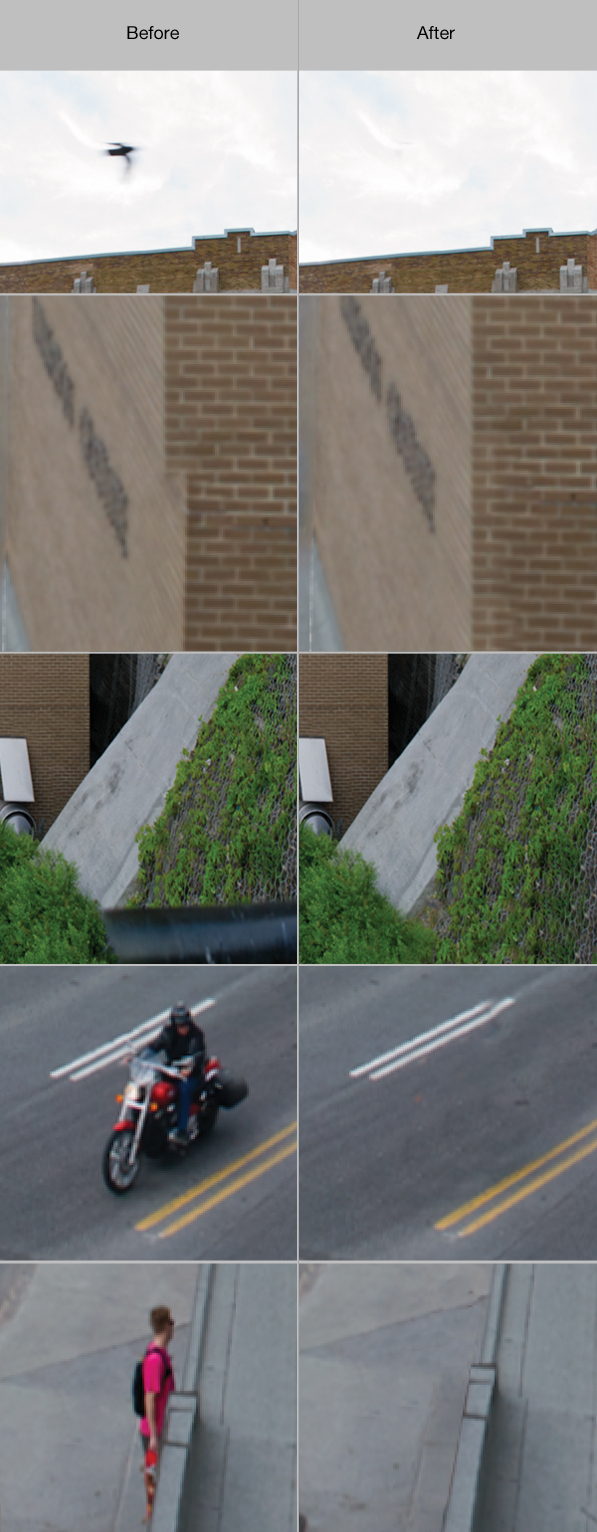
Create a new layer (Shift + Command/Ctrl + N) on which you will add the corrections. With your selection from the previous step, pick the Clone Stamp Tool (S). Make sure your tool is set to Sample: All Layers. Zoom in onto the right building, hold Alt and Click in the sky to pick a sample area, and paint out the area that was badly filled with building elements. You might have to do some more clone stamping after having removed the selection to get a good result.
Using the same technique, you can fix the remaining imperfections or annoying elements throughout your image.
Step 8 – Cropping and adding the final touches
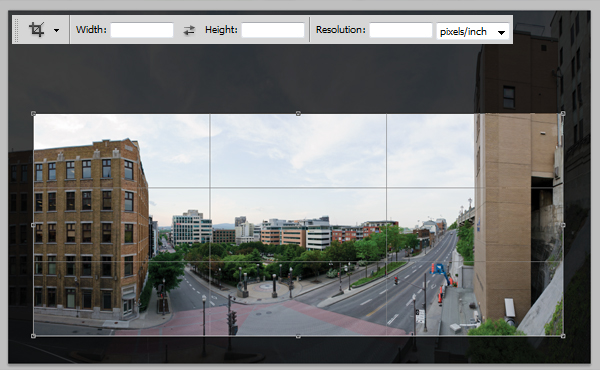
Once you are satisfied with the image, merge all the layers (Shift + Command/Ctrl + E or Layer > Merge Visible). Then, take the Crop Tool (C), and draw a selection on the area you wish to crop. Don’t forget to make sure that the Width, Height and Resolution fields are empty, and confirm.
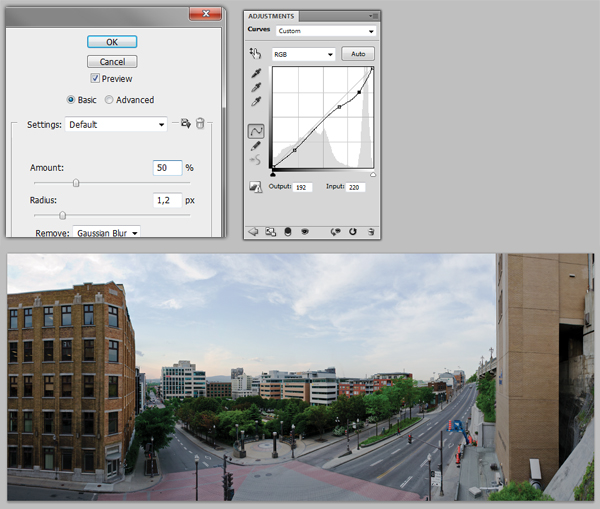
A good way to add a little bit of punch to the image is by increasing its sharpness. To do so, go to Filter > Sharpen > Smart Sharpen. Check the Preview box and play with the setting until you are satisfied. You can also increase the contrast using a Curve Adjustement (Image > Adjustement > Curves or Command/Ctrl + M).
Conclusion
The technique showed in this tutorial is only one of the many ways you can create a panorama in Photoshop. Auto-Align Layers and Auto-Blend are two very powerful features in Photoshop that are worth knowing. In this case, we’ve used them to create a panorama, but there are many other uses you can find for them.
Now stay tuned for the next part of this tutorial, in which we’ll transform this scene into a post-apocalyptic matte painting!


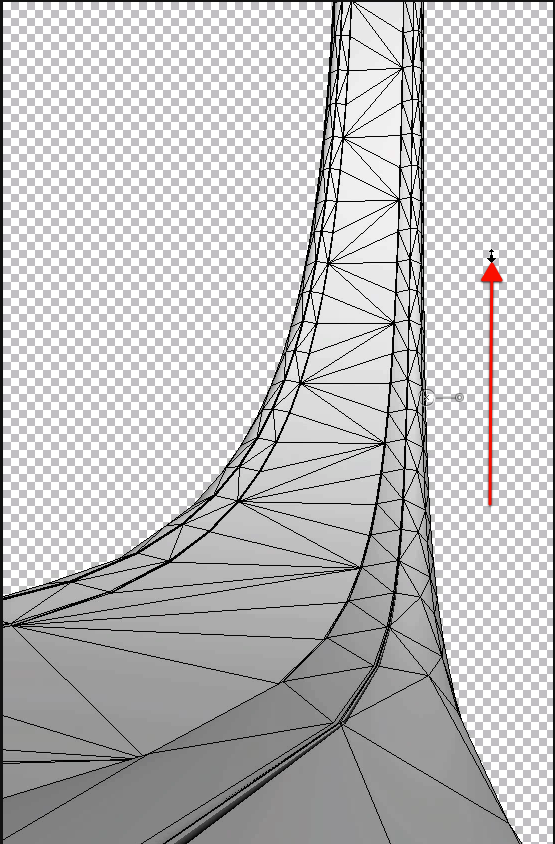
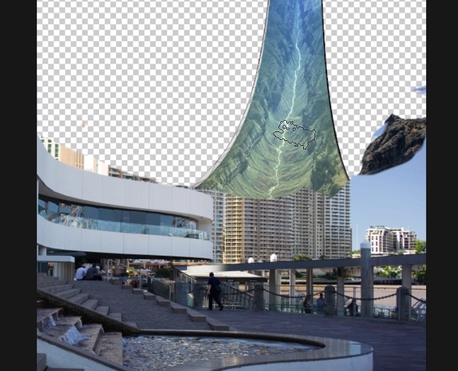
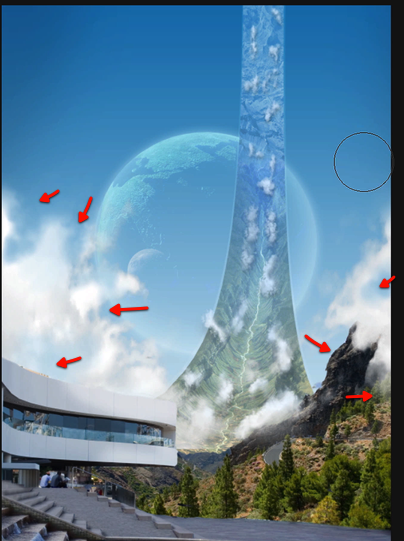
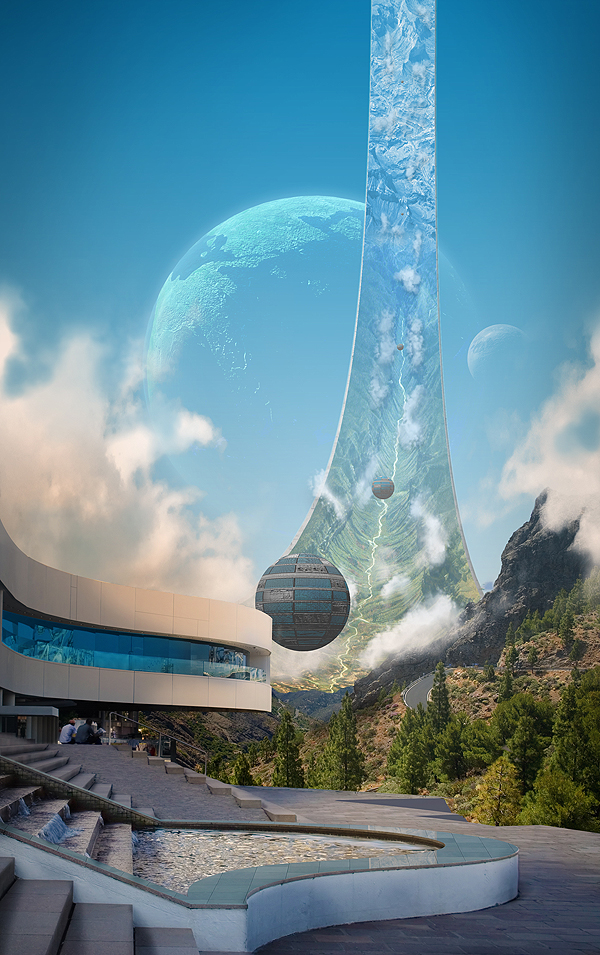
Photoshop can be used to create all kinds of imaginary worlds. In this Psd Premium tutorial, author Ed Lopez will demonstrate how to create a ring world from the 1970’s Ring World novels by Larry Niven (and more recently from the Halo franchise) using some of the 3D tools available in Photoshop CS4 and CS5. This tutorial is available exclusively to Premium Members. If you would like to take your digital painting and drawing skills to the next level, Log in or Join Now to get started!
This tutorial includes 11 videos that demonstrate the process of creating this project in detail so that you can better understand the techniques that were used in each step. Below is a clip from one of those videos. To view more clips you can Log in or Join Now!
This tutorial also includes full text and screenshots of each step. Premium members can Log in and Download! Otherwise, Join Now! Below are some sample images from this tutorial.
You can join Psd Premium for as little as $9/month. Premium membership gives you access to the source files for all our tutorials as well as access to premium tutorials like this one. This also includes the rest of the sites in our network including Vectortuts+, Webdesigntuts+, Phototuts+, Nettuts, and more! Premium Members can Log In and download this tutorial. Otherwise you can Join Today!
