|
Какой рейтинг вас больше интересует?
|
Главная /
Каталог блоговCтраница блогера PSDTUTS/Записи в блоге |
|
PSDTUTS
Голосов: 2 Адрес блога: http://psdtuts.com Добавлен: 2008-10-26 20:48:58 блограйдером DrakAngel |
|
Aligning and Blending Images Together
2011-06-01 17:00:34 (читать в оригинале)Advertise here
Are you new to Photoshop? Have you been trying to teach yourself the basics of Photoshop but have found the amount of educational material available on the net a bit overwhelming? As the world’s #1 Photoshop site, we’ve published a lot of tutorials. So many, in fact, that we understand how overwhelming our site may be to those of you who may be brand new to Photoshop. This tutorial is part of a 25-part video series demonstrating everything you will need to know to start working in Photoshop.
Photoshop Basix, by Adobe Certified Expert and Instructor, Martin Perhiniak includes 25 short video tutorials, around 5 – 10 minutes in length that will teach you all the fundamentals of working with Photoshop. Today’s tutorial, Part 23: Aligning and Blending Images Together will explain auto-align and blend, panoramic photos, and montages of movement. Let’s get started!
Epic StarCraft 2 Fan Art
2011-05-31 20:00:51 (читать в оригинале)Advertise here
StarCraft is one of my all time favorite video game franchises. I started playing back in high school – way back in 1998. I continued to play it off and on throughout college but eventually stopped when it seemed as if Blizzard would never release a sequel. Fast forward about 12 years and today, StarCraft 2 is a thriving e-sport with people like HuskyStarCraft and Day9 pushing the game on their YouTube pages. Since I am such a huge fan of the game, I decided to showcase some of my favorite pieces of StarCraft fan art for all of you to enjoy. Most of these pieces were found on the Blizzard website although some of them can also be found on Deviant Art. Let’s take a look!
All-In by TheChaoticKnight
The piece by The Chaotic Knight on Deviant Art portrays the final battle between the forces of StarCraft hero Jim Raynor and villain The Queen of Blades in StarCraft 2: Wings of Victory. As you can see, a massive battle looms overhead that include Battlecruisers and Zerg forces.
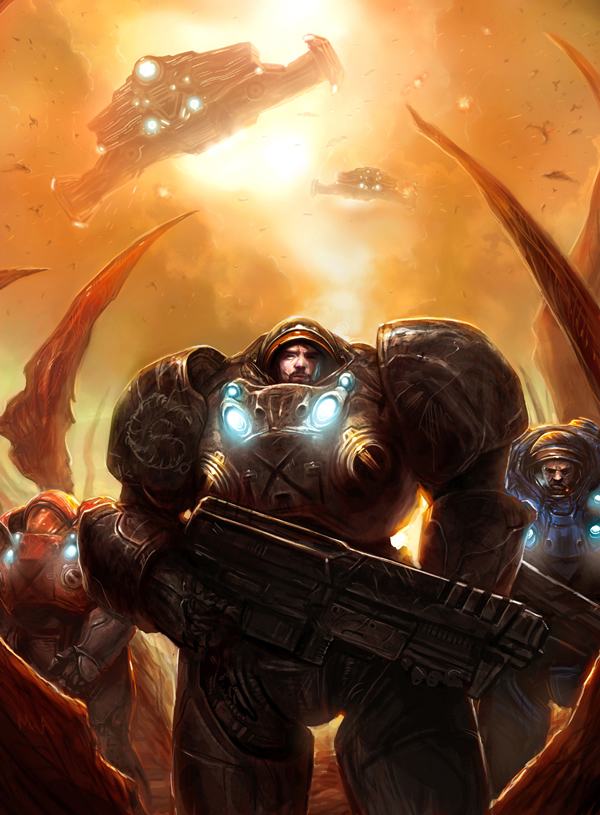
Queen of Blades by Marek Okon (OmeN2501)
This piece by Marek Okon portrays StarCraft villain, The Queen of Blades. Once a Terran Ghost named Sarah Kerrigan, the Queen of Blades is now one of the most feared individuals in the StarCraft Universe.
.jpg)
Glare by Brian Cosmiano (HoodZ)
This piece by Brian Cosmiano portrays a Terran marine as he takes cover in a trench.
.jpg)
Raynor
This piece shows Jim Raynor during a battle as the world around him burns.
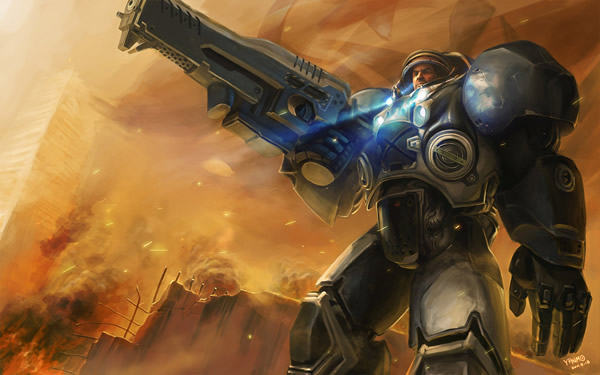
Zealot by Yi Yoon-Gi (Tazzi)
The Zealot of the most basic battlefield unit in the Protoss arsenal. This piece by Yi Yoon-Gi shows how rugged and deadly they can be.
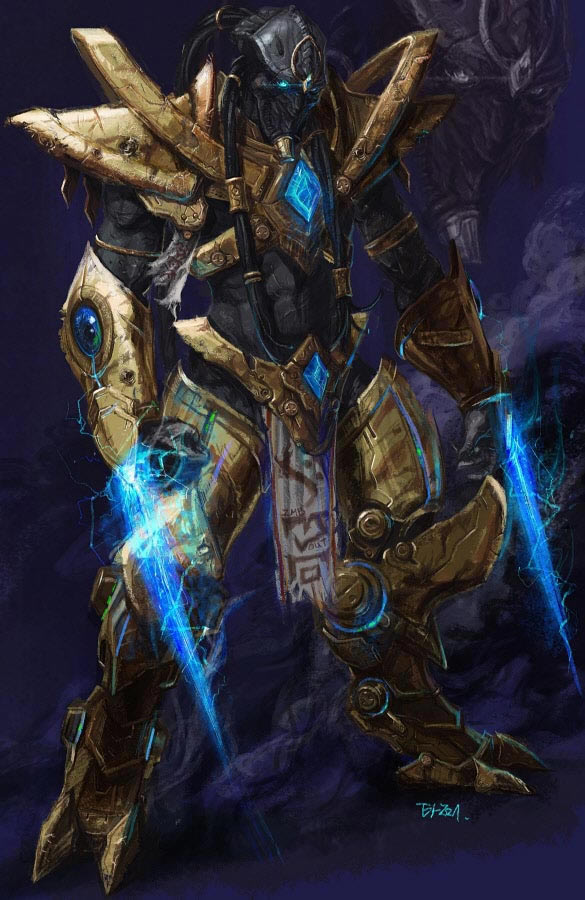
Marines on Char – Matthew McKeown
Char is a resource rich planet that was eventually settled by the Zerg. This piece by Matthew McKeown shows just how inhabitable this planet can be, even without the Zerg.
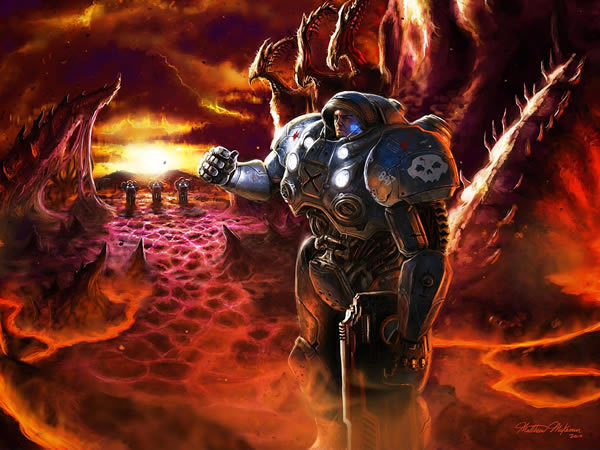
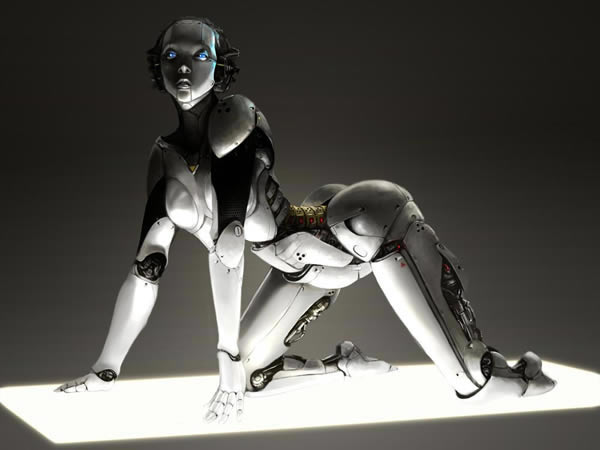
Adjutant by Kaynine
Adjutants are a form of artificial intelligence that provide players with key information about an objective or mission. This piece by Kaynine shows a side of them that most of us probably didn’t expect.
I Love The Smell by Magnus Fallgren
This piece by Magnus Fallgren portrays a marine taking in the sights and smells of battle.
.jpg)
Be Still by Magnus Fallgren
In StarCraft, sometimes it’s best to wait until the perfect time to strike. This piece by Magnus Fallgren shows a marine keeping his cool while a hydralisk passes by.
.jpg)
Stay Away From Me by Magnus Fallgren
In yet another piece by Magnus Fallgren, a Ghost takes a knee during a rain shower.
.jpg)
Bugs by Bin Zhang
This piece by Bin Zhang portrays a battle to the death between a marine and a hydralisk.
.jpg)
Black Die
This rendering of a marine shows what it would look like as a die cast action figure.
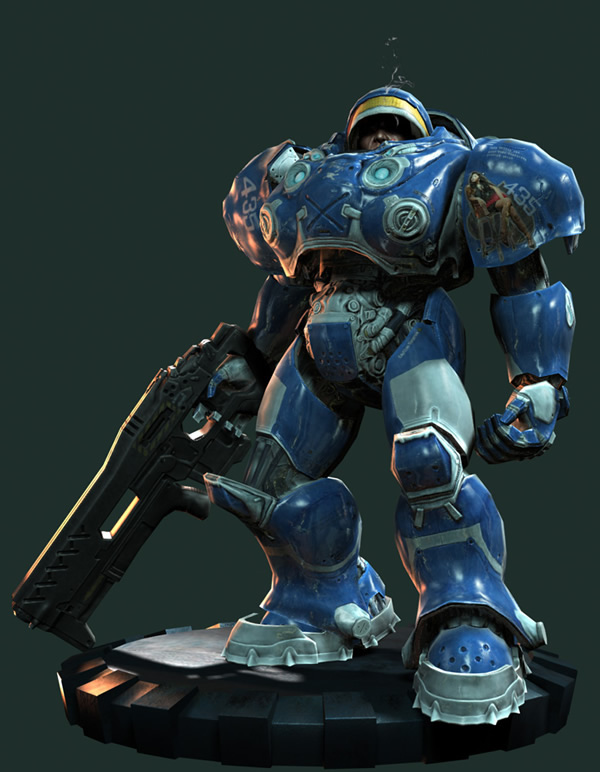
Thor by Yung-Gi-Haung
In this piece, a Thor, the largest Terran unit is blasting away at some unknown enemy.
.jpg)
You Dropped Something by Daniel H Chang
This Zerg Ultralisk is letting a marine know that he dropped his weapon on the ground. This will end well for the marine…
.jpg)
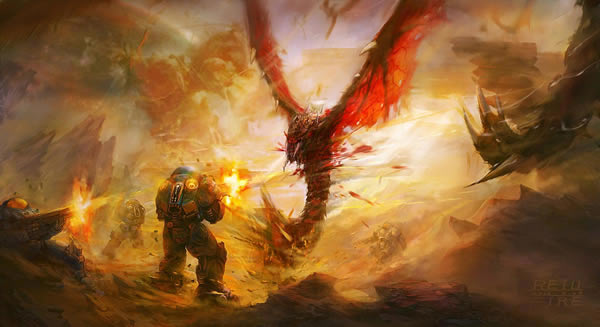
Fire
This painting shows a team of marines engaging Zerg Mutalisks in battle.
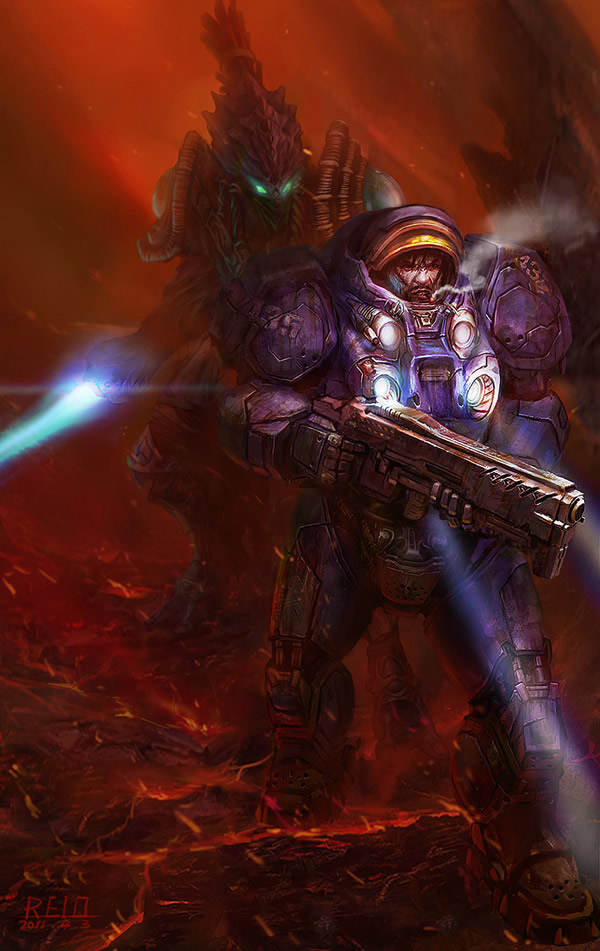
I Come From the Shadows
This piece shows a Terran Marine and a Protoss Dark Templar.
Zeratul by Yaroslav
This painting shows Protoss hero, Zeratul standing proud.
.jpg)
Marine by Lee Sin Jae
This painting shows the Terran character Tychus as he calmly walks away or towards battle.
.jpg)
Zerg Invasion by Kris
In this painting Terran forces seem surprised as the Zerg invade.
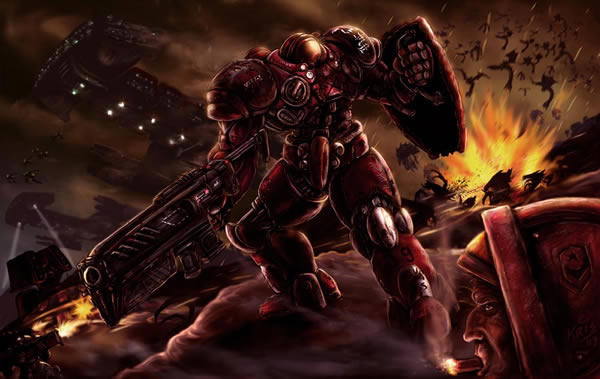
Family Portrait by Leon19
This portrait shows several Terran and Protoss units together as one happy family.
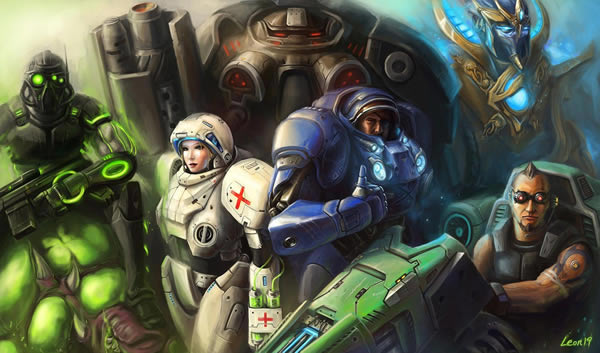
Jim Raynor by Liu Jiguo
Jim Raynor stands proud as a fleet of Banshees fly overhead.
.jpg)
Zealot by DeNdeMaN
This rendering of a Protoss Zealot shows a ton of detail.
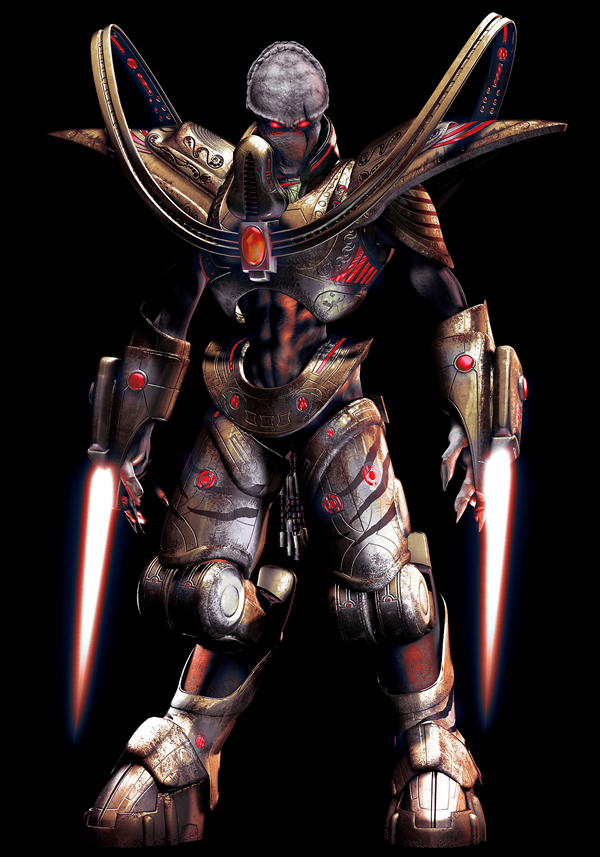
Starcraft Terran Medic by VonSchlippe
Once a key part of Terran unit structure, the Medic has now been replaced by the Medivac, an air unit that heals bio units from the sky. This rendering by VonSchlippe shows a medic up close and personal.
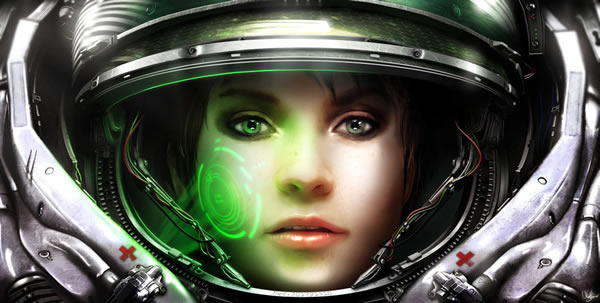
Starcraft Painting by Neocromagnum
This painting by Neocromagnum shows a marine who may be in a bit of trouble.
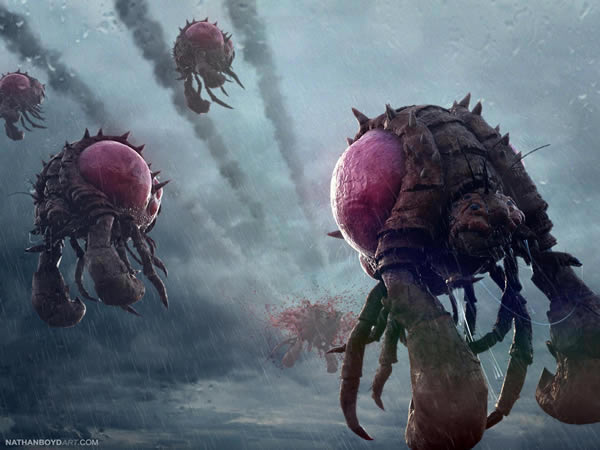
Killing Fields by Nathan Boyd
These Zerg Overlords may need to spread out a bit so those missles don’t take them all out.
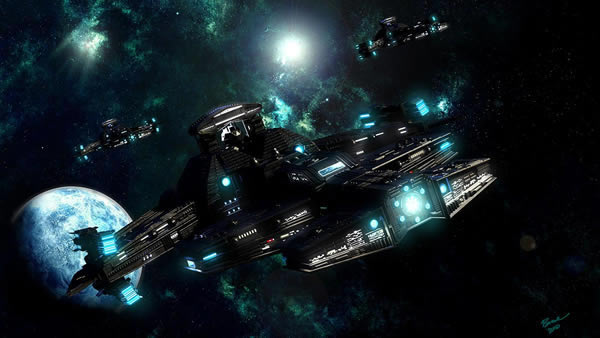
Revenge Class Battlecruiser by Branislav Bogdanovic
This piece shows a fleet of battlecruisers emerging from a blue planet.
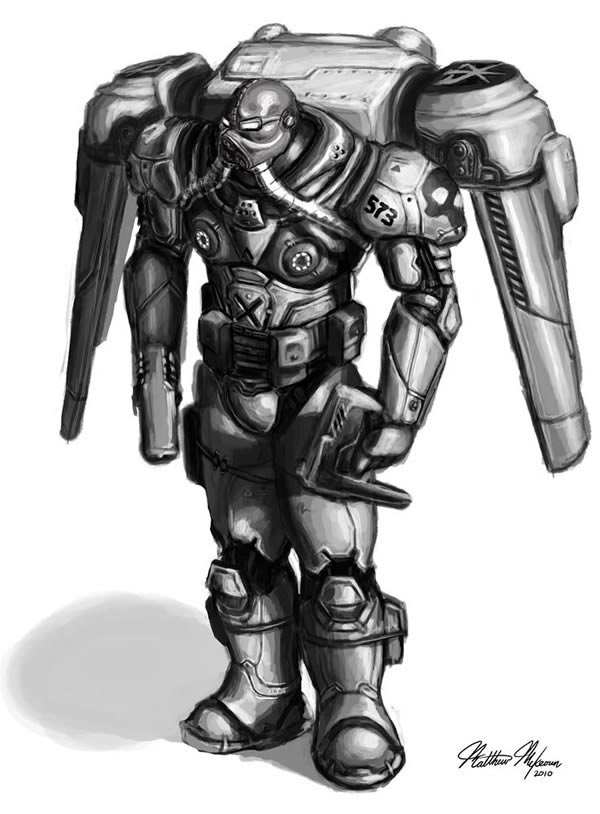
Reaper by Matthew McKeown
Reapers are new units in StarCraft 2. Their rocket packs make them excellent units to use to scout out your opponent’s base.
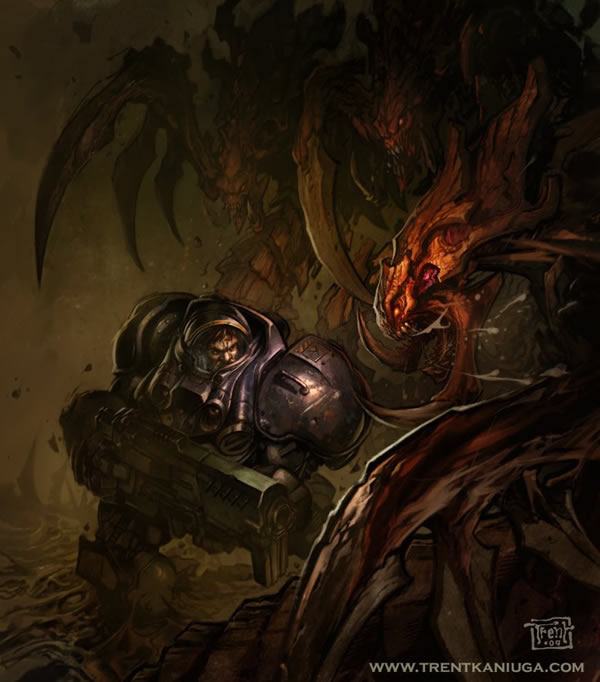
Hydralisk by HaifengLuo
This hydralisk can see the whole battlefield from the top of a cliff.
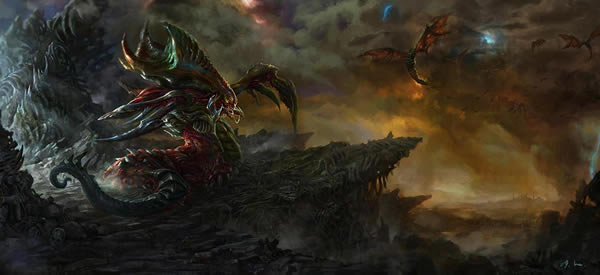
StarCraft by Christopher Pigden
This marine is wreaking havok with his dual wielding machine guns.
.jpg)
Sneak Attack by Hechao
This marine is taking advantage of an opportunity and is attacking fast before it is too late. Hopefully, that Mutalisk doesn’t see him.
.jpg)
Terran Ghost by VonSchlippe
This ghost is just hanging out, relaxing.
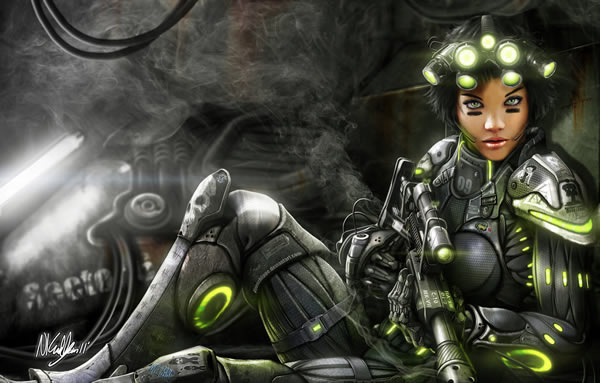
Starcraft Ghost Nova Final by Shiramune
This Terran Ghost looks both formidable and sexy.
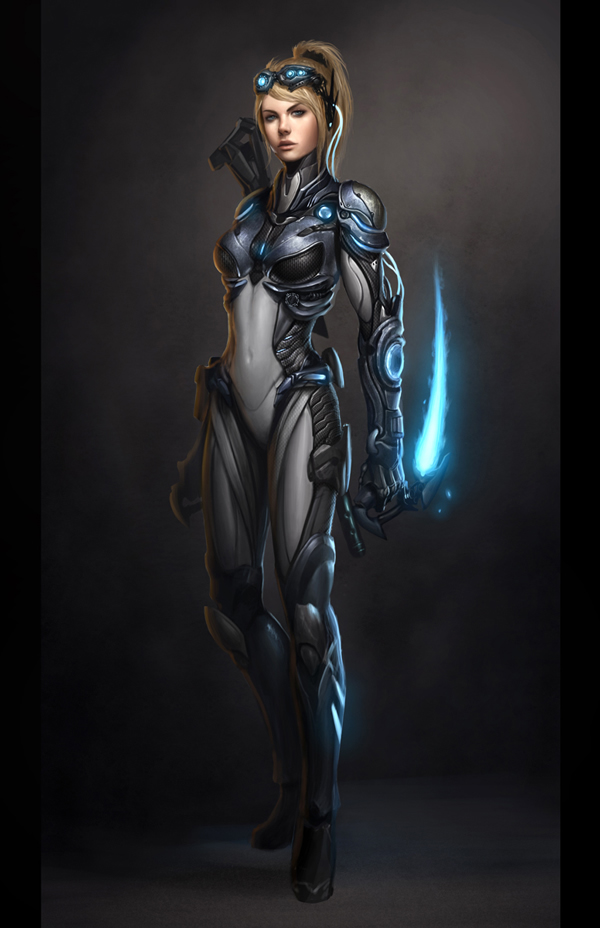
Ultralisk by Luke Mancini
This Terran marine is about to become an afternoon snack for this Ultralisk.
.jpg)
Zealot by Liu Jiguo
This Protoss Zealot stands atop his fallen enemies.
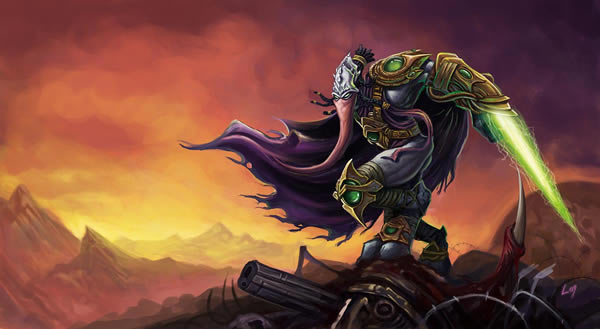
Hydralisk Nanny by Tamara
This hydra stands guard as her larva grows.
.jpg)
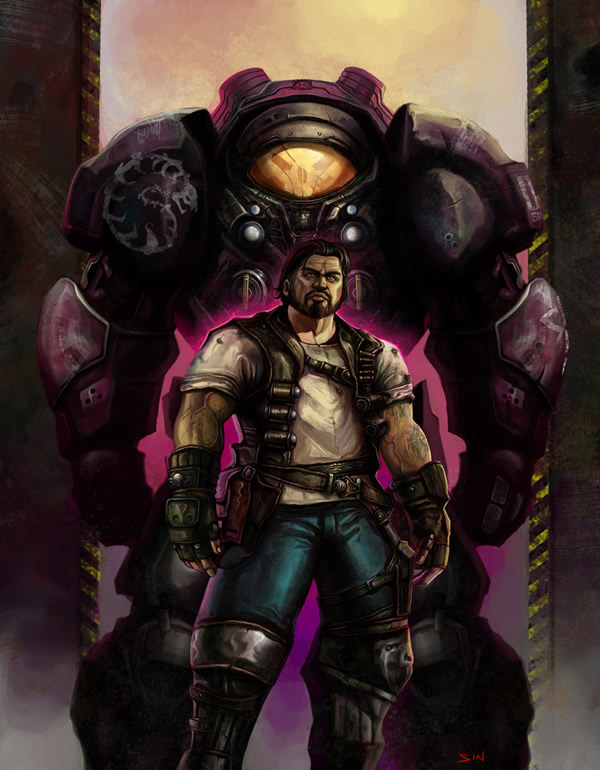
Jim Raynor by Sun Xilong
Jim Raynor is dwarfed by is marine armor.
Best of the Web – May 2011
2011-05-31 17:00:59 (читать в оригинале)Advertise here
As you know, each month, we round up some of the best Photoshop-related content from around the web. This month, there were some excellent Photoshop tutorials and articles to choose from so please take a moment to review our favorites from May 2011.
Photoshop Tutorials
-

Create a Wacom Product Advertisement in Photoshop
This tutorial from Creative Fan will demonstrate how to create a cool Wacom product advertisement using pandas and bonsai trees.
Visit Tutorial
-

Photoshop Tutorial: Create a Photo-Realistic Orange from Scratch
This tutorial from Pxleyes will demonstrate how to create a realistic looking orange from scratch using only Photoshop.
Visit Tutorial
-

Vintage 3D Typography in Photoshop with Repoussé
The repousse tool in Photoshop CS5 has many uses. This tutorial from Abduzeedo will demonstrate how to create a vintage 3D typographic effect.
Visit Tutorial
-

Video: 3D DNA Strand with Photoshop Extended
Strands of DNA can be challenging to create with standard 2D applications. This tutorial from Layers Magazine will demonstrate how to create a DNA strand using Photoshop CS5’s 3D tools.
Visit Tutorial
-

Illustration Tutorial: Creating an iOS Device Connector in Photoshop
This tutorial from Wegraphics will demonstrate how to create an iOS device connector in Photoshop.
Visit Tutorial
-

Photoshop Tutorial: Effectively Remove Facial Hair in CS5
This tutorial from Pxleyes will demonstrate how to remove a man’s beard using Photoshop CS5.
Visit Tutorial
-

How To Create a Dramatic Action Scene in Photoshop
This tutorial from Spoon Graphics will demonstrate how to create a dramatic action poster in Photoshop.
Visit Tutorial
-

Create a Surreal Landscape Using Photo Manipulation
In this tutorial from Wegraphics you will learn how to create a surreal landscape photo manipulation in Photoshop.
Visit Tutorial
Articles and Inspiration, and Freebies
-

Tips on Design Pricing, Estimates and Invoices
The business side of design can be just as challenging as the design side of the industry. This article from Cute Little Factory gives some tips on running your design business.
Visit Article
-

30 Examples of Smart Print Advertisements
This round up on Web Design Ledger showcases some examples of smart print advertisements.
Visit Article
-

Super Creative Illustrations
This collection of illustrations on Abduzeedo showcases some excellent digital paintings from Nithin Rao Kumblekar.
Visit Article
-

18 Essential Grunge Textures
These grunge textures from Lost and Taken will make an excellent addition to your design arsenal.
Visit Article
-

Useful Photoshop Tutorials for Designing Abstract Backgrounds
Looking for a creative background for your next design? This collection of tutorials on Noupe will give you plenty of ideas.
Visit Article
-

30 Epic Graffiti Illustrations by Yok Yoker
This post from Creative Overflow showcases 30 amazing graffiti illustrations by Yok Yoker.
Visit Article
-

34 Awesome Poster Designs
This article on DesignM.ag showcases 34 awesome poster designs for inspiration.
Visit Article
-

Fantastic Wakeboards to Inspire Your Designs
While wakeboards are a lot of fun to ride, they are also a lot of fun to look at and create. This showcases from Web Designer Depot showcases some excellent examples.
Visit Article
Is Photoshop Evil? Video Interview With Mark Heaps
2011-05-30 19:30:59 (читать в оригинале)Advertise here
Is Photoshop a dirty word? An evil tool? Recently, I had the opportunity to chat with Mark Heaps, a Professional Photographer, an Adobe Certified Professional, and Graphic Designer at Duarte Design where he has worked with some of the world’s most recognizable brands. Mark works as a presentation designer, helping to build presentations you might see at a major conferences like SXSW or CES, but Mark has experience doing just about everything. So it was great to hear his thoughts on several interesting topics.
During our conversation we discussed whether or not photographers truly embrace Photoshop, whether or not Photoshop is an evil tool, whether or not it is better to be a "jack of all trades" or a specialist, should you always charge for your work, and much more. Please take a moment to review this 35-minute interview, and enjoy!
Notes
Here are links to some of the items we discussed in the video.
- Katie Couric
- Ralph Lauren
- Iranian Missiles
- Situation Room
Mockup Blister Packaging in Photoshop
2011-05-30 17:00:28 (читать в оригинале)Advertise here
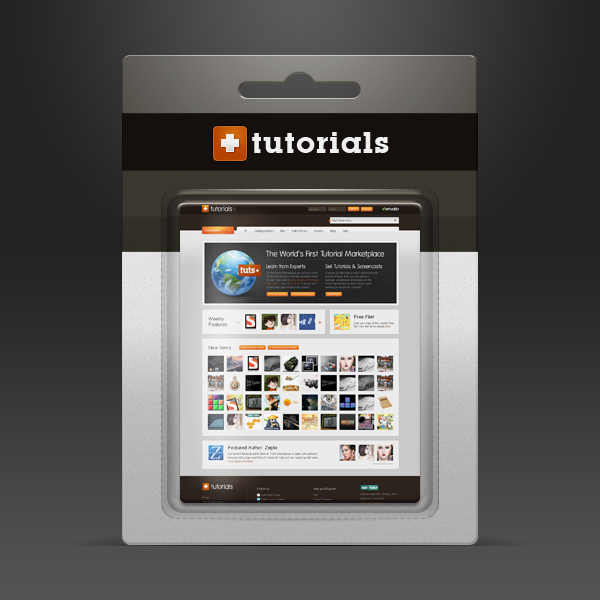
Designers and clients often have different ideas about how a finished product should be presented. Designers want to show the finished artwork, clients want to know exactly how their design will look on the shelves. In this tutorial, we will demonstrate how to create a mockup for some blister packaging so that you can present your design to your clients. Let’s get started!
Tutorial Assets
The following assets were used during the production of this tutorial.
- Screenshot of Tutorials marketplace (Example)
- Dots Pattern (Example)
- Tutorials Icon (Example)
Before You Begin
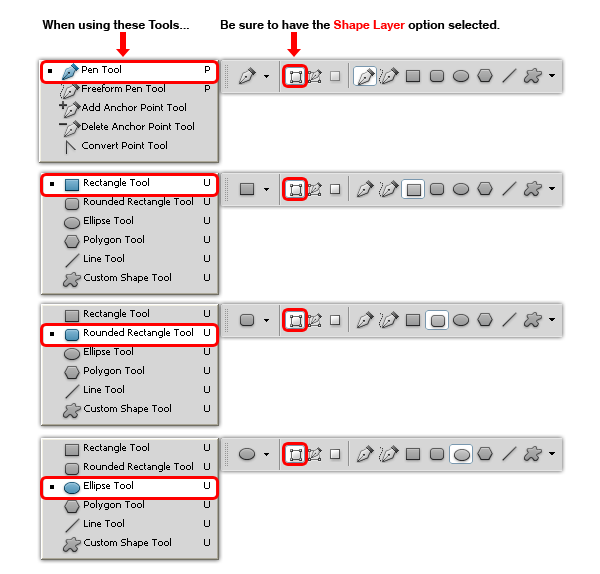
In order to make the file scalable and easy to edit, we will work always with shape layers, so please be sure to select the Shape Layer option in every single shape we make, doesn´t matter if is a circle, rectangle or even the Pen Tool (P) always have it selected from the tool menu.
Document Set-Up
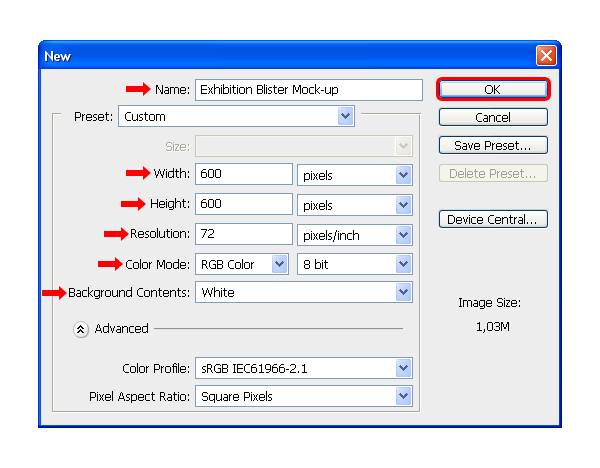
Start with a RGB Document with a 600 x 600 px canvas size at 72dpi, with the Background Contents set to White and name the file as Exhibition Blister Mock-up.
Step 1 – Setting up the Background.
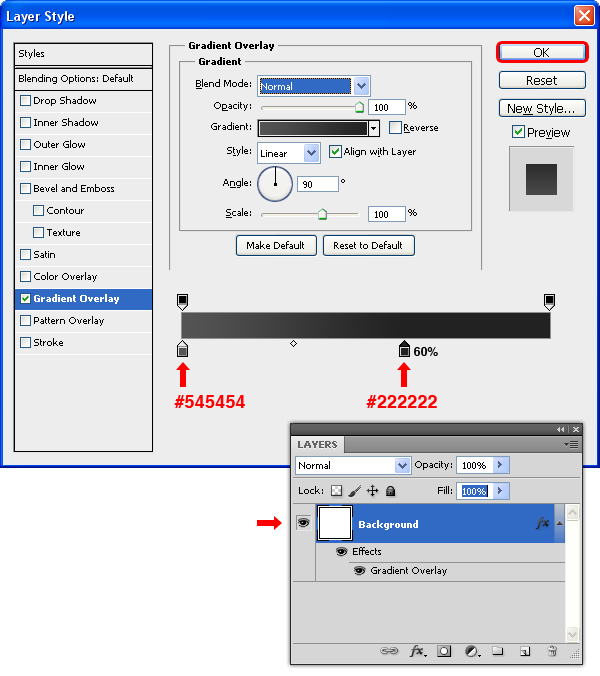
Double-click the Background layer in the Layers window to make it editable and set the name as "Background". Go to Layer > Layer Styles > Blending Options and aplly a Gradient Overlay as shown.
Select the Ellipse Tool (U) and draw a circle of 600 px diameter. Name the new layer as "Backlight" and set the Fill to 0% in the Layers window. Go to Layer > Layer Styles > Blending Options and aplly a Gradient Overlay as shown.
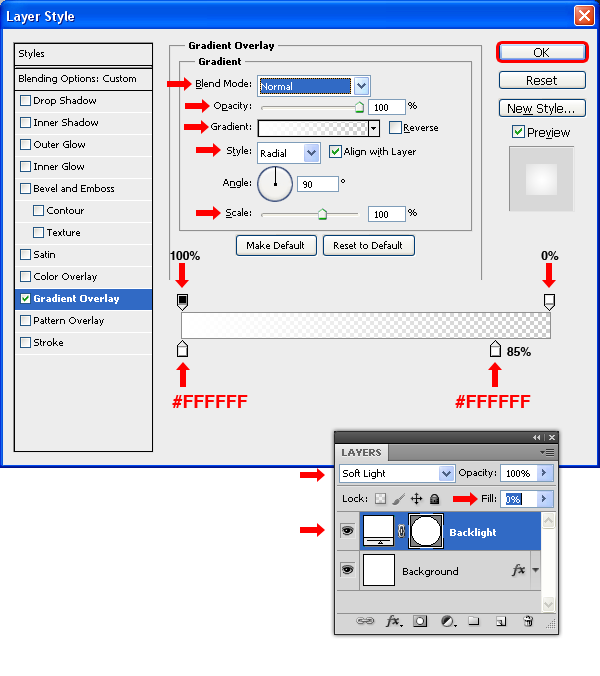
Select the Ellipse Tool (U) and draw a circle of 600 px diameter. Name the new layer as "Backlight", set the Fill to 0% and the mode to Soft Light in the Layers window. Go to Layer > Layer Styles > Blending Options and aplly a Gradient Overlay as shown.

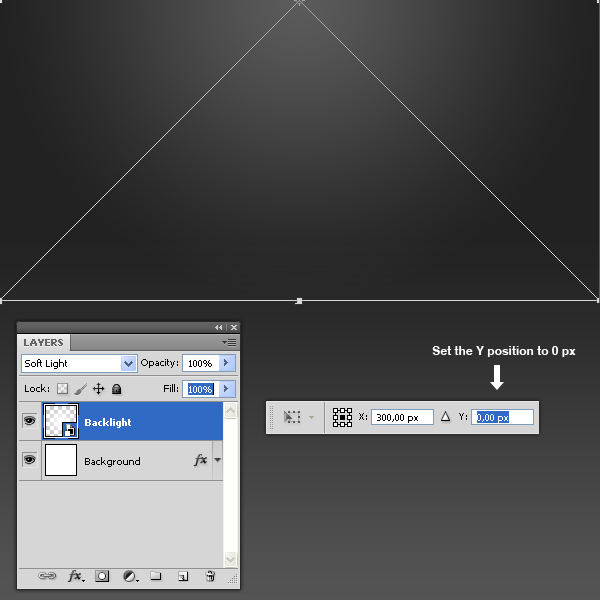
Press Command/Ctrl + T and in the Tool window set the Y position to 0 px and apply the changes. Go to Layer > Smart Objects > Convert to Smart Object.
Note: This action will set the Fill of the "Backlight" layer to 100%.
Step 2 – Drawing the Blister Board.
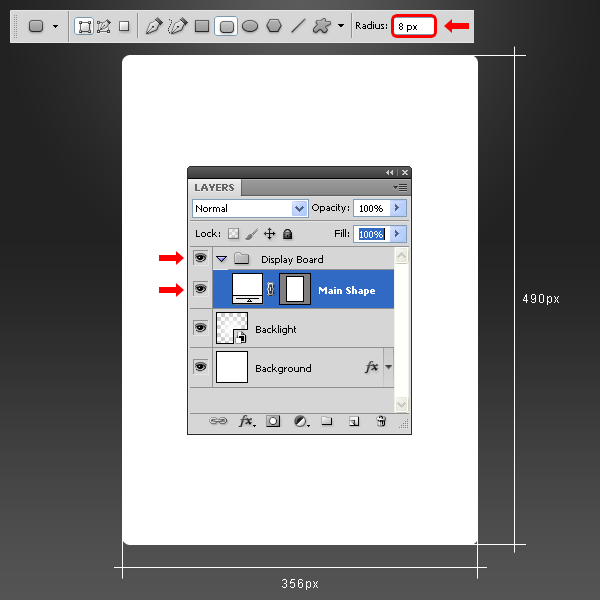
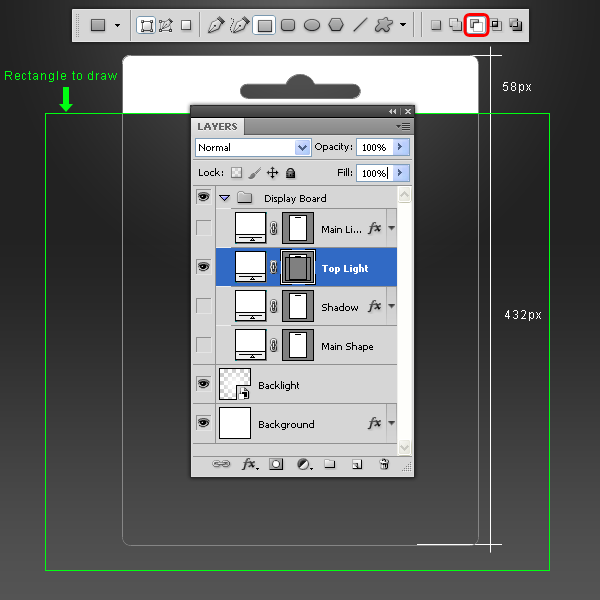
Go to Layer > New > Group and name it Display Board. Set your Foreground color to white (#000000). Select the Rounded Rectangle Tool (U), set the Radius to 8 px and draw a rectangle as shown. Name the new layer "Main Shape."
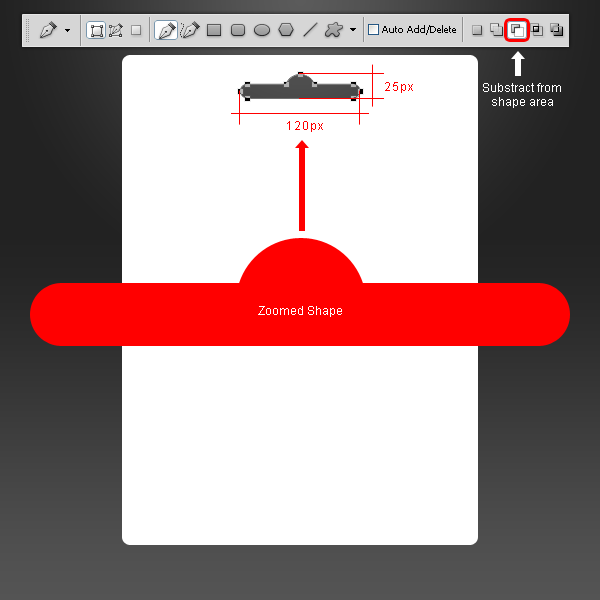
Select the Pen Tool (P), select the Subtract From Shape Area option in the Tool window and draw a shape as shown.
Step 3 – Saving for the future.
Drag the "Main Shape" layer to the New Layer icon three times in the Layers window and name these new three layers as "Main Light", "Top Light", and "Shadow."
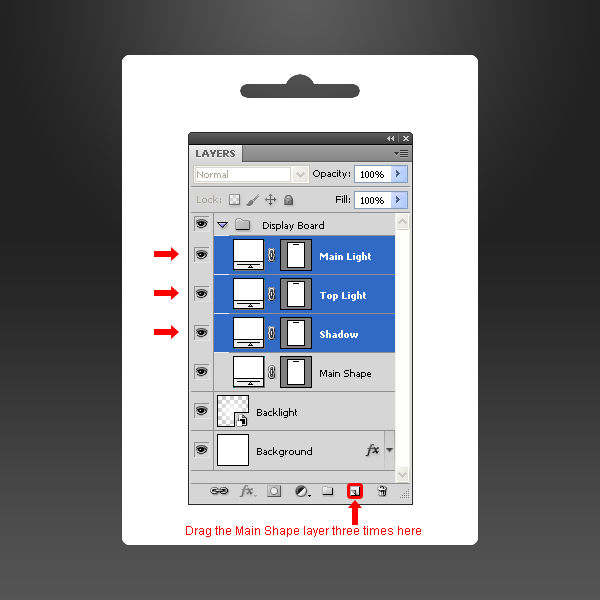
Step 4
Select the "Shadow" layer, set the Mode to Overlay with an Opacity of 9%, the Fill at 0% and go to Layer > Layer Styles > Blending Options and apply a Gradient Overlay with the following settings.
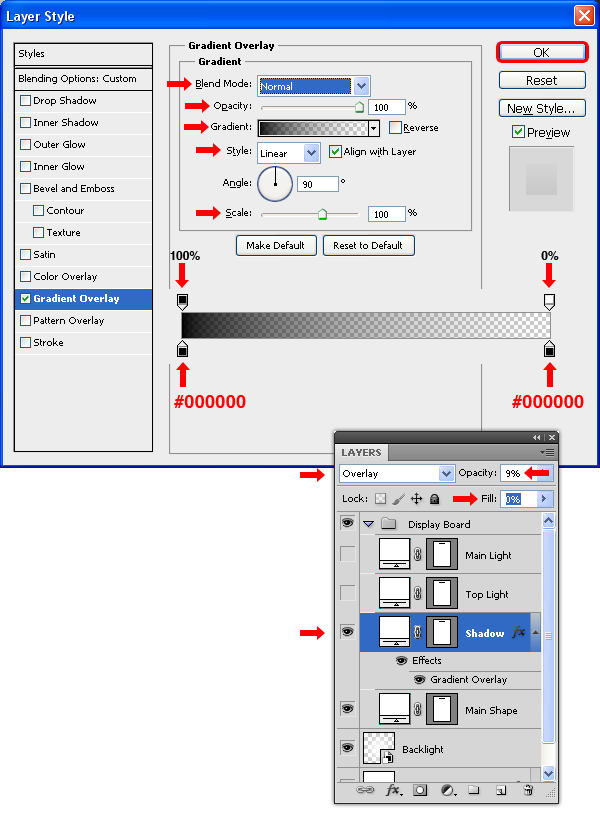
Step 5
Select the "Main Light" layer, set the Mode to Overlay with an Opacity of 75%, the Fill at 0% and go to Layer > Layer Styles > Blending Options and apply a Bevel and Emboss with the following settings.
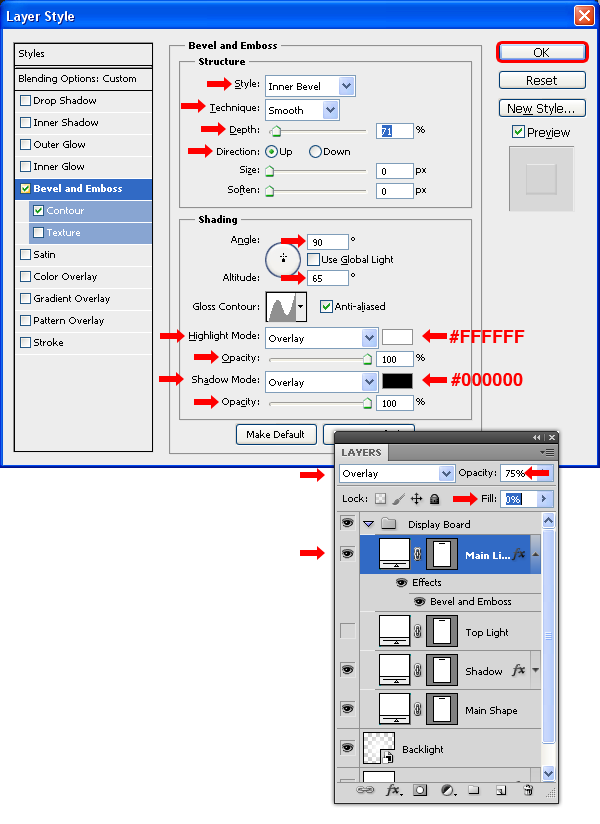
Still in the Bevel and Emboss window, click on the Gloss Contour thumbnail and in the Contour Editor set the Mapping as follows. Click OK.
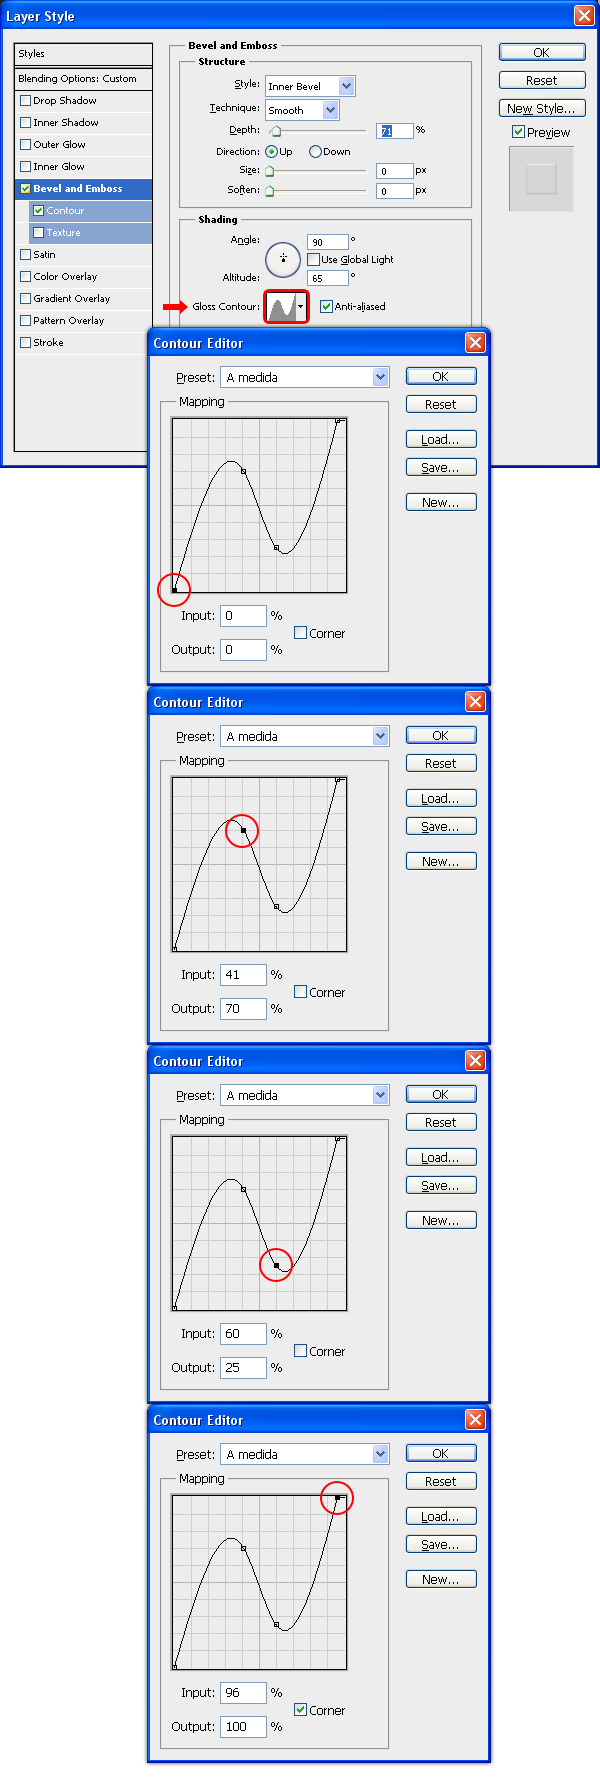
Click on the Contour tab in the layer Style window, set the Range to 55%, click on the Contour thumbnail and in the Contour Editor window set the Mapping as shown. Click OK. Again, click OK in the Layer Style window to apply the settings.

Step 6
Click on the "Top Light" layer, select the Direct Selection Tool (A) and then select the Rectangle Tool (U); click on the Subtract From Shape Area icon and draw a rectangle as shown.
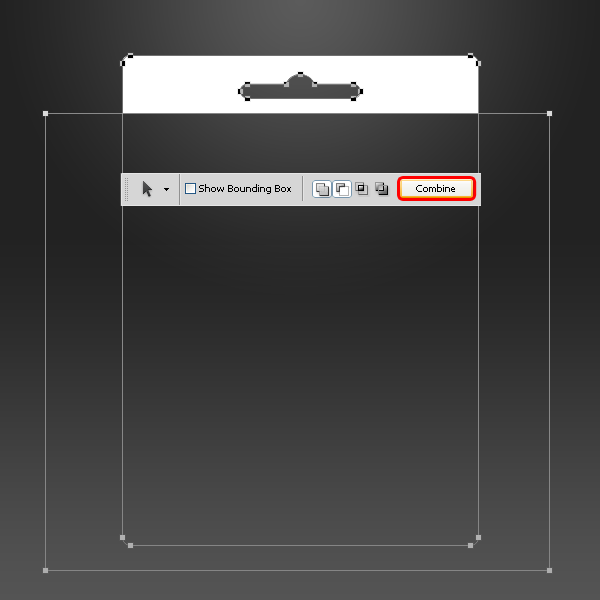
Select the Path Selection Tool (A), make a selection around the entire canvas and click the Combine button in the tool window.
Step 7
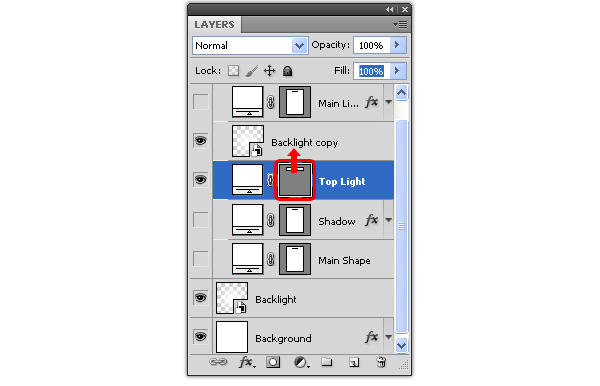
Duplicate the "Backlight" layer by dragging the layer to the New Layer icon in the Layer window and place it above the "Top Light" layer. Now click and drag the "Top Light" layer Vector Mask thumbnail to the "Backlight copy" layer and release it over it. Delete the "Top Light" layer and rename the "Backlight Copy" layer to "Top Light", set the Opacity at 55% and the Mode to Normal.
Step 8
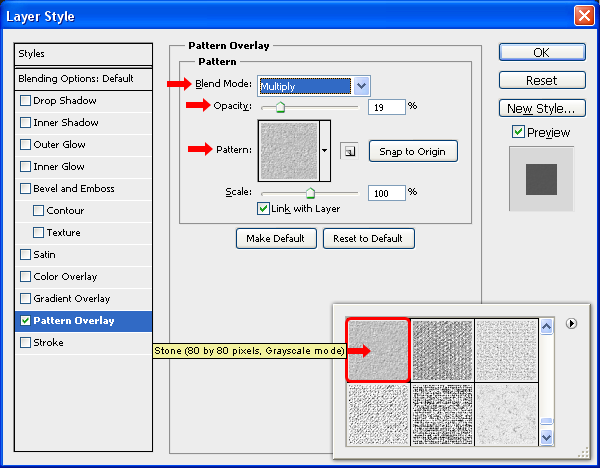
Select the "Main Shape" layer and go to Layer > Layer Styles > Blending Options. Click on the Pattern thumbnail and from the thumbnail list click on the arrow at top right, select from the dropdown menu Artist Surfaces and click on Append.
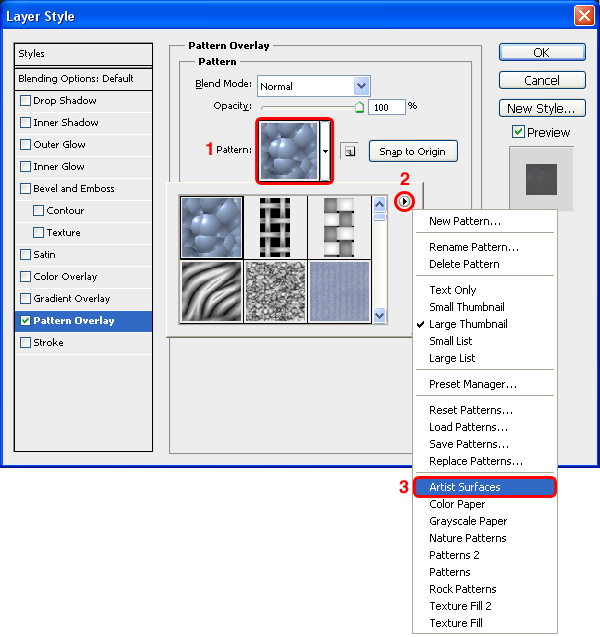
Select the patter Stone (80 by 80 pixels, Grayscale mode) and aplly a Pattern Overlay with the following settings. Click OK.
Step 9
Select the Rectangle Tool (U), and draw a rectangle as shown. Name the new layer "Design" and place it above the "Main Shape" layer.
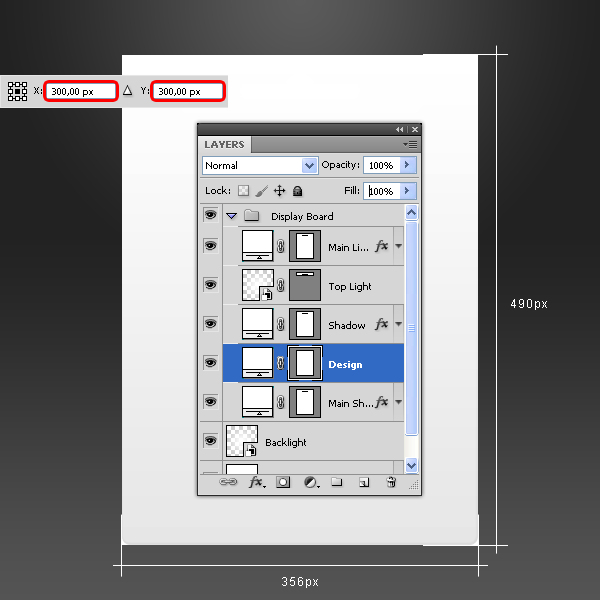
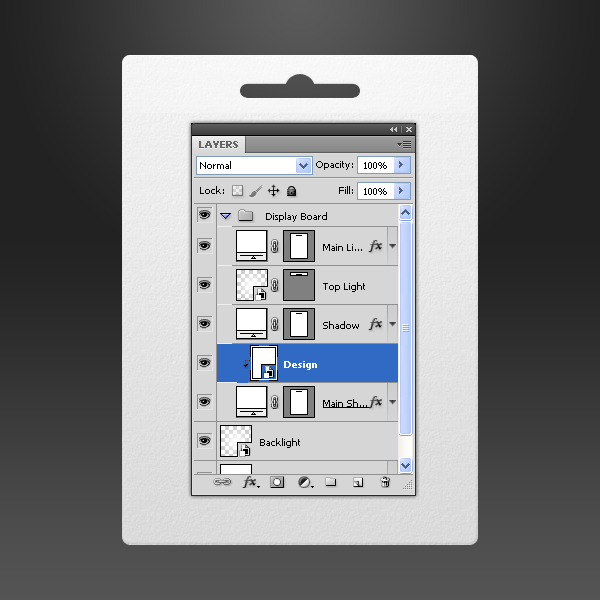
Go to Layer > Smart Objects > Convert to Smart Object and then go to Layer > Create Clipping Mask.
Step 10 – Setting up the Content.
Go to Layer > New > Group and name it Display Content. Set your Foreground color to white (#000000). Select the Rounded Rectangle Tool (U), set the Radius to 16 px and draw a rectangle as shown. Name the new layer "Side."
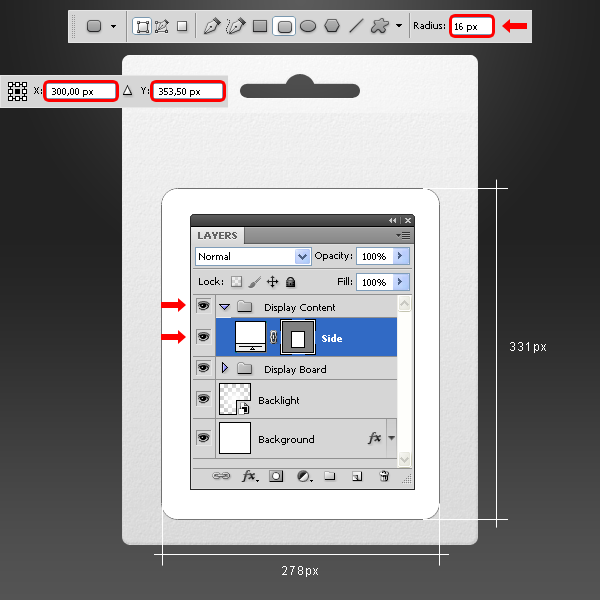
Step 11
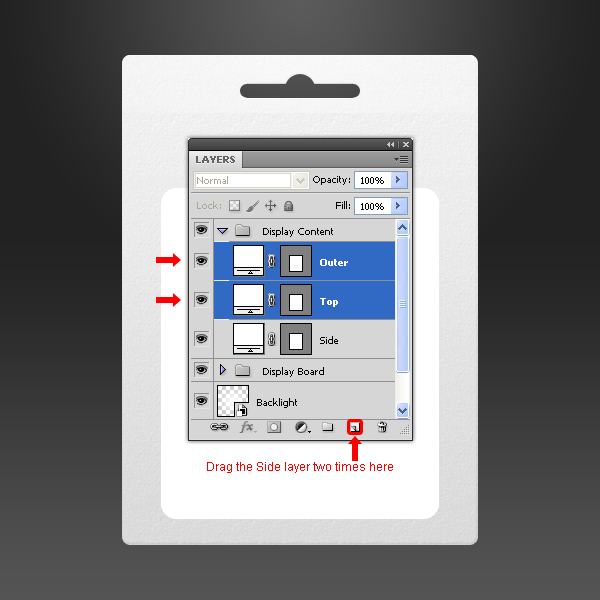
Drag the "Side" layer to the New Layer icon in the Layers window two times and name these new two layers as "Top" and "Outer."
Step 12
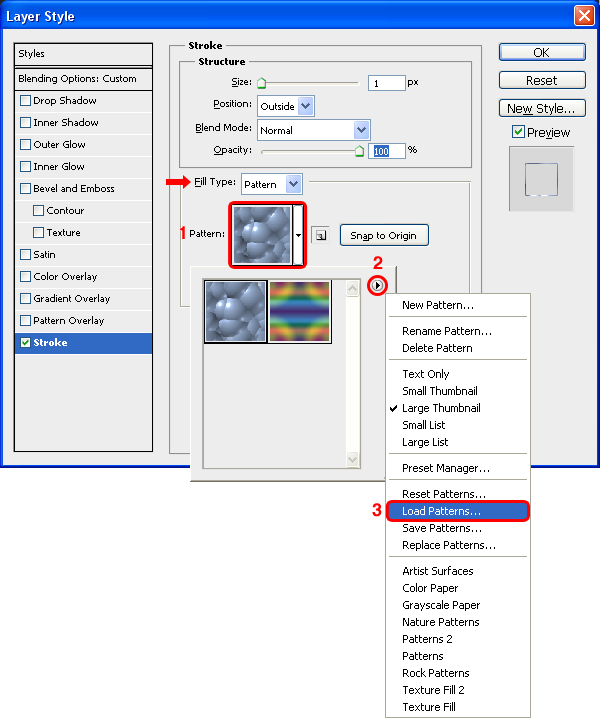
Select the "Side" layer, set the Fill to 0% and go to Layer > Layer Styles > Blending Options, select the Stroke tab and from the Fill Type dropdown menu select Pattern. Click on the Pattern thumbnail and from the thumbnail list click on the arrow at top right, select from the dropdown menu Load Patterns, search for the "Side_Dot" pattern file and click on Load.
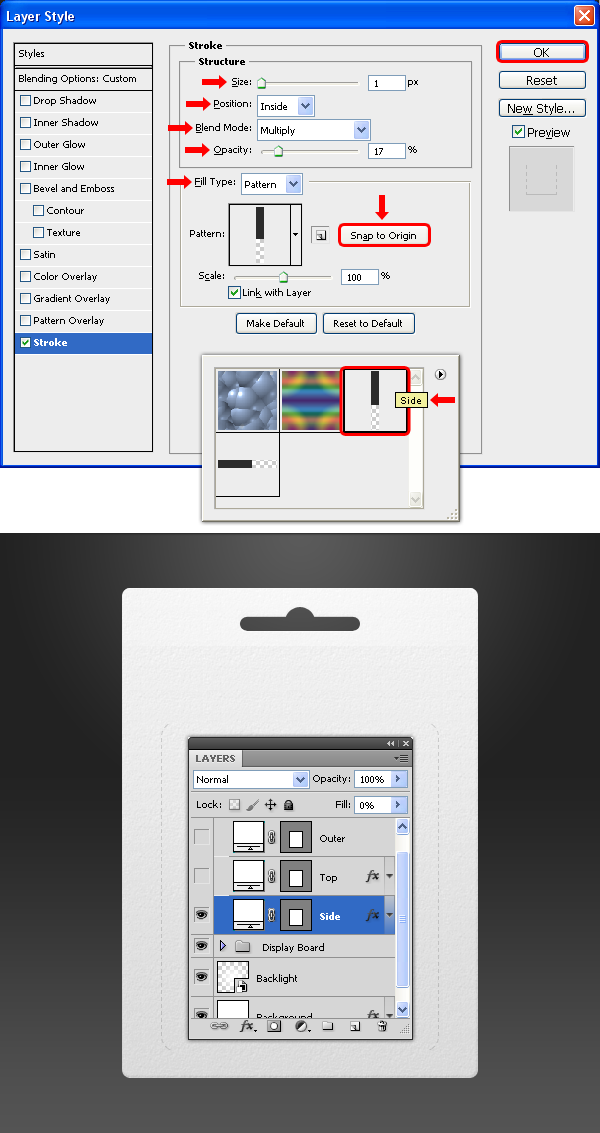
Select the pattern Side and apply a Stroke with the following settings. Click OK.
Step 13
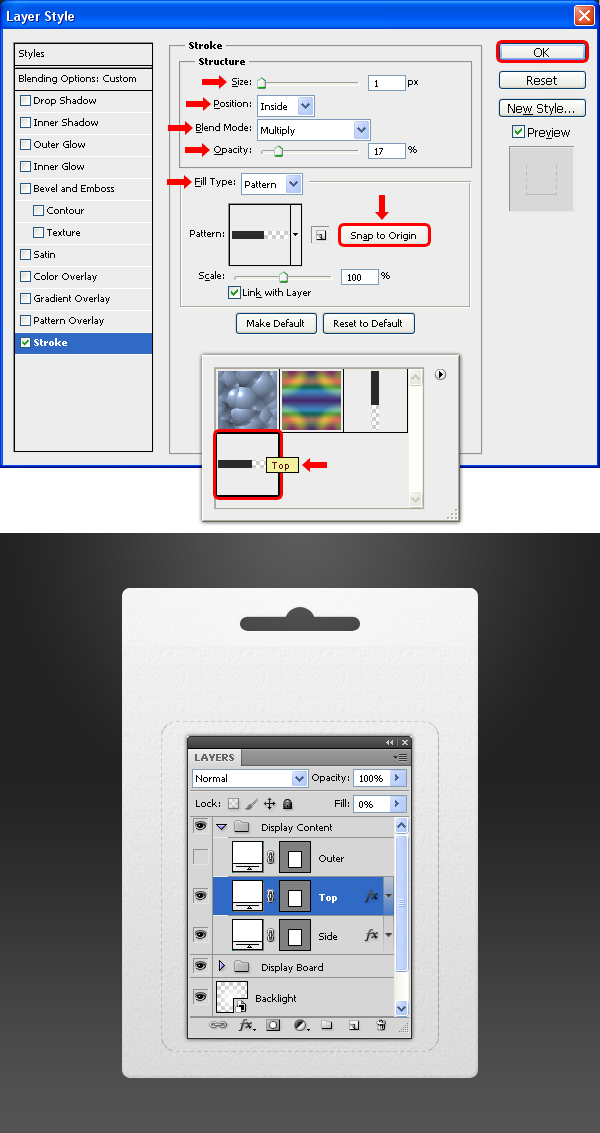
Select the "Top" layer, set the Fill to 0% and go to Layer > Layer Styles > Blending Options, select the Stroke tab and apply the following settings. Click OK.
Step 14
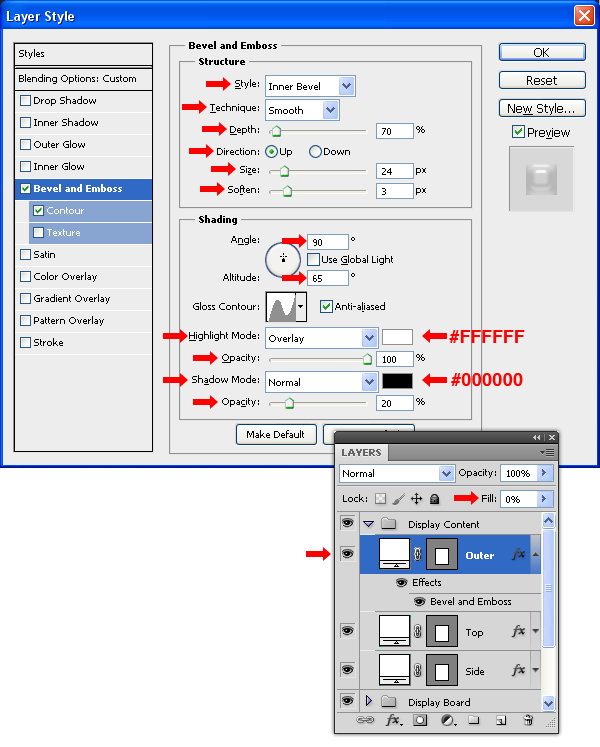
Select the "Outer" layer, set the Fill to 0% and go to Layer > Layer Styles > Blending Options, and aplly a Bevel and Emboss with the following settings.
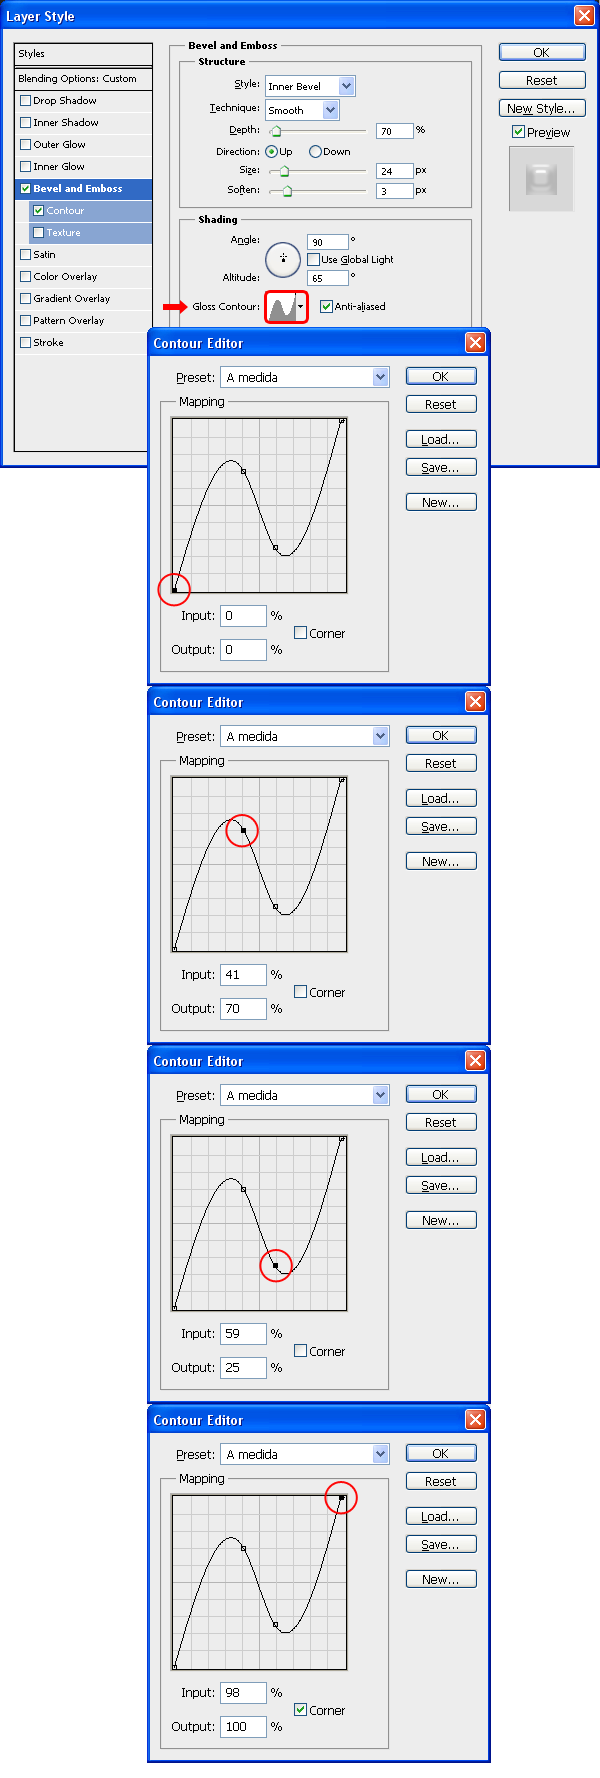
Still in the Bevel and Emboss window, click on the Gloss Contour thumbnail and in the Contour Editor set the Mapping as follows. Click OK.
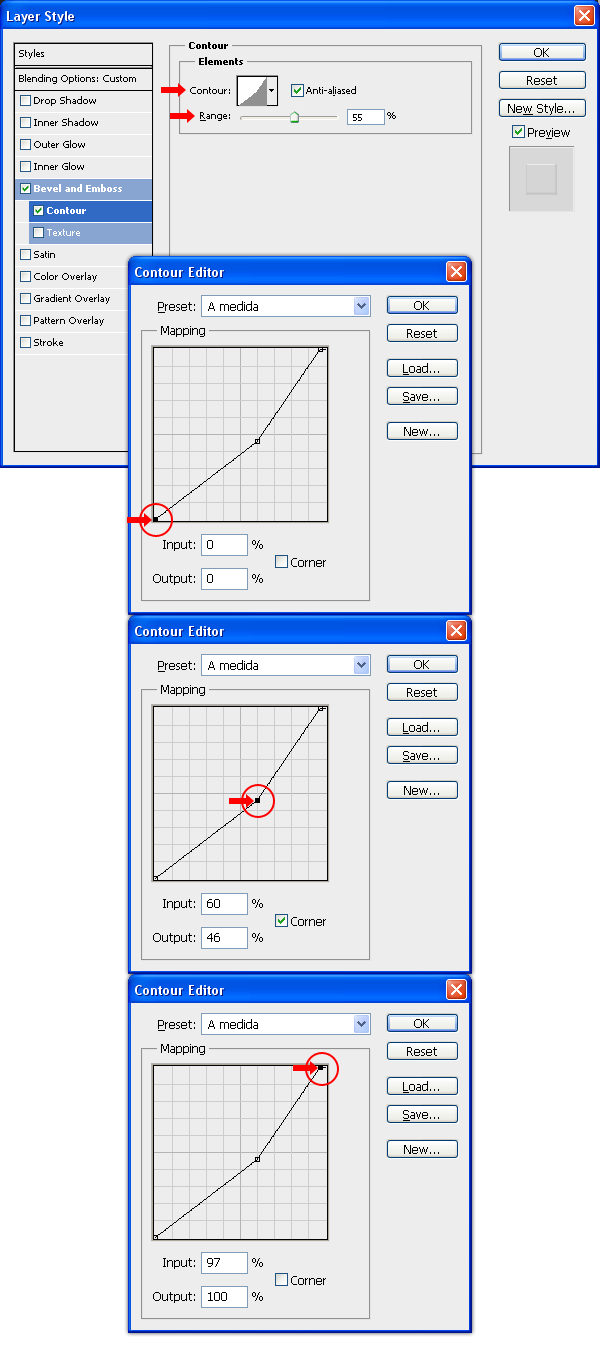
Click on the Contour tab in the layer Style window, set the Range to 55%, click on the Contour thumbnail and in the Contour Editor window set the Mapping as shown. Click OK. Again, click OK in the Layer Style window to apply the settings.
Step 15
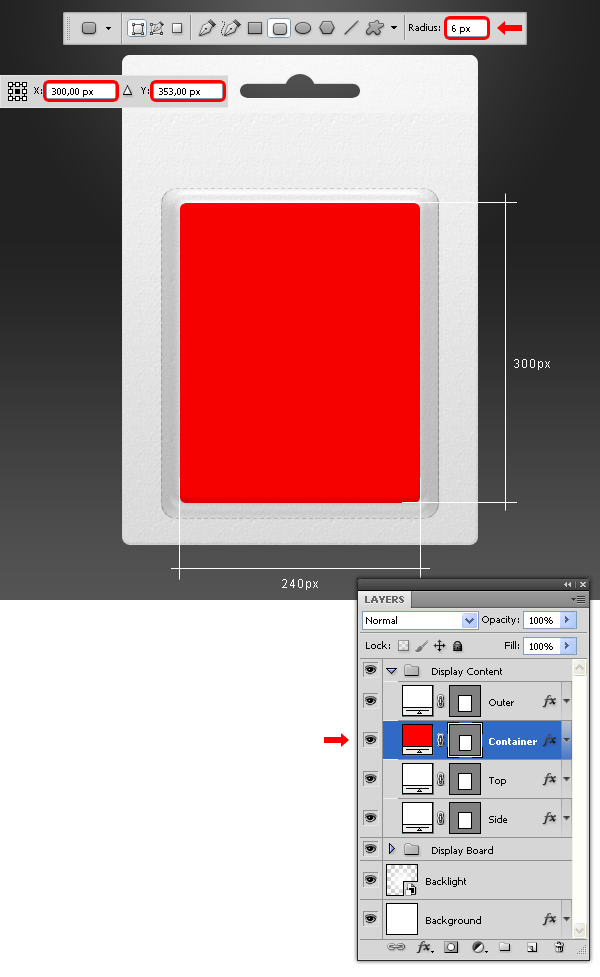
Set your Foreground color to red (#ff0000). Select the Rounded Rectangle Tool (U), set the Radius to 6 px and draw a rectangle as shown. Name the new layer "Container" and place it below the "Outer" layer.
Step 16
Drag the "Container" layer to the New Layer icon in the Layers window and name the new layer as "Soft Shadow." Set the layer Opacity to 41% in the Layers window and double-click the red thumbnail of the "Soft Shadow" layer; pick a black color (#000000) and click OK.
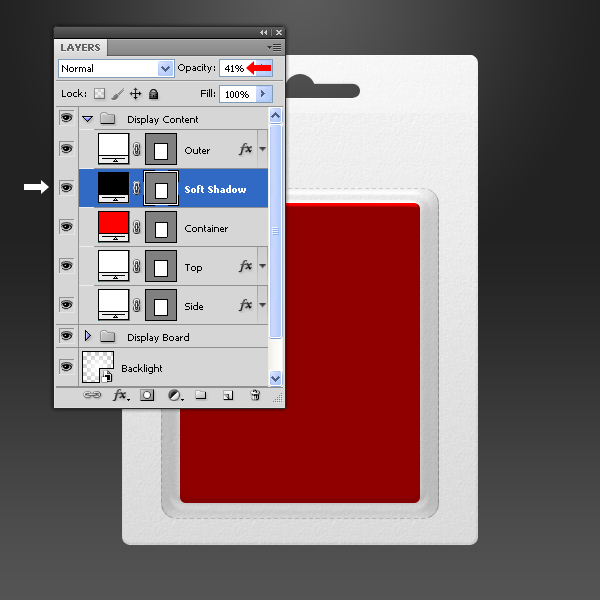
Select the Path Selection Tool (A) and drag a selection around the entire "Soft Shadow" layer. Go to Edit > Copy and the go to Edit > Paste. Using the arrow key, move the pasted selection 3 px by pressing the up arrow three times; select the Subtract From Shape Area option in the Tool window and click on the Combine button.
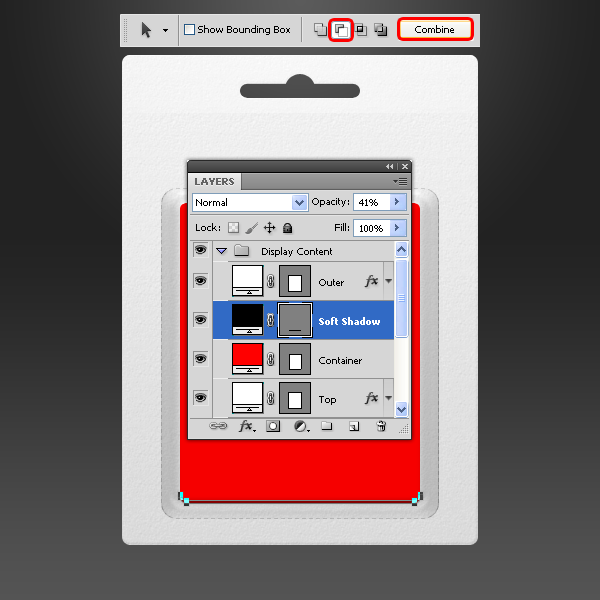
Step 17
Set your foreground color to white (#ffffff). Select the Rectangle Tool (U), and draw a rectangle as shown. Name the new layer "Content" and place it above the "Container" layer.
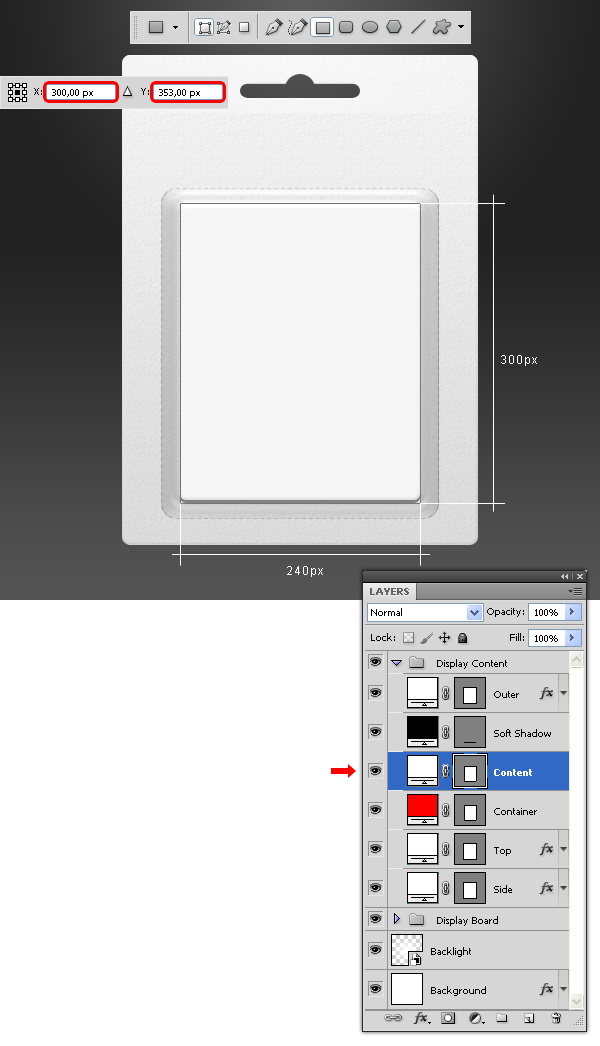
Go to Layer > Smart Objects > Convert to Smart Object. Go to Layer > Create Clipping Mask.
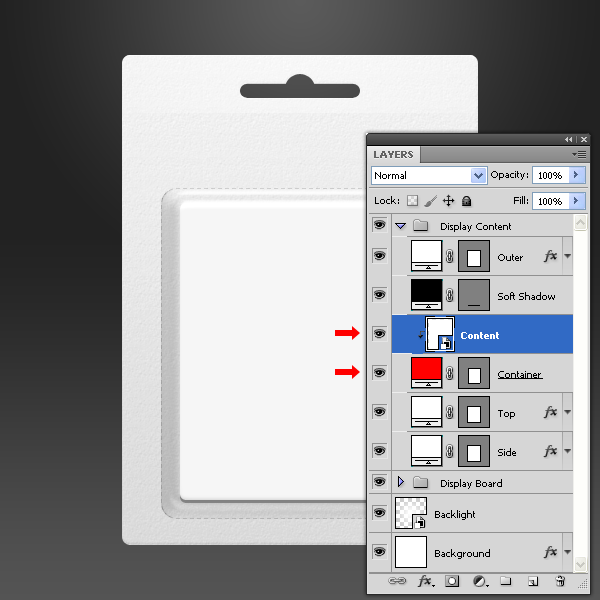
Step 18
Select the "Container" layer, go to Layer > Layer Style > Blending Options and apply a Drop Shadow with the following settings.
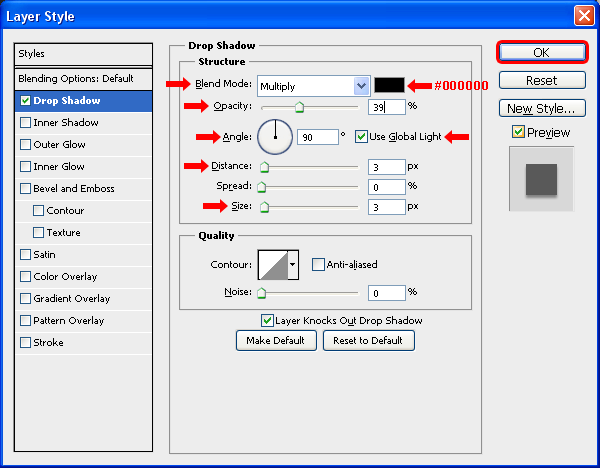
Step 19
Select the Rounded Rectangle Tool (U), set a Radius of 16 px and draw a rectangle as shown. Name the new layer "Inner" and place it above the "Outer" layer.
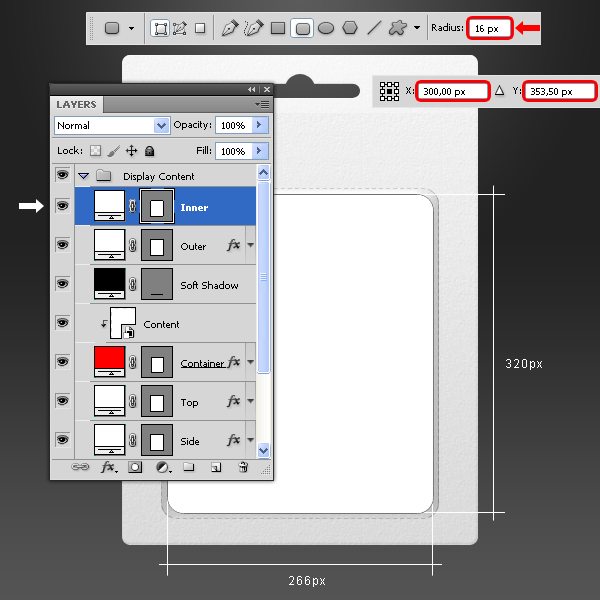
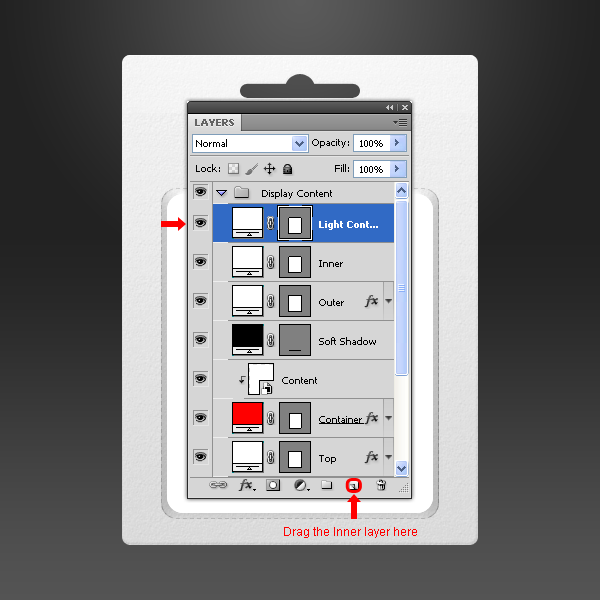
Drag the "Inner" layer to the New Layer icon in the Layers window and name the new layer as "Light Container."
Step 20
Select the "Inner" layer and set the Fill to 0%. Go to Layer > Layer Styles > Blending Options, and aplly a Bevel and Emboss with the following settings.
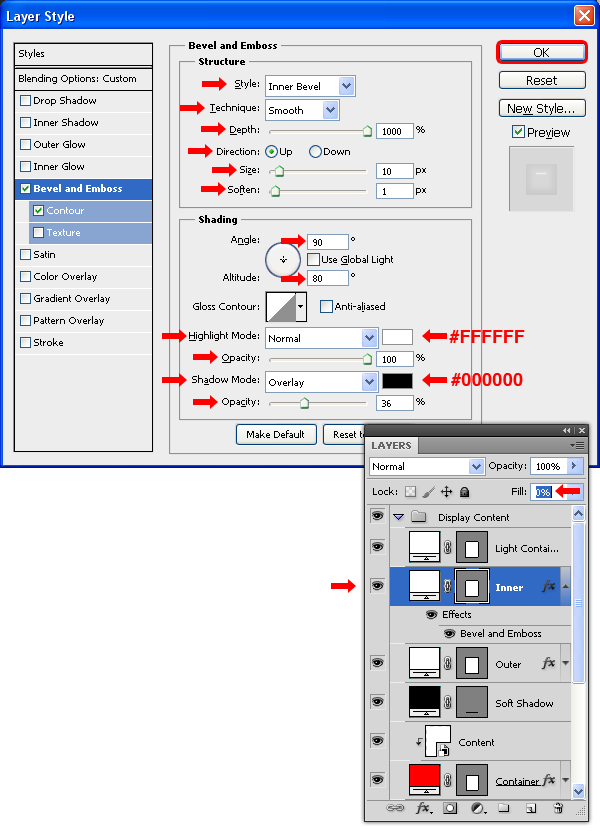
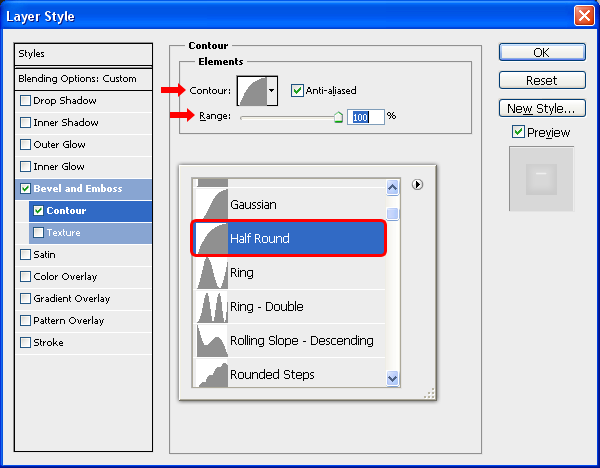
Click on the Contour tab and in the arrow next to the Contour thumbnail; from the thumbnail list click on the arrow at top right, select from the dropdown menu Contours and click Append.Contour tab in the layer Style window, set the Range to 100%, click on the Contour thumbnail arrow and from the Contour thumbnail list select the Half Rounded contour. Click OK. Again, click OK in the Layer Style window to apply the settings.
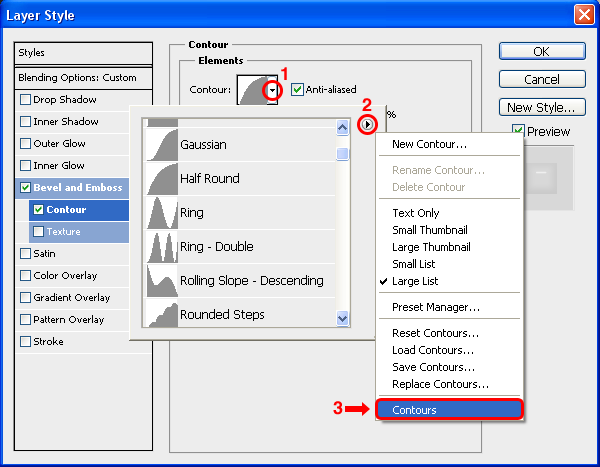
Select the Half Rounded contour from the dropdown list and set the Range to 100%. Click OK. Again, click OK in the Layer Style window to apply the settings.
Step 21
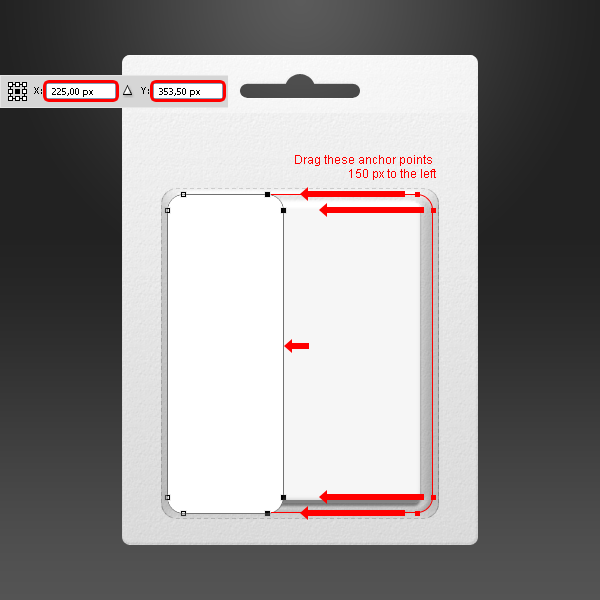
Click on the "Light Container" layer, select the Direct Selection Tool (A) and drag all the right anchor points 150 px to the left. Do this by holding Shift + pressing 15 times the left arrow on your keyboard.
Step 22
Drag the "Backlight" layer to the New Layer icon in the Layers window three times and name these new layers as "Front Light", "Content Shadow" and "Content Light."
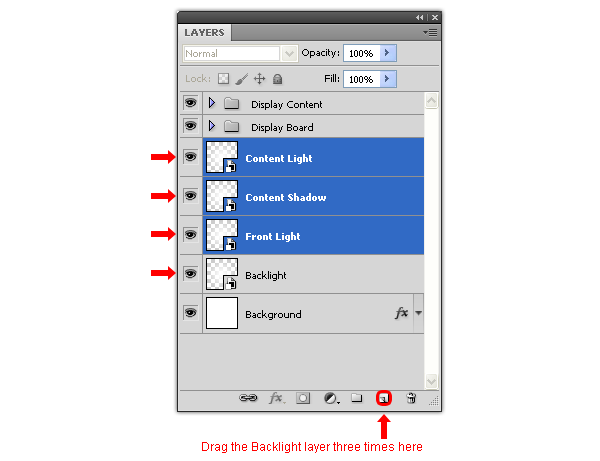
Place the "Front Light", "Content Shadow" and "Content Light" layer above the "Light Container" layer in the "Display Content" layer group.
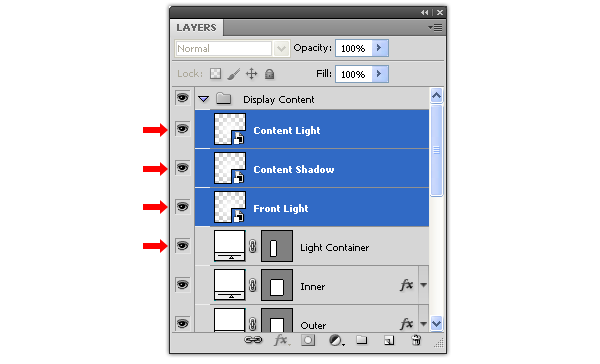
Step 23
Select the "Front Light" layer, go to Edit > Free Transform and apply the following settings.
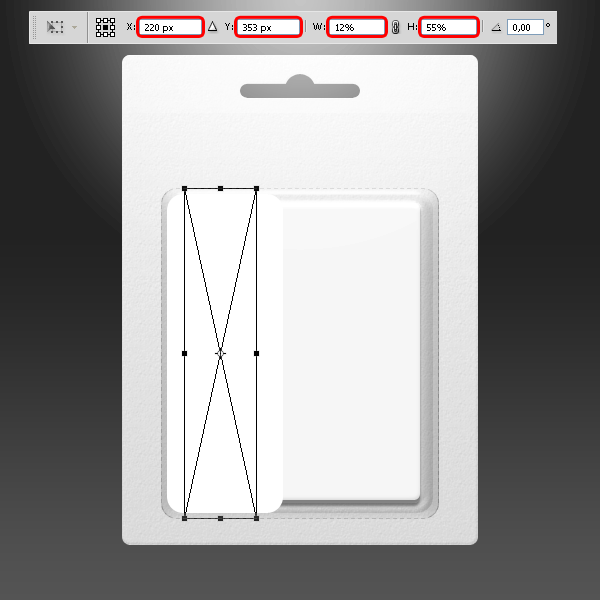
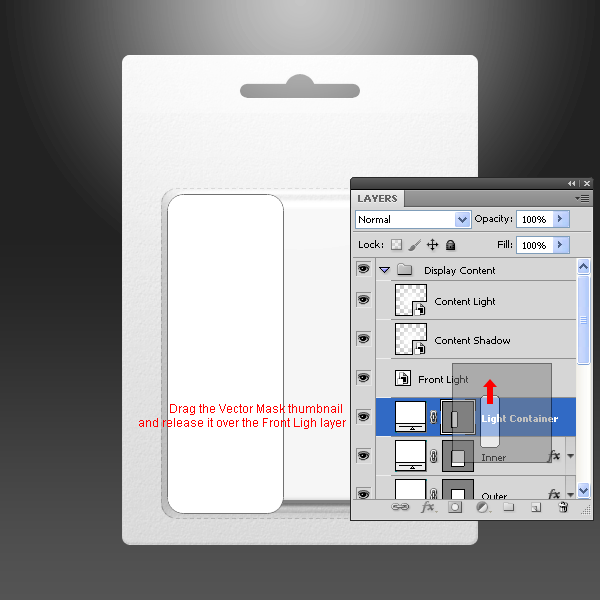
Select the "Light Container" layer, drag the Vector Mask thumbnail to the "Front Light" layer and release it on it. Delete the "Light Container" layer.
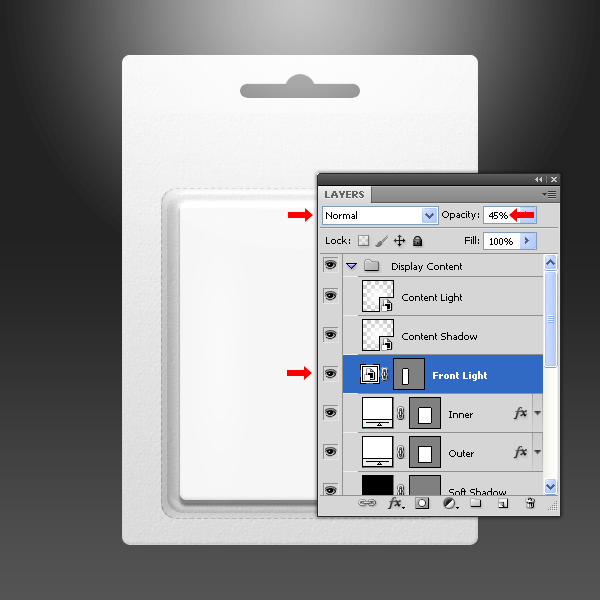
Set the "Front Light" layer to Normal and change the Opacity to 45%.
Step 24
Select the "Content Shadow" layer, go to Layer > Layer Styles > Blending Options and apply a Color Overlay with the Blend Mode set to Normal an Opacity of 100% and a black color (#000000). Click OK. Set the layer mode to Normal and change the Opacity to 18%.
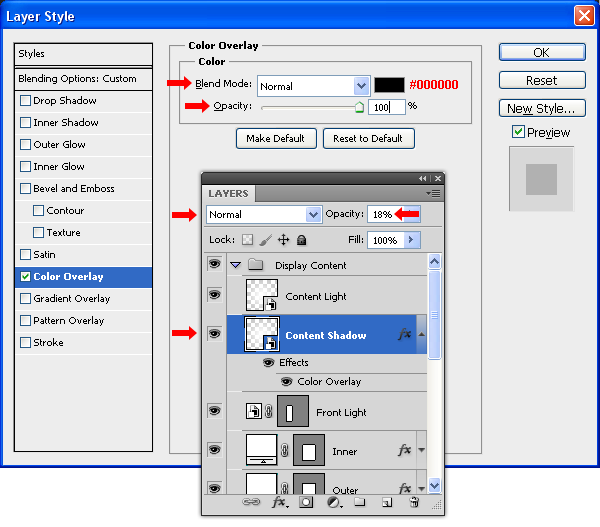
Step 25
Set the foreground color to red (#ff0000) and select the Rectangle Tool (U) then draw a rectangle as shown. Name the new layer as "Shadow Container."
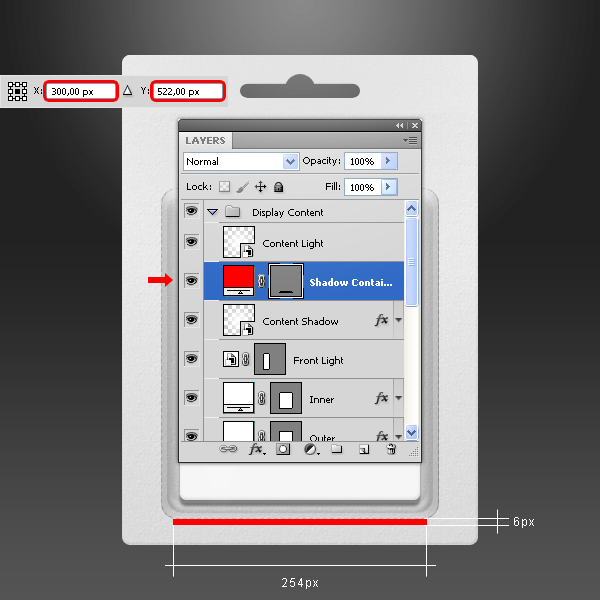
Drag the "Shadow Container" layer to the New Layer icon in the Layers window and name the new layer as "Light Container." Go to Edit > Free Transform and set the Y value to 192 px and apply the changes.
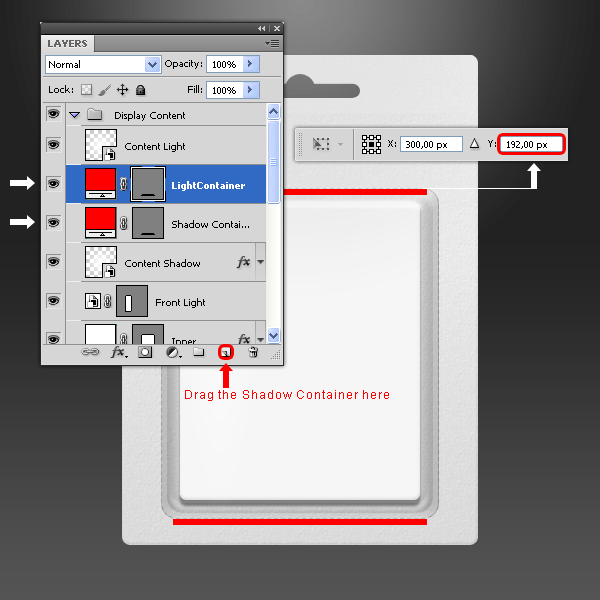
Step 26
Select the "Content Light" layer, go to Edit > Free Transform and set the following values. Apply the changes.
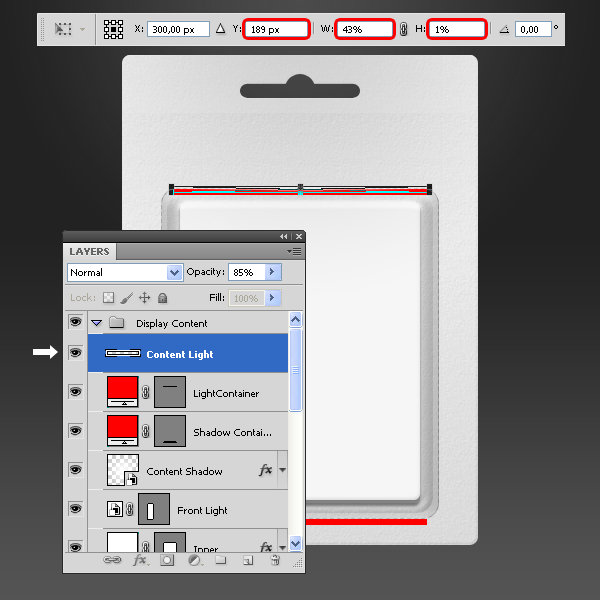
Now select the "Content Shadow" layer, go to Edit > Free Transform and set the following values. Apply the changes.
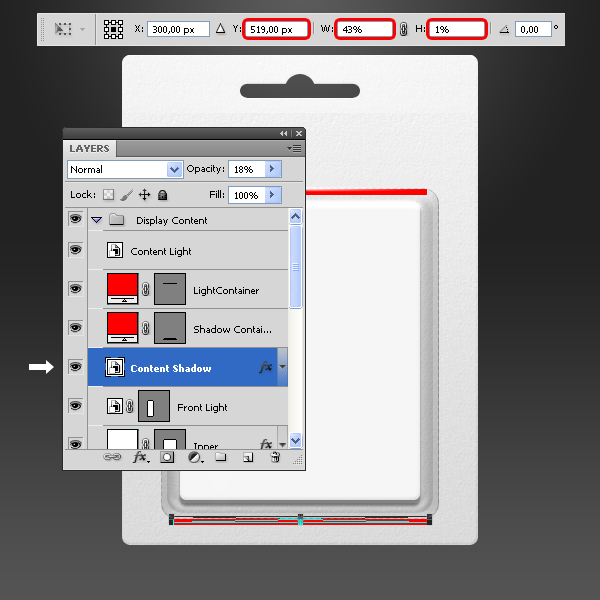
Step 27
Drag the "Light Container" layer Vector Mask thumbnail to the "Content Light" layer and release it over it. Delete the "Light Container" layer.
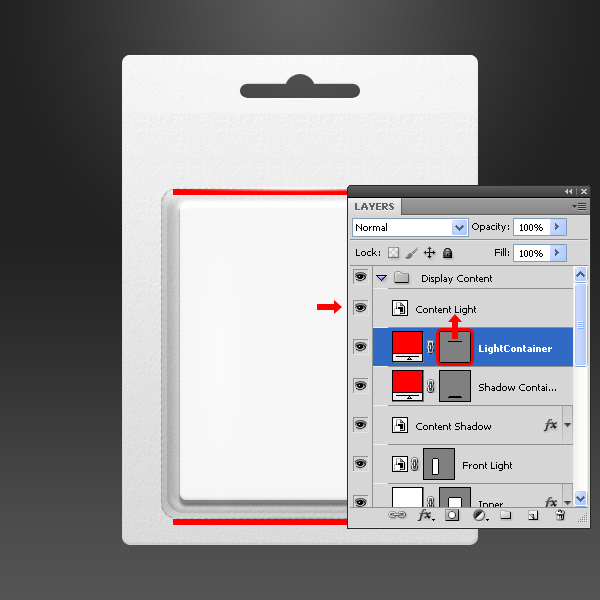
Drag the "Shadow Container" layer Vector Mask thumbnail to the "Content Shadow" layer and release it over it. Delete the "Shadow Container" layer.
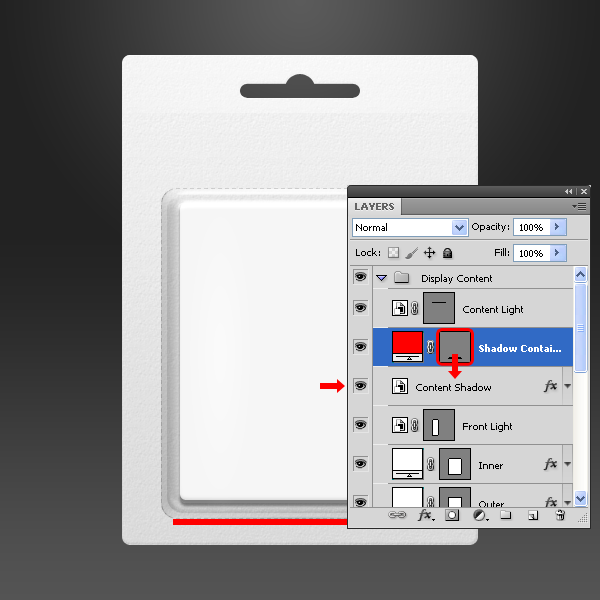
Step 28
Drag and drop the "Backlight" layer to the New Layer icon in the Layers window and name the new layer as "Fantasy Shadow", set the Mode to Normal.
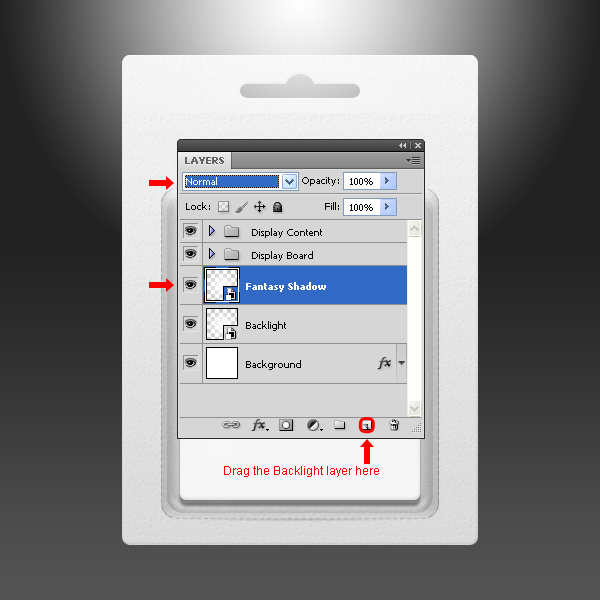
Go to Edit > Free Transform and apply the following values.
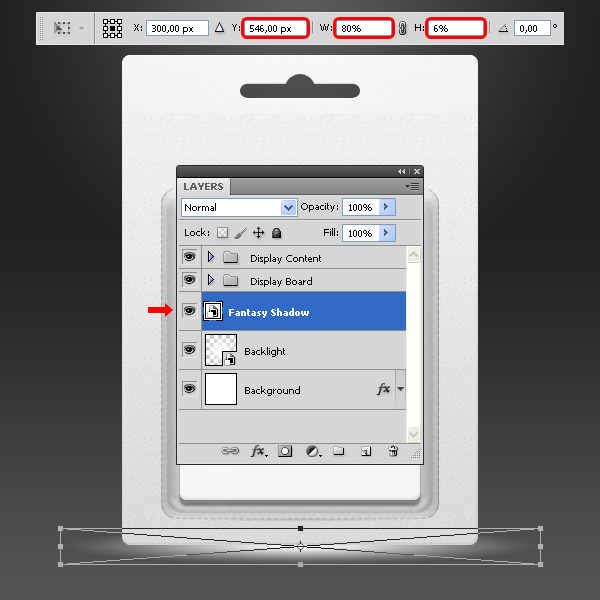
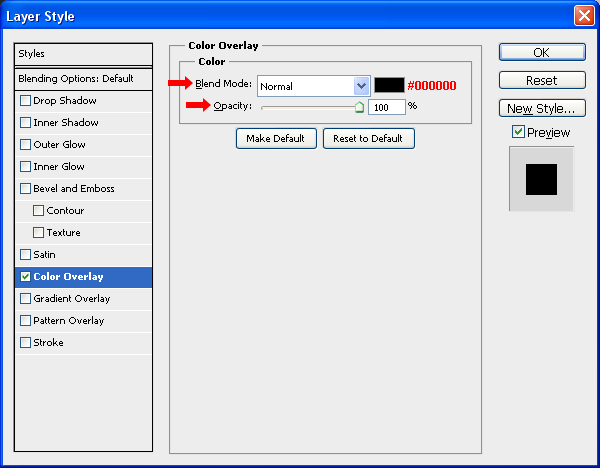
Go to Layer > Layer Style > Blending Options and apply a Color Overlay as shown.
Step 29
Select the Rectangle Tool (U) and draw a rectangle as shown. Name the new layer as "Fantasy Container".
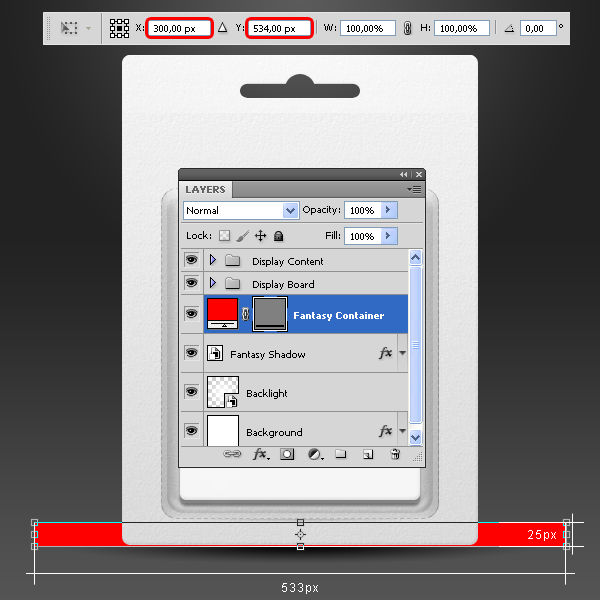
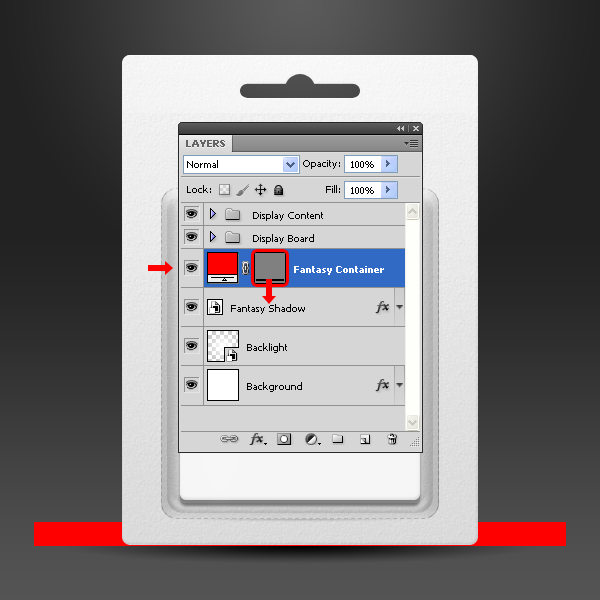
Drag the "Fantasy Container" layer Vector Mask thumbnail to the "Fantasy Shadow" layer and release it over it. Delete the "Fantasy Container" layer.
Step 30 – Putting some design on it.
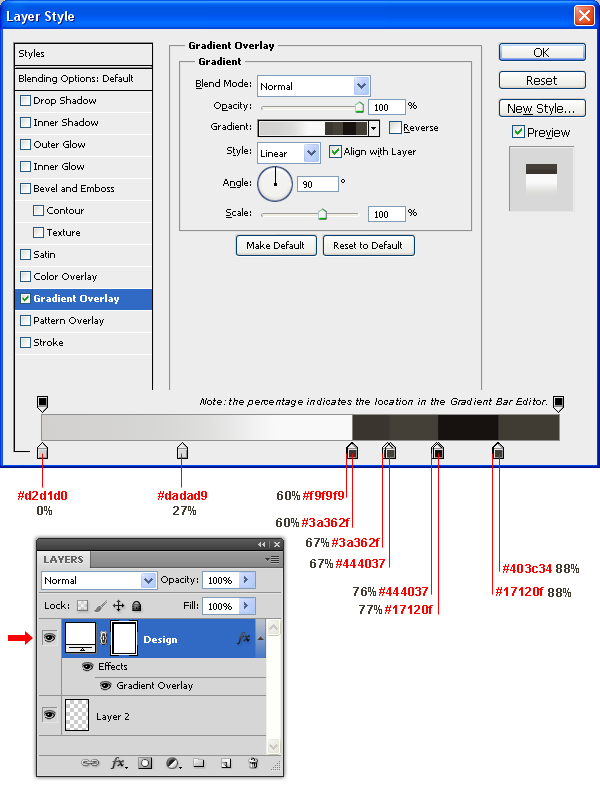
Into the "Display Board" group, select the "Design" layer and double-click on the smart object thumbnail. In the new document window select the "Design" layer and go to Layer > Layer Style > Blending Options and apply a Gradient Overlay with the following settings.
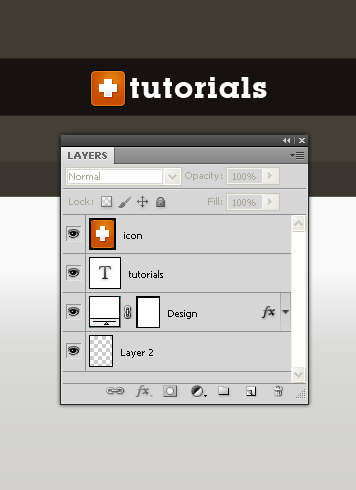
Select the Horizontal Type Tool (T) and write "tutorials". Get some nice icon and place it into the design. Save the file and close it.
Note: I have used the Lubalin typeface and the tutorials website icon, but you can use any typeface you like as well any image, it does not have to be necessarily an icon.
Step 31
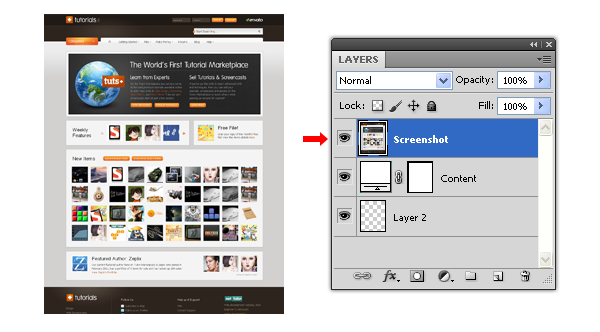
Into the "Display Content" group, select the "Content" layer and double-click on the smart object thumbnail. In the new document window paste an screenshot (or any design you like) of the tutorials marketplace. If necessary, adjust the screenshot to the canvas size, do this by going to Edit > Free Transfom. Save the document and close it.
Final Image
|
| ||
|
+382 |
399 |
Follow_through |
|
+328 |
331 |
שימותו הקנאים |
|
+320 |
334 |
Tomas50 |
|
+317 |
357 |
krodico |
|
+307 |
359 |
Ланин Сергей |
|
| ||
|
-4 |
42 |
Similis_Deo |
|
-5 |
2 |
Dark Music in Your Heart | Dark Music in Your Heart |
|
-6 |
9 |
BrightBand |
|
-15 |
135 |
Музпросвет в мыслях |
|
-16 |
167 |
Trance Music - Транс музыка |
Загрузка...
взяты из открытых общедоступных источников и являются собственностью их авторов.

